
When it comes to baking with a twist, there’s something magical about combining creativity with a little bit of science. That’s where moon cookies come in. Not only do they satisfy your sweet tooth, but they also offer an excellent opportunity for fun and educational exploration, especially for kids! From moon-phase cookies to space-themed desserts, this article will walk you through everything you need to know about creating these delightful treats. Whether you’re looking to bake them for a space-themed party, a fun learning experience, or just as a way to bring a little piece of the moon to your kitchen, you’re in the right place. So let’s get started!
Introduction to Moon Cookies
What Are Moon Cookies?
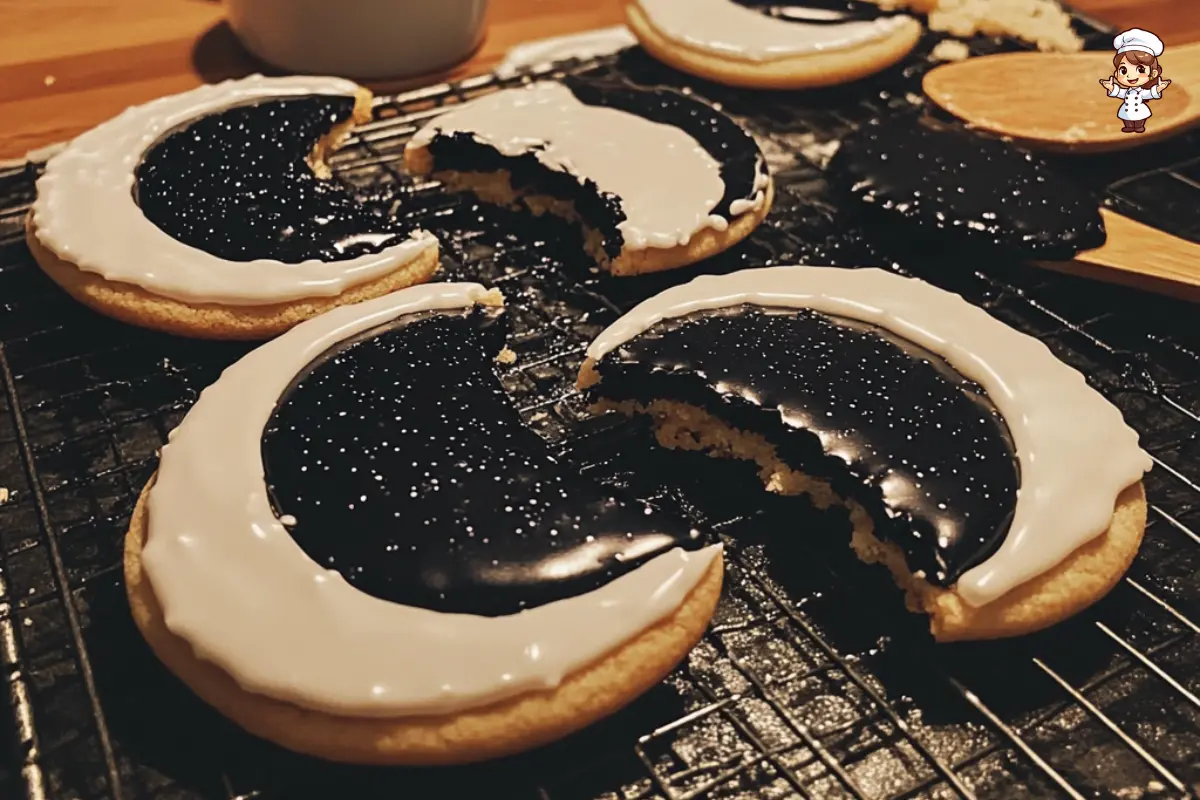
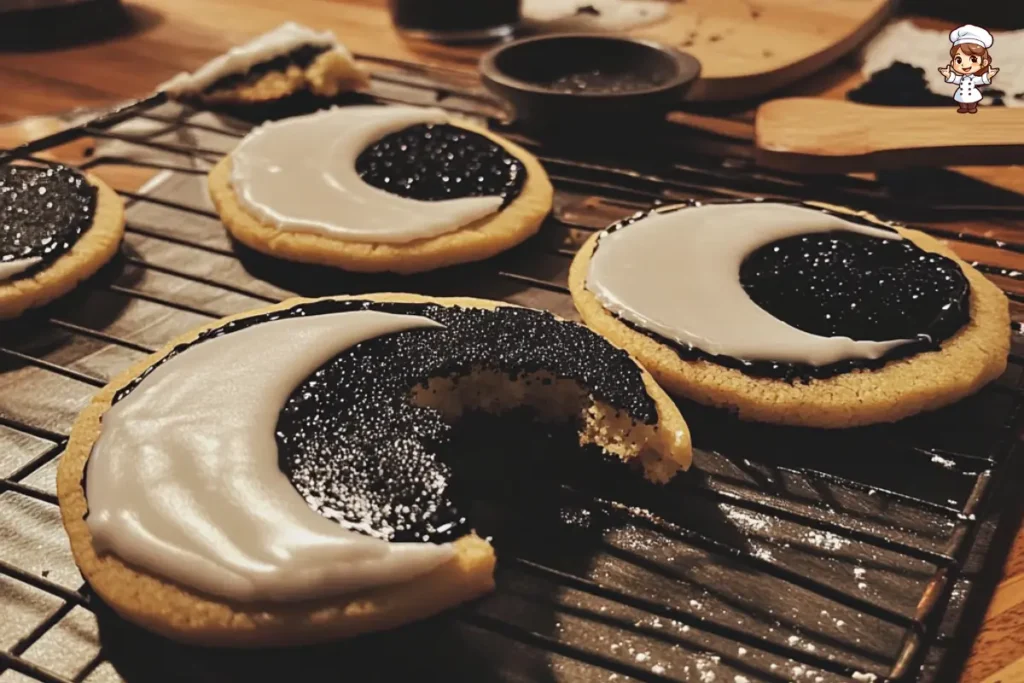
So, what exactly are moon cookies? Simply put, these are cookies that are inspired by the phases of the moon or are shaped like the moon itself. These treats are often decorated with icing and edible glitter to mimic the different phases of the lunar cycle. You might see moon cookies in the shape of crescents or full circles, and the best part is you can get as creative as you like when it comes to decorating them! It’s a fun, space-themed dessert that can be as intricate or simple as you want it to be.
Why Are They So Popular?
Why have moon-themed treats become such a hit? Well, they combine two things people absolutely love: baking and space! The moon itself is fascinating, with its many phases and its connection to the tides and the night sky. By using the moon phases as inspiration for your cookies, you can teach kids about science while having fun in the kitchen. Plus, they make for great conversation starters at parties or as a fun family activity. Moon cookies also work wonderfully for space-themed events or birthday parties. Who wouldn’t want a moon-shaped treat as part of their celebration?
Key Ingredients for Moon Cookies

Basic Cookie Ingredients
Making moon cookies starts with the basic cookie dough. You’ll need all the usual ingredients like flour, butter, sugar, and eggs. These ingredients come together to form the foundation of your cookies, and you can easily adjust the recipe depending on your preferences. For example, if you want a slightly richer flavor, you could opt for brown sugar instead of white or add a little vanilla extract to enhance the taste.
Other optional ingredients might include chocolate chips or nuts, depending on your taste and the moon cookie design you’re going for. But at its core, you’re looking for a sturdy dough that can hold its shape when baked and decorated. Once your dough is ready, it’s time to get creative!
Unique Ingredients for Moon-Themed Cookies
To truly capture the magic of the moon, you’ll want to incorporate some special ingredients. For example, you can use black food coloring to create the deep-space look of a New Moon or Waning Crescent. For the Full Moon, white icing or powdered sugar works wonderfully to make your cookie shine.
You might also experiment with silver edible glitter to represent the moon’s shimmering surface or even cocoa powder to create a more textured look for your cookies, mimicking the moon’s rugged terrain. These little touches will help bring your moon cookies to life and give them a truly celestial appearance.
In addition, you can get creative with cookie shapes. If you don’t have a moon-shaped cutter, you can simply roll out the dough and cut it into circles or use a crescent moon shape for some of your cookies. The more creative you get, the more fun your moon cookies will be!
Making Moon Cookies: Step-by-Step Guide
Print
Moon Cookies: Fun Recipe Inspired by the Lunar Phases
- Total Time: PT45M
- Yield: Serves 12 cookies 1x
Description
These moon cookies are a creative twist on traditional cookies, inspired by the phases of the moon! A perfect treat for any space-themed party or educational activity, these cookies are decorated to represent the eight phases of the moon. Whether you’re baking with kids or hosting a space-themed event, these cookies will bring some lunar magic to your kitchen. With a simple dough and a few creative decorating tips, you’ll be able to make these moon-shaped cookies in no time. Great for teaching kids about the moon phases while satisfying your sweet tooth!
Ingredients
- 2 1/4 cups all-purpose flour (280g)
- 1 cup unsalted butter, softened (227g)
- 3/4 cup granulated sugar (150g)
- 1 large egg (50g)
- 1 teaspoon vanilla extract (5ml)
- 1/2 teaspoon baking soda (2g)
- 1/4 teaspoon salt (1g)
- Black food coloring (optional, for New Moon cookies)
- White icing (for decorating, amount as needed)
- Silver edible glitter (optional, for decoration)
Instructions
- Preheat your oven to 350°F (175°C). Line a baking sheet with parchment paper.
- In a large mixing bowl, cream together butter and sugar until light and fluffy.
- Beat in the egg and vanilla extract until fully combined.
- In a separate bowl, whisk together flour, baking soda, and salt. Gradually add the dry ingredients to the wet ingredients and mix until just combined.
- Refrigerate the dough for 30 minutes to allow it to firm up.
- Roll the dough into 1-inch balls and then flatten each one into a circle.
- Bake the cookies for 10-12 minutes or until they are lightly golden at the edges.
- Let the cookies cool completely before decorating.
- Decorate the cookies to resemble the phases of the moon. Use black food coloring for the New Moon phase, white icing for the Full Moon, and edible glitter for a starry effect.
- Serve and enjoy your delicious moon cookies!
Latest Amazon Finds


Notes
- If you don’t have black food coloring, you can also use cocoa powder for a darker look.
- If you want a healthier version, consider using whole wheat flour or reducing the sugar slightly.
- For a fun twist, add some chocolate chips to the dough for added flavor!
- These moon cookies can be a fun educational activity for kids. Use the different phases as a way to teach them about the moon while they bake.
- Prep Time: PT30M
- Cook Time: PT15M
- Category: Dessert, Cookies
- Method: Baking
- Cuisine: American
Nutrition
- Serving Size: 1 cookie
- Calories: 150
- Sugar: 12g
- Sodium: 95mg
- Fat: 8g
- Saturated Fat: 5g
- Unsaturated Fat: 3g
- Trans Fat: 0g
- Carbohydrates: 21g
- Fiber: 1g
- Protein: 1g
- Cholesterol: 30mg
Keywords: Moon cookies, moon-shaped cookies, space-themed desserts, lunar cookies, moon phase cookies, space party treats, decorated cookies
Preparing the Cookie Dough
To get started on your moon cookies, you’ll need to prepare the cookie dough first. This is a simple process that requires the usual cookie ingredients: flour, butter, sugar, eggs, and a pinch of salt. Once you have these ready, simply cream the butter and sugar together until light and fluffy. After that, beat the eggs and add the dry ingredients (flour and salt), mixing until combined. If you want to add a little twist to your dough, you can even include some vanilla extract for extra flavor.
Now that your dough is ready, you can decide if you want to add any additional flavors. For example, chocolate chips or cocoa powder could make a great addition for a richer, darker cookie to resemble the darker moon phases like the New Moon.
Once everything is mixed, wrap the dough in plastic wrap and refrigerate it for at least an hour to chill. This helps the dough firm up, making it easier to shape into moon-like forms. While the dough is chilling, preheat your oven to 350°F (175°C).
Shaping the Cookies to Represent the Phases of the Moon
When your dough is ready, it’s time to shape your moon cookies! If you have a moon-shaped cutter, great—use it! Otherwise, you can roll the dough into balls and flatten them into circles with your hands. For an added touch, you can shape them into crescents to represent the Waxing Crescent or Waning Crescent phases.
To represent the different phases, think about the amount of decoration you’ll add. For example, for the New Moon, leave the cookie plain with no icing, as this phase represents a time when the moon is barely visible. For the Full Moon, use white icing or powdered sugar to create a bright and shiny cookie that mimics the moon’s full glow.
As you shape and decorate each cookie, feel free to get creative! The more phases of the moon you can represent, the better. Plus, this adds an educational aspect to your baking, which is perfect for kids or space enthusiasts.
Decorating Your Moon Cookies
Once the cookies are shaped, it’s time for the fun part—decorating! For a Full Moon, cover your cookie with a thick layer of white icing. For a Waning Gibbous or Third Quarter, consider using a slightly darker shade or leaving part of the cookie exposed to simulate the shadowed part of the moon.
You can also use edible glitter to add some sparkle, especially for the Full Moon or Waxing Crescent. Additionally, try using black food coloring for cookies that resemble the darker phases. The best part is you can get creative with your designs, so no two moon cookies have to look the same!
Once all your cookies are decorated, let them sit for a few minutes to set, and then they’ll be ready to serve!
Fun Ways to Serve Moon Cookies
Creating a Moon Phase Platter
Now that your moon cookies are ready, it’s time to display them! One fun idea is to arrange the cookies on a platter to mirror the moon’s phases. Start with the New Moon cookies at one end of the plate and work your way through to the Full Moon, then back again toward the Waning Crescent. This not only makes for a visually appealing presentation but also gives your guests a chance to learn a little about the phases of the moon while enjoying the treats.
For added flair, consider using a dark cloth or a starry background for your platter, creating a “night sky” feel that will complement the theme perfectly.
Incorporating Moon Cookies into Parties and Events
Moon cookies are a hit at space-themed parties or educational events. Whether it’s for a child’s birthday or a fun gathering with friends, these cookies are sure to grab everyone’s attention. Pair them with other space-themed treats, such as star-shaped cookies or drinks with “galaxy” swirls, to complete your celestial spread.
You can also use these cookies as a fun, interactive activity during a science-themed event, allowing participants to decorate their own cookies based on the moon phases. It’s a sweet way to blend learning with a delicious treat!
For more delicious and fun recipe ideas, check out our Protein Cookie Recipe.
Troubleshooting and Tips for Perfect Moon Cookies
Common Cookie-Making Mistakes to Avoid
Baking moon cookies can be a fun and rewarding experience, but like any baking project, there are a few mistakes you’ll want to avoid to ensure your cookies turn out just right. One common issue is overbaking. It can be easy to forget about the cookies once they’re in the oven, but overbaking will result in a dry, crumbly texture. To avoid this, keep a close eye on them and pull them out of the oven when they’re just golden on the edges—this will keep them soft and chewy.
Another mistake is using too much flour in your dough. If the dough feels too stiff, you might have added a bit too much flour. If this happens, just add a tiny bit of milk or water to loosen it up and make it easier to shape.
Lastly, not letting the dough chill long enough can affect the cookie’s shape. If the dough isn’t chilled, it might spread too much while baking. Make sure to refrigerate the dough for at least an hour before you start shaping your moon cookies.
Expert Tips for Perfect Cookies
To get those perfect moon cookies, a few expert tips can make a big difference. First, when decorating your cookies, try using piping bags for a more precise icing application. This is especially helpful when trying to create intricate designs for the different moon phases, like the Full Moon or Third Quarter.
Another tip is to decorate your cookies after they’ve cooled completely. If you ice them while they’re still warm, the icing can melt, making it hard to achieve the sharp details you want. Also, feel free to experiment with different textures, like using edible glitter or cocoa powder, to give your cookies a unique, lunar touch.
FAQs About Moon Cookies
Can I Make Moon Cookies Without Special Equipment?
Absolutely! While it’s helpful to have moon-shaped cookie cutters, you can still make moon cookies without them. Simply roll out the dough and use a round cookie cutter, or even a glass, to cut the cookies into circles. If you want a crescent moon shape, you can use a knife to carefully shape the dough into crescents before baking.
How Can I Make Moon Cookies Healthier?
If you’re looking to make moon cookies a bit healthier, there are a few simple swaps you can make. For instance, use whole wheat flour instead of all-purpose flour for a more nutritious base. You can also reduce the sugar or swap it for a natural sweetener like honey or maple syrup. If you want to make your cookies dairy-free, consider using plant-based butter or coconut oil as a substitute.
Are Moon Cookies Suitable for Kids to Make?
Yes! Moon cookies are a fantastic activity for kids, especially if you’re making them teach about the phases of the moon. Kids can help with everything from mixing the dough to decorating the cookies with icing. Just make sure to supervise them while they’re handling the hot oven, and let them get creative with their cookie designs!
For more tasty and creative recipes, check out our Protein Cookie Recipe.
If you’re ready to bring the magic of the moon to your kitchen with these fun and delicious moon cookies, why not get started today? Whether you’re baking with the kids, hosting a space-themed party, or simply enjoying a creative baking session, these cookies are sure to impress. Don’t forget to experiment with different designs and decorations for each moon phase—let your imagination run wild!
For more delightful baking inspiration, be sure to check out our other creative recipes. Happy baking!