
Cherry tarts are the perfect blend of tangy and sweet, a dessert that satisfies every palate. Whether you’re a seasoned baker or just dipping your toes into the world of pastry, a well-made cherry tart can be both a rewarding experience and a crowd-pleaser. This comprehensive guide will walk you through every step, from selecting the best cherries to serving a tart that looks straight out of a patisserie. Along the way, you’ll find helpful tips, common pitfalls to avoid, and even a few creative variations to try. Let’s dive in!
Introduction to Cherry Tarts
What is a Cherry Tart?
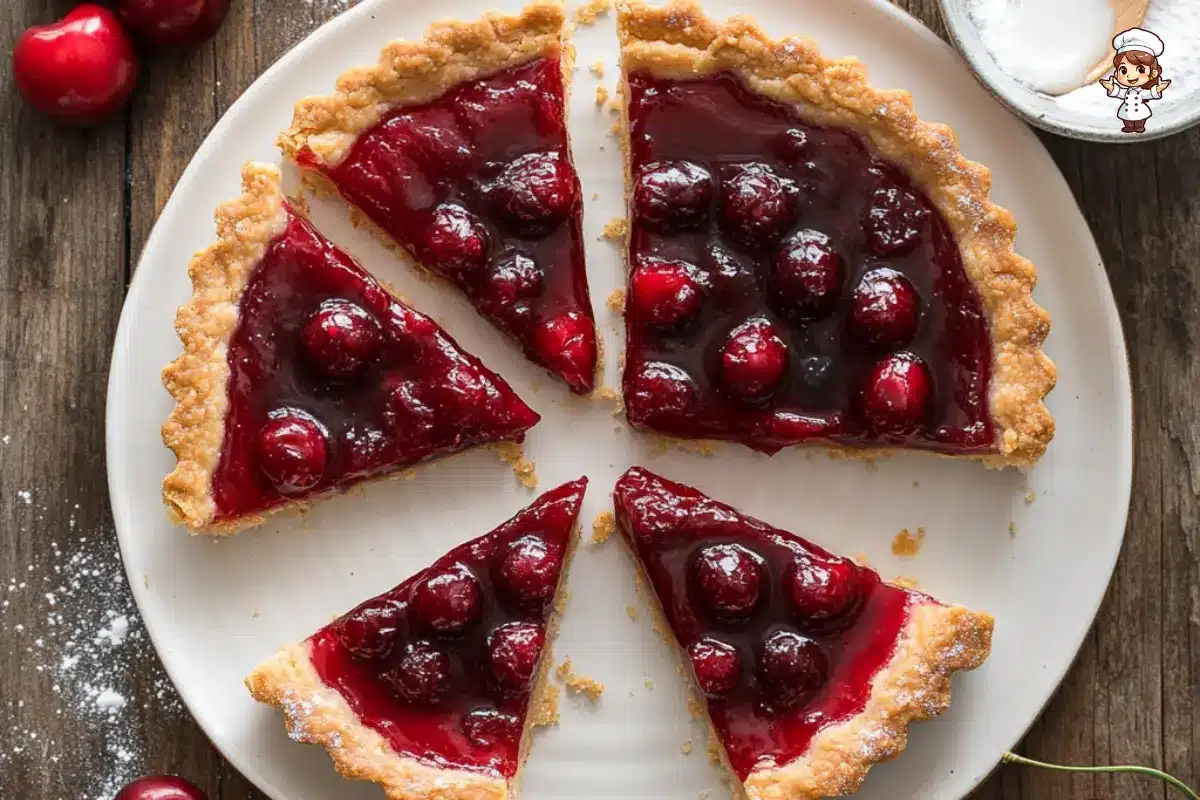
A cherry tart is a classic dessert featuring a buttery, flaky crust filled with a sweet and tangy cherry mixture. Unlike a cherry pie, which typically has a more robust crust and sometimes a top layer, tarts emphasize their filling, often leaving it open-faced to showcase its vibrant color and texture.
Why Are Cherry Tarts a Timeless Dessert?
Cherry tarts have been a dessert staple for centuries, and it’s easy to see why. Their simplicity, versatility, and bold flavor make them a favorite for special occasions or an ordinary weeknight treat. Plus, they’re a wonderful way to celebrate the cherry season, using fresh produce in a way that truly shines.
Brief Overview of Cherry Tart Variations Worldwide
The charm of a cherry tart recipe lies in its adaptability. In France, there’s the rustic clafoutis, where cherries are baked in a custard-like batter. In Germany, you’ll find cherry streusel tarts, topped with a crumbly layer of sugar and butter. Across the globe, bakers put their unique spin on this dessert, making it a cultural icon as much as a culinary delight.
Selecting the Right Ingredients
The Star Ingredient: Fresh vs. Frozen Cherries
When it comes to a cherry tart recipe, the cherries you use can make or break the dessert. Fresh cherries, especially during peak season, are your best bet for achieving that perfect balance of sweetness and tang. Sweet cherries like Bing or Rainier add a rich flavor, while tart cherries like Montmorency bring a punchier taste.
However, don’t fret if fresh cherries aren’t available. Frozen cherries can be a fantastic alternative, especially during off-season months. Just remember to thaw and drain them thoroughly to avoid excess moisture in your filling.
The Crust: Homemade or Store-Bought?
The crust is the foundation of any tart, and getting it right is crucial. A homemade crust allows you to control the flavor and texture, making it buttery and flaky. With a little practice, creating a homemade tart crust is easier than you might think!
If you’re short on time, store-bought crusts can be a lifesaver. Look for high-quality options with minimal additives. Whether you choose homemade or store-bought, a well-prepared crust ensures your cherry tart recipe has the perfect balance of flavor and structure.
Enhancing Flavors: Sweeteners, Spices, and Extracts
While cherries are the star, complementary flavors elevate your tart to the next level. Almond extract, for instance, enhances the natural nuttiness of cherries. A pinch of cinnamon or nutmeg adds warmth and depth, while sugar helps balance tartness.
For an extra burst of flavor, consider a splash of vanilla or a sprinkle of lemon zest. These small additions create layers of complexity, turning a simple cherry tart recipe into a masterpiece.
Tools and Equipment You Need
Essential Tools for Cherry Tart Success
Creating the perfect tart doesn’t require a kitchen full of gadgets, but having the right tools makes the process smoother. At the top of your list should be a tart pan, ideally with a removable bottom for easy serving. A rolling pin, pastry cutter, and mixing bowls are also must-haves.
For preparing cherries, an ergonomic cherry pitter can save you a ton of time. Trust us—pitting cherries by hand can quickly become tedious!
Optional Gadgets to Elevate Your Baking
If you’re ready to step up your cherry tart recipe game, consider investing in a few optional gadgets. A food processor is fantastic for quickly making homemade crusts, while a kitchen scale ensures precise measurements.
Another handy tool is a silicone baking mat, which makes rolling out dough a breeze and minimizes cleanup. While these aren’t strictly necessary, they can make the baking process more efficient and enjoyable.
Print
Classic Cherry Tart Recipe
- Total Time: 1 hour 40 minutes
- Yield: 8 servings
Description
Enjoy your homemade cherry tart recipe! It’s perfect for family gatherings, celebrations, or any time you crave a sweet, tangy dessert. 🍒
Ingredients
For the Crust:
– 1 ½ cups (190g) all-purpose flour
– ½ cup (115g) unsalted butter, cold and cubed
– 2 tablespoons granulated sugar
– ¼ teaspoon salt
– 3-4 tablespoons cold water
For the Cherry Filling:
– 4 cups fresh or frozen cherries, pitted
– ¾ cup granulated sugar (adjust based on cherry sweetness)
– 2 tablespoons cornstarch or tapioca starch
– 1 tablespoon lemon juice
– ½ teaspoon almond extract (optional)
– A pinch of salt
For Garnish (Optional):
– Powdered sugar, whipped cream, or vanilla ice cream
Instructions
1. Prepare the Crust:
1. In a large mixing bowl, combine flour, sugar, and salt.
2. Add the cold butter cubes and cut them into the flour using a pastry cutter or fork until the mixture resembles coarse crumbs.
3. Gradually add cold water, one tablespoon at a time, mixing until the dough just comes together. Avoid overmixing.
4. Form the dough into a disc, wrap it in plastic wrap, and chill for at least 30 minutes.
2. Make the Filling:
1. In a medium saucepan, combine cherries, sugar, cornstarch, lemon juice, almond extract, and a pinch of salt.
2. Cook over medium heat, stirring frequently, until the mixture thickens and becomes glossy (about 5-7 minutes). Let it cool slightly.
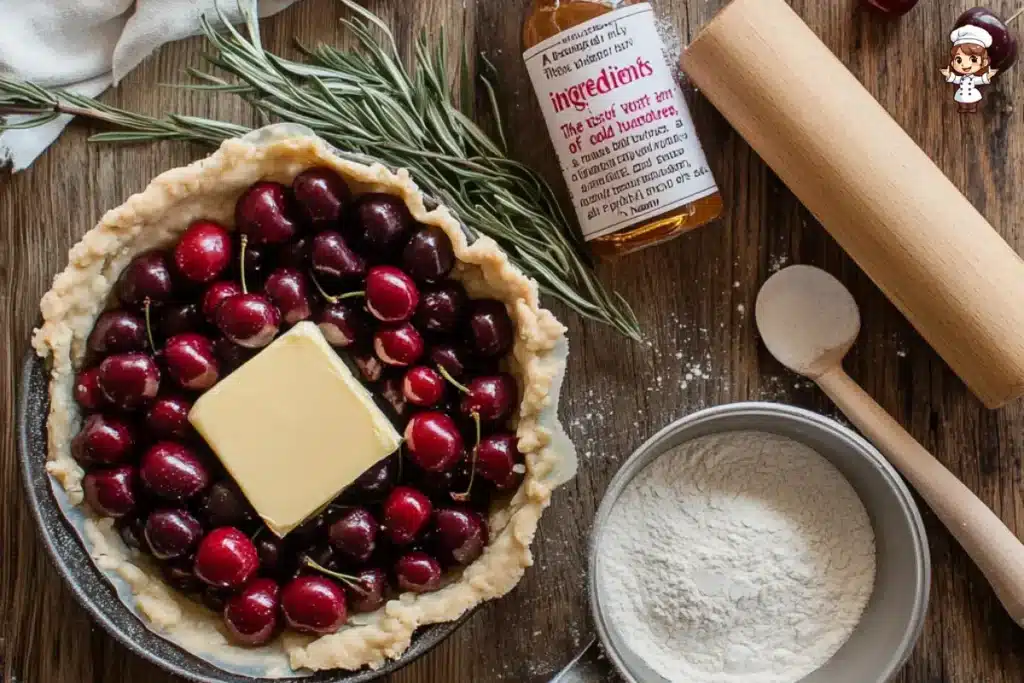
3. Assemble the Tart:
1. Preheat your oven to 375°F (190°C).
2. Roll out the chilled dough on a lightly floured surface to fit your tart pan. Press it gently into the pan and trim any excess dough.
3. Spoon the cherry filling evenly into the crust.
4. Bake the Tart:
1. Place the tart on the middle rack of the oven and bake for 35-40 minutes, or until the crust is golden and the filling is bubbling.
2. If the crust starts to brown too quickly, cover the edges with aluminum foil.
5. Cool and Serve:
1. Let the tart cool for at least 15-20 minutes before slicing.
2. Garnish with powdered sugar, whipped cream, or a scoop of vanilla ice cream for a delightful finish.
- Prep Time: 30 minutes
- Cook Time: 40 minutes
How to Make the Perfect Cherry Tart Crust
Step-by-Step Guide to a Flaky Pastry
A tart’s crust can make all the difference between a dessert that’s just okay and one that’s unforgettable. To create the perfect base for your cherry tart recipe, start by using cold butter and chilled water—these ensure a flaky texture. Combine flour, salt, and sugar in a bowl, then cut in the butter using a pastry cutter or your hands until the mixture resembles coarse crumbs. Slowly add the cold water, mixing just until the dough comes together.
Roll the dough out on a lightly floured surface, then carefully fit it into your tart pan. Trim any excess dough and chill the crust in the fridge for at least 30 minutes before baking.
Common Mistakes and How to Avoid Them
One of the biggest pitfalls in tart-making is overworking the dough, which can make it tough. Use a gentle touch and stop mixing as soon as the dough forms a cohesive ball. Also, don’t skip chilling—it helps prevent the crust from shrinking during baking.
For a golden, crispy crust, blind bake it with pie weights or dried beans to keep it from puffing up. Removing the weights halfway through ensures an even bake.
Chilling and Rolling Techniques for Best Results
Always roll your dough from the center outward, turning it frequently to maintain a circular shape. If it starts to stick, sprinkle a little flour on the surface and your rolling pin. Chilling the rolled-out dough before fitting it into the pan makes it easier to handle and less likely to tear.
For more dessert inspiration, you might enjoy checking out this guide to almond nut cake recipes.
Crafting the Cherry Filling
Preparing the Cherries: Pitting and Prepping Tips
The filling is the heart of any cherry tart recipe, and preparing your cherries properly ensures a balanced, flavorful dessert. Start by washing and pitting the cherries—this is where a cherry pitter can be a game-changer. If you don’t have one, a sturdy straw or chopstick can work in a pinch.
If using fresh cherries, taste-test them first. Add sugar sparingly, adjusting for sweetness or tartness. For frozen cherries, thaw and drain them well to prevent excess liquid from watering down the filling.
Balancing Sweetness and Tartness
A great cherry filling strikes the perfect balance of sweet and tart flavors. Add sugar gradually, and don’t forget a pinch of salt—it heightens the natural sweetness of the fruit. Lemon juice or zest can provide a subtle tang, while almond extract enhances the cherry flavor beautifully.
Adding Texture and Depth to the Filling
For a rich, glossy filling, consider mixing a thickening agent like cornstarch or tapioca flour into your cherries. This ensures the juices set properly during baking, preventing a runny tart. Sprinkle a little sugar over the filling just before baking to give it a caramelized finish.
Assembling and Baking Your Cherry Tart
Layering the Crust and Filling
Assembling your cherry tart recipe is where everything comes together. Begin by preheating your oven to 375°F (190°C). Roll out the chilled crust and fit it snugly into your tart pan. For an elegant finish, trim any overhang and press the edges lightly for a decorative touch.
Once the crust is ready, sprinkle a thin layer of almond flour or breadcrumbs at the base. This step helps absorb any extra moisture from the filling, ensuring a crisp bottom. Then, carefully spoon the cherry mixture into the crust, spreading it evenly to the edges.
Baking Temperatures and Timings
Bake the tart on the center rack to ensure even heat distribution. Start at a higher temperature, such as 400°F (200°C), for the first 10 minutes to set the crust. Then, reduce the heat to 350°F (175°C) and bake for an additional 25–30 minutes.
Keep an eye on the edges—if they start to brown too quickly, shield them with aluminum foil or a pie crust protector. The tart is ready when the filling is bubbly and the crust is golden.
Troubleshooting Common Baking Issues
If your crust seems undercooked, give the tart a few extra minutes in the oven. A soggy bottom can usually be avoided by blind baking the crust beforehand. If the filling looks too runny, let the tart cool completely; it will thicken as it sets.
For more tart-related inspiration, explore this no-bake cherry cheesecake recipe.
Serving and Storing Your Cherry Tart Recipe
Creative Ways to Serve Your Cherry Tart Recipe
A beautifully baked cherry tart is a showstopper on its own, but the right garnish can elevate it even more. Consider a dollop of whipped cream, a scoop of vanilla ice cream, or a drizzle of dark chocolate. For an added crunch, sprinkle toasted almonds or pistachios over the top.
Serving the tart slightly warm enhances its flavors, but it’s equally delicious at room temperature or chilled. To impress guests, dust a bit of powdered sugar over the tart just before serving—it’s a simple touch that adds elegance.
How to Store a Cherry Tart Recipe for Freshness
If you have leftovers (though it’s hard to imagine!), store the tart properly to keep it fresh. Wrap it tightly with plastic wrap and place it in the refrigerator for up to three days.
For longer storage, you can freeze the tart. Wrap it in a layer of plastic wrap and aluminum foil, then store it in an airtight container. To enjoy later, thaw it overnight in the fridge and warm it slightly in the oven to restore its crisp texture.
Reheating Your Cherry Tart Recipe for the Perfect Texture
To reheat a slice, pop it into a preheated oven at 350°F (175°C) for about 10 minutes. This method ensures the crust stays crisp, and the filling warms through evenly. Avoid using a microwave—it can make the crust soggy.
FAQs About Cherry Tart Recipes
Can I Substitute Other Fruits for Cherries?
Absolutely! While cherries are the heart of a traditional cherry tart recipe, you can easily swap them for other fruits. Try raspberries, blackberries, or even sliced peaches for a fun twist. Just adjust the sugar and thickener to match the fruit’s sweetness and juiciness. For a mixed-fruit tart, combine cherries with blueberries or strawberries for a colorful and flavorful variation.
What Makes a Tart Different from a Pie?
Tarts and pies may seem similar, but they have distinct differences. A tart is typically made in a shallow pan with straight sides and has a crumbly, buttery crust that often remains uncovered. Pies, on the other hand, are usually deeper, with a softer, flakier crust and often feature a top layer of pastry. The open-faced design of a tart beautifully showcases the vibrant cherry filling, making it the star of the dessert.
How Do I Avoid a Soggy Bottom Crust?
A soggy crust can be a common issue, but there are several ways to avoid it. First, blind bake the crust before adding the filling to ensure it’s partially cooked and crisp. Additionally, sprinkle a layer of almond flour, breadcrumbs, or crushed cookies at the base to absorb excess moisture from the cherries. Finally, make sure your filling is thickened properly to reduce liquid seepage during baking.
Exploring Cherry Tart Variations
Rustic French Cherry Tarts (Clafoutis)
Clafoutis is a delightful French twist on the classic cherry tart recipe. Instead of a traditional crust, it features a batter-like base that’s poured over the cherries and baked until golden. This rustic variation is perfect for those who love custard-like desserts and want a simpler preparation process.
Mini Cherry Tarts for Individual Servings
For a fun and personalized touch, create mini cherry tarts. Use a muffin tin or small tart pans to make individual portions. These are great for parties, picnics, or when you’re craving a smaller indulgence. Mini tarts bake faster and can be customized with different toppings for each guest.
Diet-Friendly Options: Vegan and Gluten-Free Tarts
Catering to dietary needs doesn’t mean sacrificing flavor. For a vegan option, use a plant-based butter alternative and replace eggs (if your recipe calls for them) with flaxseed or aquafaba. Gluten-free versions can be achieved by using almond flour, oat flour, or a pre-made gluten-free crust mix. These variations ensure everyone can enjoy a delicious cherry tart recipe.
Regional Twists: Sour Cherry and Almond Combinations
Sour cherries, known for their tangy bite, pair beautifully with almond flavors. In many European countries, sour cherry tarts are enhanced with a layer of almond cream (frangipane) beneath the filling. This combination adds richness and a nutty depth that complements the cherries’ acidity.
For more tart recipes and ideas, you can explore this guide to easy pie recipes.