
Have you ever baked a dessert that completely stole the show at a family gathering? A dessert so rich, so creamy, and so perfectly balanced in flavor that every guest asks for the recipe? Well, that was my experience with chocolate mousse pie. A few years ago, I stumbled upon a no-bake chocolate mousse pie recipe while trying to come up with a dessert for a potluck. At first, I was skeptical—could a pie without any baking really be that good?
To my surprise, this mousse pie was not only easy to make but also a huge hit. The layers of smooth, velvety chocolate mousse, the crispy Oreo crust, and the light, fluffy whipped cream on top created a dessert that everyone couldn’t get enough of. From that day on, it became my go-to dessert for any special occasion. Now, I want to share the magic of chocolate mousse pie with you. In this article, I’ll walk you through everything—from its origins and key ingredients to how you can customize it to suit your taste.
Introduction to Chocolate Mousse Pie
What is Chocolate Mousse Pie?
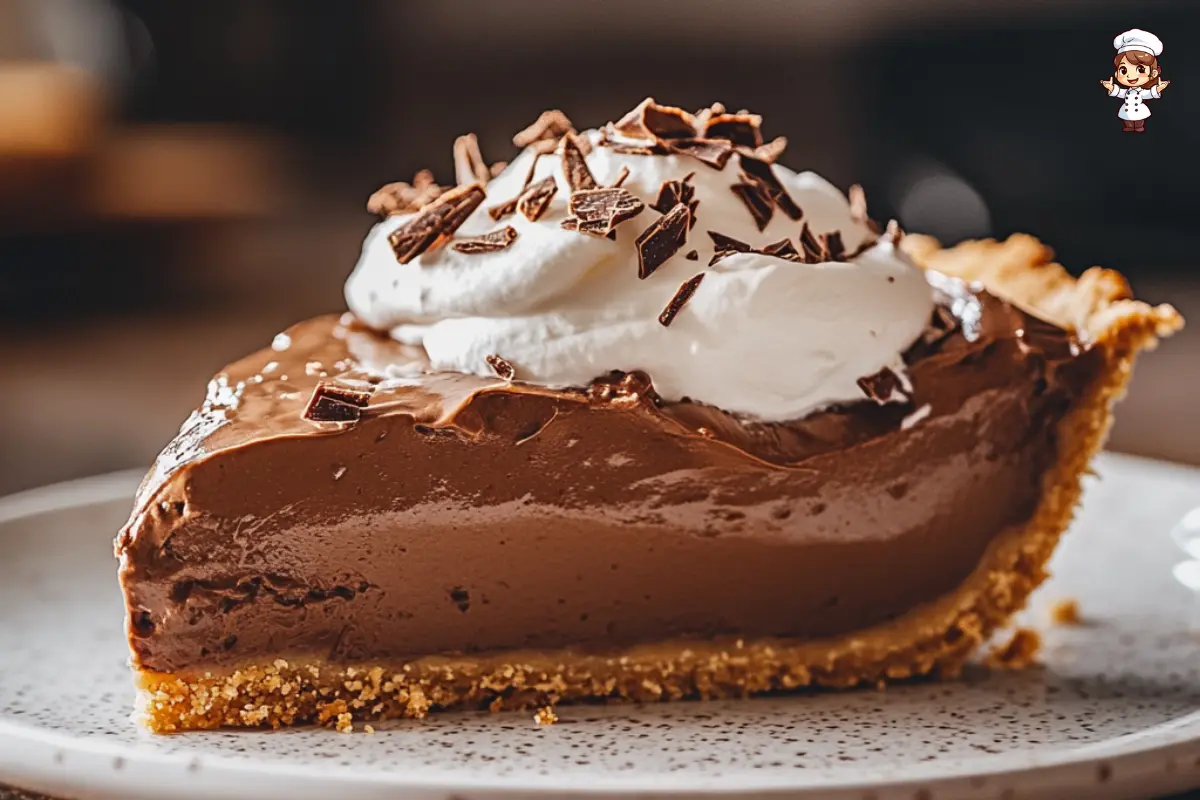
If you’ve never had the pleasure of sinking your spoon into a chocolate mousse pie, let me paint the picture. Imagine a creamy, velvety mousse filling made with high-quality chocolate, nestled in a crunchy, sweet pie crust (usually Oreos—but we’ll get into that later). It’s topped with a cloud-like whipped cream, and perhaps finished off with some chocolate shavings or a dusting of cocoa powder. Sounds dreamy, right?
This dessert strikes the perfect balance between rich chocolate flavor and light, airy texture. It’s not too heavy, which makes it a delightful treat for any occasion. Whether you’re making it for a holiday, a birthday, or just a sweet treat to enjoy after dinner, chocolate mousse pie fits the bill every time.
Why This Dessert is a Crowd Favorite
What makes chocolate mousse pie so universally loved? For starters, it checks all the boxes: it’s indulgent yet light, simple to make, and no-bake (meaning you don’t need to worry about turning on the oven). Plus, who can resist the combination of chocolate mousse and whipped cream? This dessert is a hit with both kids and adults, making it perfect for parties, potlucks, or family gatherings. It’s the kind of dessert that sparks compliments and, inevitably, requests for the recipe!
Now that you’ve got a feel for what makes chocolate mousse pie so special, let’s dive into the history and origins of this delightful dessert.
The History of Chocolate Mousse Pie
Origins of Chocolate Mousse
Chocolate mousse itself has a long and rich history. Originating in France, the word “mousse” translates to “foam,” reflecting the light, airy texture of the dessert. French chefs were the first to master the art of blending whipped cream and chocolate to create a fluffy yet indulgent treat that would eventually become known as chocolate mousse. The mousse was originally served as a simple dessert, typically in a bowl, enjoyed by those with a penchant for rich, chocolatey indulgences.
As time passed, chocolate mousse gained popularity outside France, especially in the United States. Its decadent taste and smooth texture made it a perfect candidate for creative variations, leading to the development of many different mousse-based desserts. One such creation? Chocolate mousse pie.
Evolution into a Pie Form
The transformation of chocolate mousse into a pie is likely the result of the desire to make the dessert more visually appealing and easier to serve at large gatherings. By placing the mousse into a pie crust, often made of Oreos or graham crackers, it became a portable and shareable dessert. Not only did this add a crunchy contrast to the creamy mousse, but it also made the dessert more versatile. In fact, chocolate mousse pie quickly became a favorite at holiday dinners, birthday parties, and other celebrations. Its popularity has only grown over the years, with countless variations appearing in kitchens around the world.
Print
Chocolate Mousse Pie
- Total Time: 4 hours 20 minutes (including chill time)
- Yield: 8 servings
Description
This chocolate mousse pie is rich, creamy, and absolutely irresistible! It’s perfect for any special occasion, family gathering, or simply when you’re craving a sweet, indulgent dessert.
Ingredients
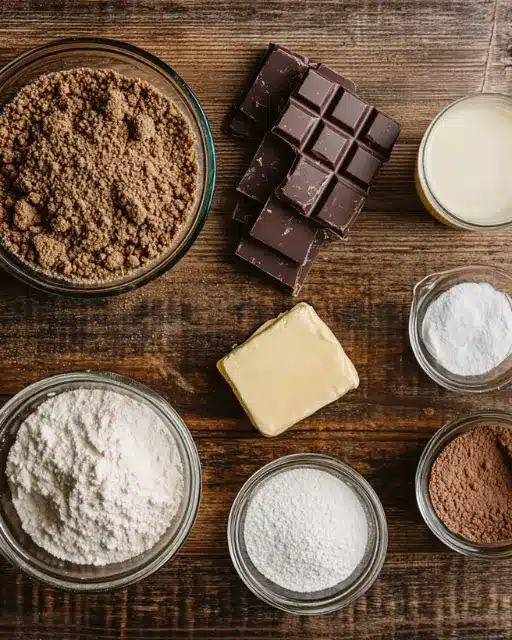
For the Crust:
– 1 ½ cups graham cracker crumbs (or you can use Oreo crumbs for a chocolate crust)
– ¼ cup sugar
– ⅓ cup unsalted butter, melted
– A pinch of salt (optional)
For the Chocolate Mousse Filling:
– 8 oz dark chocolate (around 60% cocoa)
– 2 cups heavy cream (divided)
– ¼ cup powdered sugar
– 1 tsp vanilla extract
Instructions
1. Make the Crust:
– Preheat the oven to 350°F (175°C).
– In a medium-sized bowl, combine the graham cracker crumbs, sugar, and melted butter. Stir until the crumbs are evenly coated with butter.
– Press the mixture into the bottom and up the sides of a 9-inch pie dish or tart pan. Use a spoon to gently pack the crumbs tightly.
– Bake the crust in the preheated oven for 8-10 minutes, until golden and slightly firm. Let it cool completely on a wire rack.
2. Prepare the Chocolate Mousse Filling:
– Break the dark chocolate into pieces and melt it. You can melt it using a double boiler or microwave (in 30-second intervals, stirring each time).
– Once the chocolate is melted, allow it to cool slightly.
– In a separate bowl, whip 1 ½ cups of the heavy cream with the powdered sugar and vanilla extract until soft peaks form.
– Fold the whipped cream gently into the cooled melted chocolate, being careful not to deflate the mixture. The mousse should be light and fluffy.
3. Assemble the Pie:
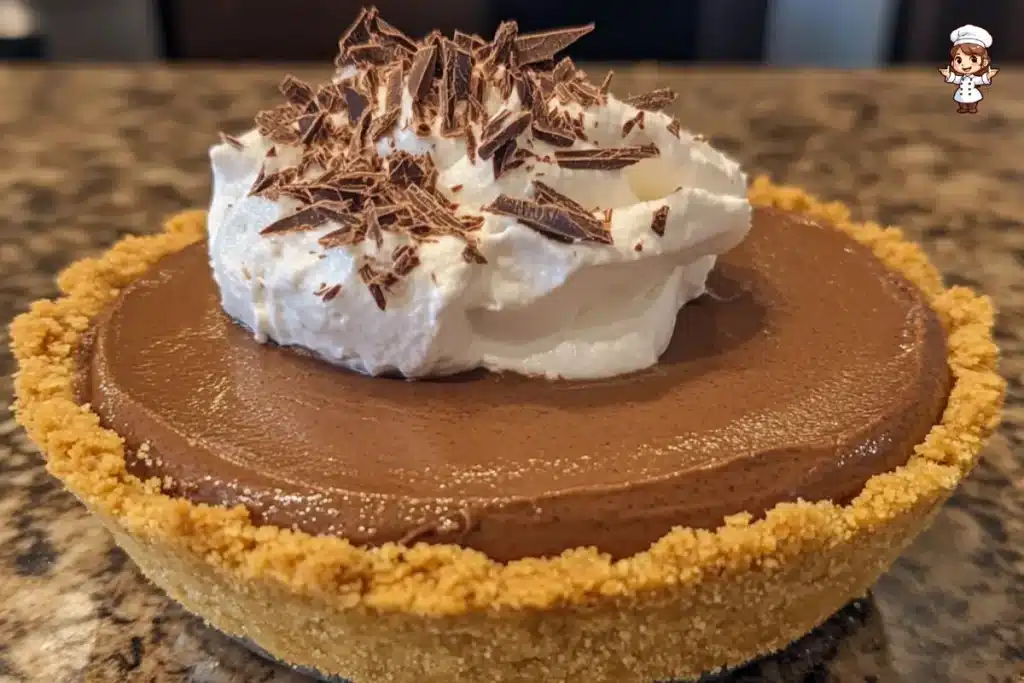
– Pour the chocolate mousse filling into the cooled crust. Smooth out the top with a spatula to create an even layer.
– Refrigerate the pie for at least 4 hours, preferably overnight, to allow the mousse to set.
4. Serve and Enjoy:
– Before serving, whip the remaining ½ cup of heavy cream and pipe or spoon it on top of the pie for decoration.
– You can garnish with shaved chocolate, chocolate curls, or fresh berries for an extra touch.
- Prep Time: 20 minutes (for preparation)
- Cook Time: 4 hours (for the pie to set in the fridge)
Key Ingredients for Chocolate Mousse Pie
Essential Ingredients for the Mousse Filling
The core of any chocolate mousse pie is the mousse itself, and the key ingredients for creating that luxurious, silky filling are simple yet essential. The base typically includes chocolate, heavy cream, and sugar. High-quality dark chocolate is usually preferred for its rich flavor, but some recipes call for semi-sweet or milk chocolate, depending on how sweet you like your dessert.
Heavy cream is crucial for achieving the mousse’s smooth, melt-in-your-mouth texture. It helps create that light yet rich consistency that makes this dessert so irresistible. A touch of sugar adds sweetness to balance the bitterness of the chocolate, while vanilla extract often enhances the overall flavor, giving it that comforting, familiar taste.
For those looking to add a bit of extra decadence, some recipes include egg yolks or marshmallows, which help to create a thicker, richer mousse. But in its simplest form, the mousse is just chocolate, cream, sugar, and a bit of love.
The Perfect Crust: Oreo vs. Other Variations
Now, what about the crust? While Oreo crusts are the most popular choice for chocolate mousse pie, they’re far from the only option. You can easily customize the crust to suit your taste or dietary needs. Graham cracker crusts are a great alternative if you prefer a more neutral, slightly sweeter base, while a chocolate cookie crust offers a richer, more intense chocolate flavor.
You can also make a gluten-free version by using crushed gluten-free cookies or even nuts for a crunchy, grain-free option. The crust is an essential part of the pie, as it provides that satisfying contrast to the creamy mousse filling. No matter which type you choose, it’s sure to complement the mousse beautifully.
In the next sections, we’ll go deeper into the step-by-step process of making chocolate mousse pie, as well as some pro tips to ensure it turns out perfect every time.
Making the Chocolate Mousse Pie
Preparing the Chocolate Mousse Filling
Now that you’ve crafted the perfect pie crust, it’s time to prepare the rich chocolate mousse filling. Begin by melting the chocolate. You can use dark chocolate for a more intense flavor or milk chocolate for a sweeter, creamier texture. To melt the chocolate, break it into small pieces and place it in a heatproof bowl. Set the bowl over a pot of simmering water, ensuring the bowl does not touch the water (double-boiler method). Stir occasionally until the chocolate is fully melted and smooth.
Once melted, remove it from heat and allow it to cool slightly. Meanwhile, in a separate bowl, whip the cream until stiff peaks form. It’s essential that the whipped cream is fully stiff to achieve a light and airy mousse texture. Gently fold the whipped cream into the melted chocolate, being careful not to deflate the whipped cream. The goal is to keep the mixture light and fluffy.
Assembling the Pie
With your crust and mousse ready, it’s time to assemble the chocolate mousse pie. Spoon the mousse mixture into your prepared pie crust and spread it evenly. Smooth the top with a spatula for a professional finish. For an extra touch, you can sprinkle grated chocolate or cocoa powder on top of the mousse, or even garnish with whipped cream and chocolate shavings.
After assembling, refrigerate the pie for at least 4 hours, or overnight if possible. This allows the mousse to set and firm up, making each slice perfectly structured. The chill time is crucial to achieve that luscious, melt-in-your-mouth texture when you cut into the pie.
For more delicious pie recipes, check out our recipe article for Coconut Cream Pie.
Serving and Enjoying the Chocolate Mousse Pie
Serving Suggestions
When it’s finally time to serve your Chocolate mousse tart, make sure it’s nice and chilled. Use a sharp knife to slice through the mousse, and be sure to clean the knife between cuts for neat, clean slices. This pie pairs beautifully with a cup of coffee, a glass of dessert wine, or even a scoop of vanilla ice cream.
To elevate the experience further, consider adding fresh berries like raspberries or strawberries on the side. The tartness of the berries complements the rich, creamy chocolate, creating a harmonious balance of flavors.
Tips for a Perfect Chocolate Mousse Pie
- Choosing the Right Chocolate: The type of chocolate you use will dramatically affect the flavor of your mousse pie. Opt for a high-quality chocolate to ensure the best taste and texture. Dark chocolate will provide a more intense, sophisticated flavor, while milk chocolate will offer a sweeter, creamier result.
- Whipping Cream to Perfection: Be sure to whip the cream to stiff peaks, as this is what gives the mousse its airy, light texture. Over-whipping can lead to a grainy consistency, so keep a close eye on the cream as you whip.
- Chill Time: Don’t rush the refrigeration process. Giving the pie ample time to chill will ensure that the mousse sets properly, making it easier to slice and more enjoyable to eat.
Enjoy your decadent chocolate mousse pie, a perfect treat for any occasion!
For more dessert inspiration, be sure to check out our Strawberry Cheesecake Dump Cake recipe!
Common Mistakes to Avoid When Making Chocolate Mousse Pie
1. Overmixing the Chocolate Mousse
One of the most common mistakes people make when preparing chocolate mousse pie is overmixing the mousse filling. When you’re folding the whipped cream into the melted chocolate, be gentle. If you stir too vigorously, you’ll deflate the whipped cream, and your mousse will lose its light, airy texture. Instead, fold the two components together slowly and carefully, using a spatula. This technique ensures that your mousse stays fluffy and smooth, giving your pie that perfect consistency.
2. Using Low-Quality Chocolate
While it’s tempting to go for the cheapest chocolate available, this can affect the final taste and texture of your chocolate mousse pie. High-quality chocolate makes a world of difference in flavor. Opt for chocolate with a high cocoa percentage (at least 60% for dark chocolate) for a richer taste. Cheap chocolate can result in a waxy texture or a less pronounced chocolate flavor. Always invest in good chocolate for the best outcome!
3. Not Letting the Pie Set Long Enough
Patience is key when making Chocolate mousse tart. If you rush the chilling process, the mousse won’t set properly, and the pie won’t hold its shape when sliced. Be sure to refrigerate the pie for at least 4 hours, preferably overnight. This extra time allows the mousse to firm up, creating a pie that’s easy to cut and perfectly structured. It’s tempting to cut into it early, but trust us—it’s worth the wait!
Variations of Chocolate Mousse Pie
1. White Chocolate Mousse Pie
If you’re not a fan of dark chocolate or prefer a sweeter version, consider making a white chocolate mousse pie. White chocolate has a smoother, creamier texture and a sweeter flavor profile. To make this variation, simply substitute the dark chocolate with high-quality white chocolate. The rest of the process remains the same, and you’ll still end up with a deliciously rich and velvety pie. This version is perfect for those who want a lighter, sweeter twist on the classic chocolate mousse pie.
2. Adding Flavors to the Chocolate Mousse
Want to get creative? You can easily customize your chocolate mousse pie by adding different flavors to the mousse. For instance, a splash of vanilla extract can enhance the chocolate flavor and add a subtle warmth. Or, for a more adventurous flavor, try adding a few drops of mint extract to make a chocolate-mint mousse pie. For a citrusy twist, a hint of orange zest can create a refreshing contrast to the richness of the chocolate.
3. Gluten-Free Chocolate Mousse Pie
For those following a gluten-free diet, you can easily make this dessert gluten-free by choosing a gluten-free pie crust. Many grocery stores offer pre-made gluten-free crusts, or you can make your own from gluten-free graham crackers. The mousse filling itself is already naturally gluten-free, so as long as the crust is safe, you can enjoy this dessert without worry.
In the end, the beauty of the chocolate mousse pie is its versatility. With just a few simple tweaks, you can make it your own and satisfy different tastes and dietary preferences!
How to Store and Keep Chocolate Mousse Pie Fresh
Storing Chocolate Mousse Pie in the Refrigerator
Once you’ve made your Chocolate mousse tart, it’s essential to store it properly to keep it fresh. The best way to store the pie is in the refrigerator. The mousse filling needs to stay chilled to maintain its smooth and creamy texture. Make sure to cover the pie with plastic wrap or foil to prevent it from absorbing any odors in the fridge. If the pie is in a pie tin, you can also use a pie keeper to protect it.
Refrigerating the chocolate mousse pie helps it keep its structure and prevents the mousse from becoming too soft. It’s important to note that mousse-based desserts, especially those with whipped cream, can become runny if left out at room temperature for too long. So, once you’ve made your pie, always store it in the fridge, and it should last for up to 3 days.
Freezing Chocolate Mousse Pie for Longer Storage
If you’re planning to keep the chocolate mousse pie for a longer time, freezing is an excellent option. To freeze, simply cover the pie tightly with plastic wrap and then place it in a large freezer bag or airtight container. This will prevent freezer burn and keep your pie fresh for up to 1 month.
When you’re ready to serve it, take it out of the freezer and let it thaw in the refrigerator for several hours or overnight. The pie’s texture may be slightly firmer when frozen, but it will still taste delicious once it’s thawed and back to its creamy state.
Frequently Asked Questions About Chocolate Mousse Pie
1. Can I make chocolate mousse pie ahead of time?
Yes, absolutely! In fact, making chocolate mousse pie ahead of time is highly recommended. Preparing it a day or even two in advance allows the mousse to set properly, and the pie will taste even better after chilling for a longer period. Just be sure to cover it well to keep it fresh and prevent it from absorbing any unwanted smells in the fridge.
2. Can I use a different type of chocolate for the mousse filling?
Yes, you can! While dark chocolate is most commonly used, feel free to experiment with other types of chocolate. Milk chocolate will make the mousse sweeter, while white chocolate will create a creamier, lighter flavor. Each variation brings its unique twist to the pie, so choose the one that fits your taste preference.
3. How do I prevent my mousse from being too runny?
To avoid a runny mousse, make sure your whipped cream is firm and that the melted chocolate has cooled slightly before folding it in. Also, ensure that the pie is refrigerated long enough to set before serving. If you’re making the mousse ahead of time, it will have time to firm up in the fridge, so you can enjoy a perfectly structured slice.