
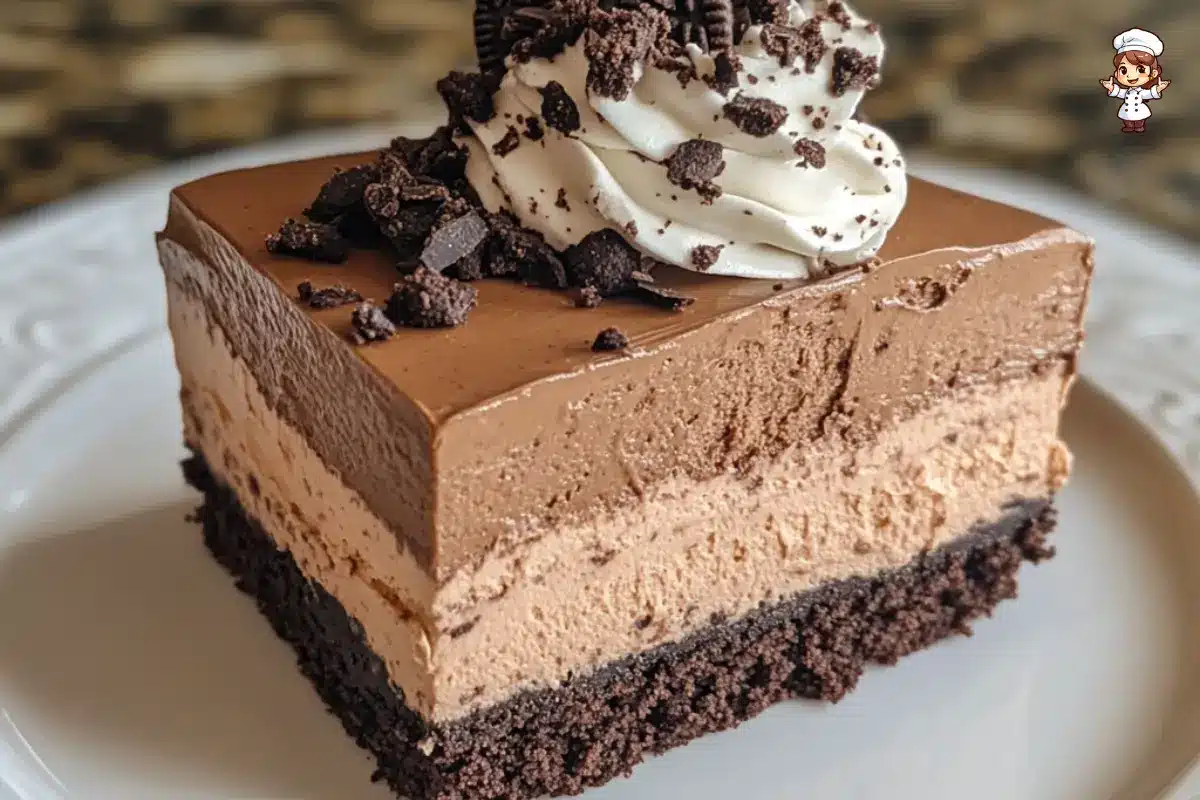
Look no further if you’ve been hunting for the ultimate dessert to impress your guests or satisfy your sweet tooth. This chocolate peanut butter mousse cake with Oreo crust is the perfect blend of rich, velvety chocolate, creamy peanut butter, and a crunchy Oreo cookie crust. With its layers of mousse and the irresistible crunch from the Oreo base, this cake is a showstopper that will leave everyone asking for seconds. What’s even better? It’s simple to make and requires no baking—layer and chill!
In this article, we’ll explain everything you need to know to make this delightful treat from scratch, including step-by-step instructions, helpful tips, and common variations. So, grab your apron, and let’s dive into making this indulgent chocolate peanut butter mousse cake with an Oreo crust.
Introduction to Chocolate Peanut Butter Mousse Cake
Why This Cake Is the Ultimate Dessert
The chocolate peanut butter mousse cake with Oreo crust ticks all the boxes when satisfying your sweet cravings. The combination of rich chocolate and creamy peanut butter is a match made in dessert heaven. Each bite brings a melt-in-your-mouth experience, with the smooth, velvety mousse layers blending perfectly with the crunch of the Oreo crust. Whether serving it at a dinner party or enjoying a treat at home, this cake will elevate any occasion.
This dessert also has the benefit of being a no-bake, which means you can skip the oven and still create a masterpiece. The mousse layers are easy to prepare, and the Oreo crust adds an excellent contrast in texture, making it a standout dessert that’s simple to put together.
What truly makes this cake special is its versatility. You can customize it by adding extra flavours, like crushed peanuts for crunch or even a chocolate ganache drizzle for that extra indulgence. Whatever way you choose to make it, this cake is guaranteed to be a crowd-pleaser.
What Makes the Oreo Crust Stand Out?
The Oreo crust is the foundation of this cake, which takes this dessert to the next level. It’s buttery, crunchy, and flavour, creating the perfect base for the creamy mousse layers. Unlike traditional pie crusts, which can be heavy, the Oreo crust has a lighter, more delicate crunch that pairs wonderfully with the rich, fluffy mousse. Plus, it’s incredibly easy to make, requiring two ingredients: crushed Oreos and melted butter.
This crust not only provides a satisfying crunch but also brings a slight sweetness to balance out the richness of the mousse. It’s the unsung hero of this dessert, offering a contrast that makes every bite feel like a little piece of heaven.
What You Need to Make Chocolate Peanut Butter Mousse Cake
Essential Ingredients
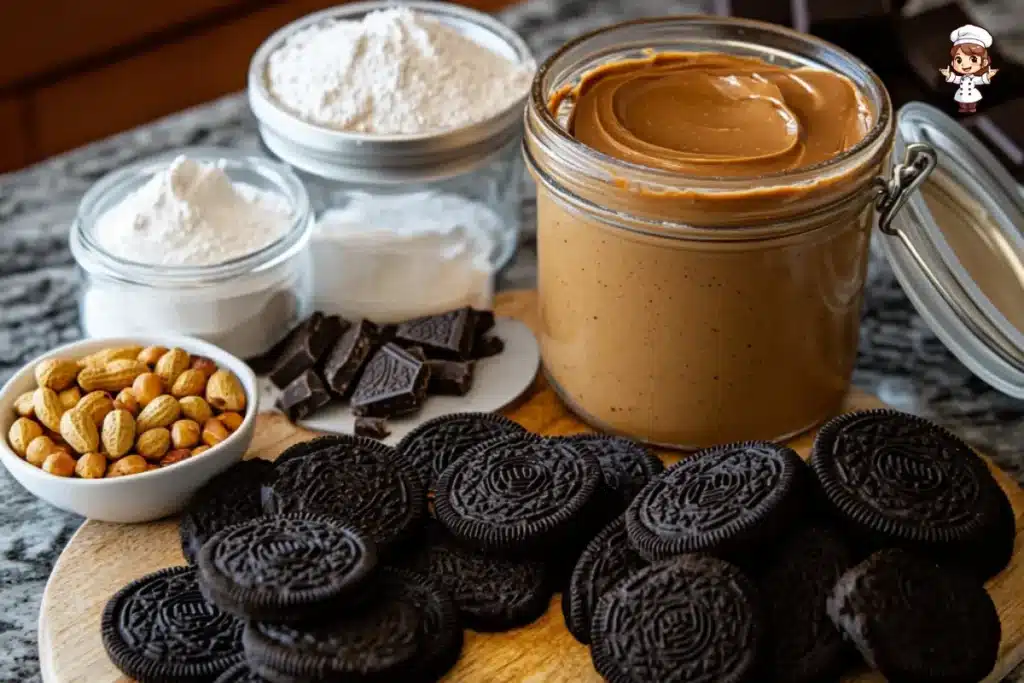
You’ll need some key ingredients to make this chocolate peanut butter mousse cake with an Oreo crust. Don’t worry—they’re easy to find, and the best part is that you probably have most of them in your pantry already!
- Oreo cookies are the foundation of your crust. To create that rich, sweet base, you’ll need a whole package of Oreos, including the filling.
- Butter: Melted butter binds the Oreo crumbs together. It helps form a firm yet tender crust that contrasts beautifully with the mousse.
- Cream cheese: Softened cream cheese creates a smooth, creamy texture for the peanut butter mousse.
- Peanut butter: Use creamy peanut butter for the mousse. It gives the cake that signature nutty flavour that pairs perfectly with the chocolate.
- Heavy whipping cream: This is essential for both the peanut butter and chocolate mousse, as it helps achieve that light, airy texture.
- Powdered sugar: A bit of sweetness to balance out the richness of the peanut butter and chocolate.
- Dark chocolate: Choose dark chocolate with a high cocoa content for a rich, deep flavour in the chocolate mousse layer.
These ingredients combine to create the delicious blend of chocolate, peanut butter, and Oreo goodness everyone loves. Now that you know what you’ll need, let’s move on to the fun part—preparing the cake!
Optional Ingredients for Variations
While the ingredients above will make a perfectly decadent chocolate peanut butter mousse cake with an Oreo crust, there are some great ways to change things up if you’re feeling creative.
- Chocolate chips: Add mini chocolate chips into the mousse layers for chocolatey goodness.
- Chopped peanuts: For a bit of crunch and a peanut-buttery kick, chop some peanuts and mix them into the mousse layers or sprinkle them on top.
- Whipped cream topping: To make the cake even more indulgent, top it off with a swirl of fresh whipped cream and a few extra Oreo crumbs.
These optional ingredients will take your cake to the next level, but don’t worry—if you prefer to keep things simple, the basic recipe will be just as delightful.
How to Prepare the Oreo Crust
Crushing the Oreos
Creating the perfect Oreo crust for your chocolate peanut butter mousse cake is easy. All you need to do is crush your Oreos into fine crumbs. You can use a food processor for quick results, or if you prefer, place the Oreos in a sealed ziplock bag and crush them with a rolling pin. Either way, you want the crumbs to be okay and uniform, with no large chunks. This ensures that the crust holds together when pressed into the pan.
Mixing with Butter
Once you’ve crushed your Oreos, it’s time to mix them with melted butter. For this, you’ll need about 1/2 cup of melted butter. Add the butter to the crushed Oreos and stir until everything is well combined. The butter acts as a binding agent, helping the crumbs stick together when pressed into the pan.
Now, it’s time to press the Oreo butter mixture into your springform pan or pie dish. Press down firmly and evenly so that the crust forms a solid base for your mousse layers. To ensure a smooth, even crust, you can use the back of a spoon to press it down. After this, refrigerate the crust for 10-15 minutes to help it set. This will give the crust a firm, crisp texture that perfectly contrasts with the creamy mousse.
How to Make the Chocolate Peanut Butter Mousse Cake with Oreo Crust

Step 1: Prepare the Oreo Crust
You’ll need to prepare the delicious, crunchy Oreo crust. Begin by crushing your Oreo cookies into fine crumbs using a food processor. If you don’t have one, you can place the cookies in a plastic bag and crush them with a rolling pin. Once you have your crumbs, combine them with melted butter. Mix until the crumbs are well-coated and the mixture holds together when pressed.
Now, press the mixture into the base of a springform pan, ensuring it’s even and compact. This step will form the base of your chocolate peanut butter mousse cake. Bake the crust in a preheated oven at 350°F (175°C) for 8-10 minutes, then set it aside to cool completely.
Step 2: Prepare the Peanut Butter Mousse
While the crust is cooling, prepare the peanut butter mousse filling. Combine heavy cream, peanut butter, powdered sugar, and vanilla extract in a large mixing bowl. Using an electric mixer, beat the mixture until it’s smooth and slightly thickened.
If desired, you can fold in some chopped peanut brittle or chopped peanuts to add texture. Once your mousse reaches a thick, fluffy consistency, spread it evenly over the cooled Oreo crust.
Step 3: Make the Chocolate Mousse Layer
For the top layer, prepare the chocolate mousse by melting some high-quality dark chocolate in a heatproof bowl over simmering water. Let it cool slightly before folding in whipped cream. The chocolate should still be soft but not too runny. Carefully layer the chocolate mousse on top of the peanut butter mousse.
Once both layers are in place, refrigerate the cake for at least 4 hours, or overnight, to allow the mousse to set. This step is crucial for the mousse cake to hold its shape when sliced.
Print
Chocolate Peanut Butter Mousse Cake with Oreo Crust
- Total Time: 4 hours 30 minutes
- Yield: 8-10 servings
- Diet: Gluten Free
Description
Enjoy this Chocolate Peanut Butter Mousse Cake with Oreo Crust at your next gathering, and watch everyone go back for seconds! Whether it’s for a birthday, holiday, or just because, this decadent, no-bake dessert is sure to impress!
Ingredients
For the Oreo Crust:
– 24 Oreo cookies (with filling)
– 1/2 cup (115g) unsalted butter, melted
For the Peanut Butter Mousse Layer:
– 8 oz (225g) cream cheese, softened
– 1 cup creamy peanut butter (smooth)
– 1 cup powdered sugar
– 1 teaspoon vanilla extract
– 1 cup heavy whipping cream (cold)
For the Chocolate Mousse Layer:
– 8 oz (225g) dark chocolate (preferably 70% cocoa)
– 1 cup heavy whipping cream (cold)
– 1 tablespoon powdered sugar (optional)
For Garnishing (Optional):
– Whipped cream
– Crushed Oreos
– Chopped peanuts
– Mini chocolate chips
– Drizzle of peanut butter or melted chocolate
Instructions
Step 1: Prepare the Oreo Crust
1. Crush the Oreos:
Place 24 Oreo cookies (with filling) in a food processor and pulse until they become fine crumbs. If you don’t have a food processor, place the Oreos in a sealed ziplock bag and crush them with a rolling pin until fine.
2. Mix with Butter:
In a large bowl, combine the Oreo crumbs with 1/2 cup melted butter. Stir until the crumbs are evenly coated with butter.
3. Form the Crust:
Press the mixture into the bottom of a 9-inch springform pan. Press it down firmly using the back of a spoon or your fingers until it’s compact and even.
4. Chill:
Refrigerate the crust for at least 15 minutes to firm it up.
Step 2: Prepare the Peanut Butter Mousse Layer
1. Whip the Cream Cheese and Peanut Butter:
In a large mixing bowl, beat together 8 oz softened cream cheese and 1 cup peanut butter until smooth and creamy.
2. Add Powdered Sugar and Vanilla:
Add 1 cup powdered sugar and 1 teaspoon vanilla extract. Beat until the mixture is well combined.
3. Whip the Heavy Cream:
In a separate bowl, whip 1 cup cold heavy whipping cream until stiff peaks form (you can use a hand mixer or stand mixer).
4. Fold in the Whipped Cream:
Gently fold the whipped cream into the peanut butter mixture until fully combined. Be careful not to deflate the whipped cream too much.
5. Spread the Mousse:
Once the crust has chilled, spread the peanut butter mousse layer evenly over the Oreo crust. Smooth out the top with a spatula.
6. Chill:
Place the pan back in the refrigerator and let it set for at least 1 hour, or until the mousse is firm.
Step 3: Prepare the Chocolate Mousse Layer
1. Melt the Chocolate:
Melt 8 oz dark chocolate in a heatproof bowl over simmering water (double boiler method). Stir until smooth and fully melted. Let it cool slightly.
2. Whip the Heavy Cream:
In another bowl, whip 1 cup cold heavy whipping cream until stiff peaks form. If you prefer a sweeter chocolate mousse, add 1 tablespoon powdered sugar while whipping.
3. Combine the Chocolate and Cream:
Gently fold the cooled, melted chocolate into the whipped cream. Stir until fully combined and smooth.
4. Layer the Chocolate Mousse:
Once the peanut butter mousse has set, carefully spread the chocolate mousse on top, smoothing it out to cover the entire cake.
5. Chill Again:
Refrigerate the cake for at least 4 hours, or overnight for best results. The longer it chills, the better the flavors will meld together.
Step 4: Garnish and Serve
1. Whip Some Cream:
For an extra indulgent touch, whip some additional heavy cream and pipe or spread it on top of the chocolate mousse layer.
2. Add Toppings:
Garnish with crushed Oreos, chopped peanuts, mini chocolate chips, or a drizzle of melted chocolate or peanut butter.
3. Slice and Serve:
To slice the cake, run a knife under hot water and dry it off between cuts for clean slices. Serve chilled and enjoy the rich, creamy layers of chocolate peanut butter mousse!
Latest Amazon Finds


Notes
– In the Refrigerator: Store leftovers in an airtight container in the fridge for up to 3-4 days.
– Freezing: If you want to store it for longer, wrap the cake tightly in plastic wrap and foil, then freeze for up to 2 months. Thaw in the fridge before serving.
- Prep Time: 30 minutes
- Cook Time: 4 hours ( Chill Time )
- Category: No-Bake Desserts
- Method: No-Bake, Layered, Whipping, Melting
- Cuisine: American
Nutrition
- Serving Size: 1 slice (based on 10 servings)
- Calories: ~450 kcal
- Sugar: ~30g
- Sodium: ~150mg
- Fat: 30g
- Saturated Fat: ~10g
- Unsaturated Fat: ~15g
- Trans Fat: ~0g
- Carbohydrates: ~40g
- Fiber: ~2g
- Protein: ~5g
- Cholesterol: ~40mg
Decorating and Serving Your Chocolate Peanut Butter Mousse Cake with Oreo Crust
Step 1: Add Whipped Cream and Garnishes
Once your mousse cake has set, it’s time to decorate! Whip up some additional heavy cream and spread it over the top layer of the chocolate mousse. You can sprinkle some chopped Oreos or peanuts on top for added flair. To get even more creative, consider drizzling some extra melted chocolate or peanut butter on top for a rich finish.
Step 2: Slice and Serve
Now that your chocolate peanut butter mousse cake with Oreo crust is beautifully decorated, it’s time to slice and enjoy. Use a hot knife to get clean slices, and serve the cake chilled for the best experience. This dessert is perfect for any occasion, from birthdays to casual gatherings.
For more delicious dessert ideas, check out our other recipe articles on the site!
Following these simple steps will give you a show-stopping dessert that will impress anyone. The combination of crunchy Oreo crust, creamy peanut butter mousse, and rich chocolate mousse makes this cake a true treat. Whether you’re a fan of peanut butter or chocolate (or both!), this cake is an indulgence you won’t want to miss.
Tips and Tricks for Making the Perfect Chocolate Peanut Butter Mousse Cake with Oreo Crust
Tip 1: Use High-Quality Ingredients
The quality of ingredients matters when making a dessert as decadent as a chocolate peanut butter mousse cake with Oreo crust. Opt for high-quality dark chocolate and smooth peanut butter for the best taste. Premium chocolate will melt smoothly, giving your mousse a glossy and rich finish, while creamy peanut butter ensures a velvety texture. Don’t skimp on the quality of your Oreos either—using fresh, crisp cookies will make your crust even more delicious.
Tip 2: Allow Enough Time for Chilling
Patience is key when making this dessert. After assembling the chocolate peanut butter mousse cake with Oreo crust, you must allow enough time to chill in the refrigerator. Chilling helps the mousse layers firm up and set perfectly. The cake needs at least 4 hours to relax, but for the best results, leave it overnight. The longer it chills, the more the flavours meld together, making the cake easier to slice.
Tip 3: Get Creative with Toppings
While the cake is already delicious, toppings can take it to the next level. Consider adding some crushed Oreos or drizzling chocolate and peanut butter on top. For extra texture, sprinkle chopped peanuts or mini chocolate chips on it for a delightful crunch. You can add a few whipped cream dollops for a creamy contrast. The more creative you get with your toppings, the more visually appealing the cake becomes!
Common Mistakes to Avoid When Making a Chocolate Peanut Butter Mousse Cake with Oreo Crust
Mistake 1: Overmixing the Mousse
One of the most common mistakes when making a mousse cake is overmixing the mousse. Overheating the cream can cause it to become grainy, and you’ll lose that smooth texture that makes mousse so delightful. When preparing the peanut butter and chocolate mousse, beat the ingredients until they are combined and thickened. Avoid overmixing to ensure the mousse is light, fluffy, and smooth.
Mistake 2: Not Letting the Oreo Crust Cool
Many bakers forget to let the Oreo crust cool completely before adding the mousse layers. This is a crucial step! If the crust is still warm, the mousse could melt, resulting in a messy cake. Let the crust cool thoroughly before adding the peanut butter and chocolate mousse layers. This ensures the structure holds up and maintains that crisp, crunchy base.
Mistake 3: Using Too Much Peanut Butter
While peanut butter is one of the stars of this chocolate peanut butter mousse cake with Oreo crust, too much can overwhelm the other flavours. The balance between chocolate and peanut butter should be just right. Stick to the measurements in the recipe, and if you want to experiment with flavours, consider adding powdered sugar or vanilla to mellow out the peanut butter’s richness.
By avoiding these common mistakes, you can ensure your cake always comes out perfect!
How to Store Your Chocolate Peanut Butter Mousse Cake with Oreo Crust
Storing in the Refrigerator
Once you’ve made your delicious chocolate peanut butter mousse cake with Oreo crust, you’ll want to ensure it stays fresh and ready to enjoy. The best way to store it is in the refrigerator. Since the mousse layers are made with whipped cream and dairy, keeping the cake cold ensures it maintains its structure and flavour. Cover the cake tightly with plastic wrap or store it in an airtight container. This will prevent it from absorbing any odours from the fridge and keep the mousse nice and creamy.
Freezing for Long-Term Storage
If you cannot finish your cake within a few days, don’t worry—you can freeze it! Just be sure to let the cake chill entirely in the refrigerator first. Afterwards, wrap it tightly in plastic and foil, then store it in a freezer-safe container. The cake can be frozen for up to 2 months. When you’re ready to enjoy it, let it thaw in the refrigerator for a few hours. Freezing won’t affect the cake’s taste, and it’ll still be just as decadent when served!
By following these storage tips, you can extend the life of your chocolate peanut butter mousse cake with Oreo crust and enjoy it for days (or even weeks!) to come.
FAQs About Chocolate Peanut Butter Mousse Cake with Oreo Crust
Can I Use a Different Crust Instead of Oreos?
Absolutely! While the Oreo crust gives this cake its signature crunch and flavour, you can switch it up. Graham cracker crumbs make a great alternative if you want something lighter. You can also use chocolate wafer cookies or a nut-based crust for a more natural, gluten-free option. The key is ensuring the crust binds together well with butter, just like the Oreo version.
How Can I Make This Cake Gluten-Free?
Making a gluten-free chocolate peanut butter mousse cake with an Oreo crust is easier than you might think! Substitute the regular Oreos with gluten-free Oreos or another gluten-free cookie you choose. You’ll still get that delicious crunch in the crust but without the gluten. Double-check all your ingredients, especially the peanut butter and chocolate, to ensure they’re certified gluten-free.
How Long Will the Cake Last?
When stored properly in the refrigerator, your mousse cake lasts about 3-4 days. If you freeze it, you can keep it for up to 2 months, though it’s best to enjoy it within the first month for the best flavour and texture.
Can I Make the Cake Ahead of Time?
Yes! This cake is perfect for making ahead. In fact, it benefits from sitting in the fridge for a few hours or overnight. The flavors will deepen, and the mousse will set beautifully. So, feel free to prepare it a day or two in advance—just make sure to keep it chilled until you’re ready to serve!