

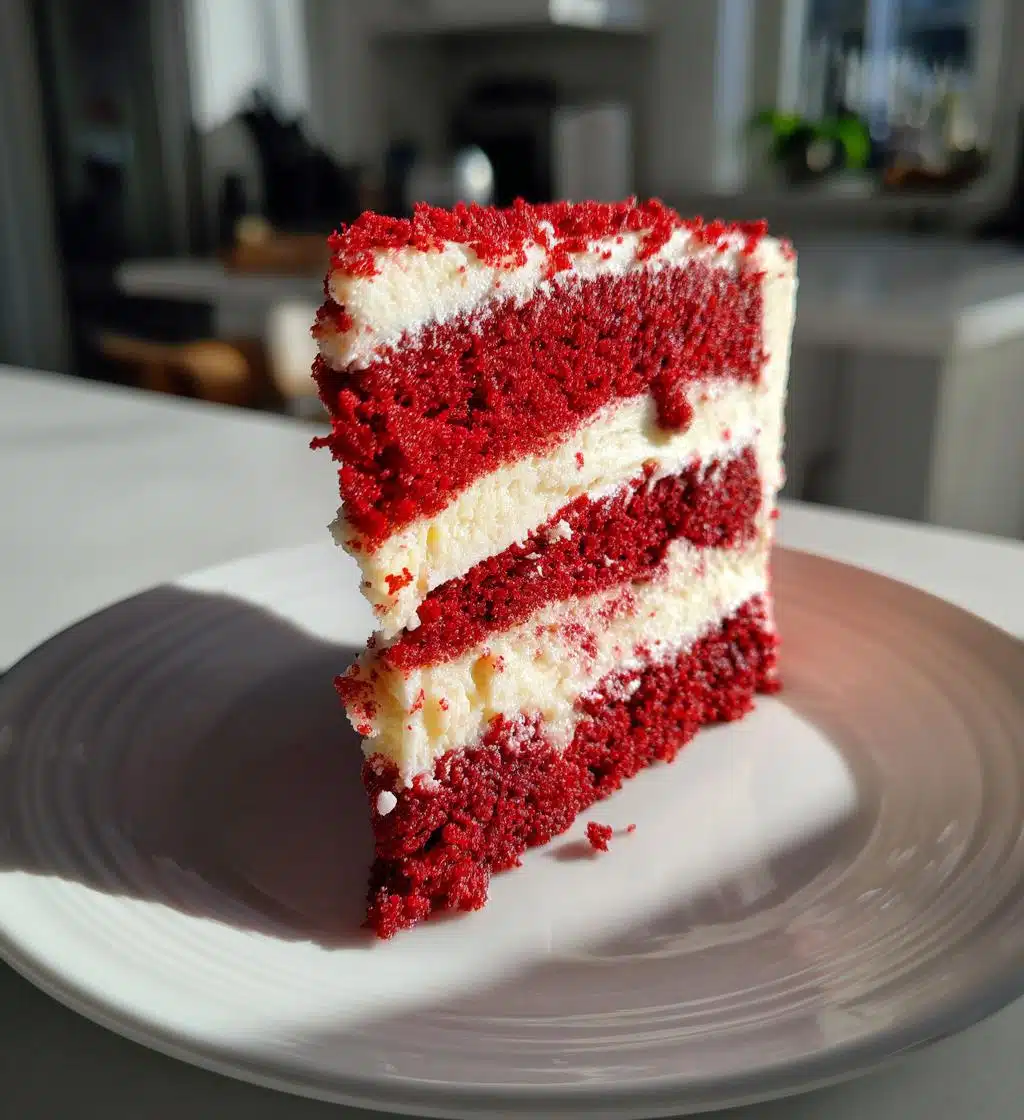
Oh my goodness, let me tell you about this red velvet cheesecake cake! It’s like the ultimate dessert mashup that makes every celebration feel extra special. Picture this: layers of rich, moist red velvet cake paired with the smoothest, creamiest cheesecake filling you can imagine. Seriously, when you slice into it, the vibrant red and creamy white layers are just stunning! It’s a showstopper, whether it’s for a birthday, holiday gathering, or just because you want something fabulous to treat yourself.
I remember the first time I made this beauty—it was for a friend’s anniversary party, and I was so nervous! But the moment I took that first bite, all my worries melted away. The flavors dance together in a way that’s simply irresistible. The slight tang from the cream cheese filling perfectly balances the sweetness of the cake. Trust me when I say that every bite feels like a celebration! So, grab your apron, and let’s dive into making this delightful dessert that’s sure to impress everyone at your table!
Ingredients List
(Tip: You’ll find the full list of ingredients and measurements in the recipe card below.)
- 2 cups all-purpose flour
- 1 cup granulated sugar
- 1 teaspoon baking soda
- 1 teaspoon salt
- 1 cup vegetable oil
- 1 cup buttermilk, at room temperature
- 2 large eggs, lightly beaten
- 2 tablespoons red food coloring (gel works best for vibrant color)
- 1 teaspoon vanilla extract
- 1 teaspoon white vinegar
- 16 oz cream cheese, softened to room temperature
- 1 cup powdered sugar
- 1 teaspoon vanilla extract (for cheesecake filling)
- 1 cup heavy cream, chilled
How to Prepare the Red Velvet Cheesecake Cake
Alright, let’s get down to the nitty-gritty of making this stunning red velvet cheesecake cake! Don’t worry, I’ll walk you through every step, and I promise it’s easier than it looks. The key is to take your time and enjoy the process. So, let’s jump right in!
Prepping the Cake Layers
First things first, you’ll want to preheat your oven to 350°F (175°C). This is crucial because a hot oven means perfectly baked cakes! While that’s heating up, grab your two 9-inch round cake pans and grease and flour them. This will help your cakes come out nice and clean without sticking.
Now, in a medium bowl, whisk together the dry ingredients: 2 cups of all-purpose flour, 1 cup of granulated sugar, 1 teaspoon of baking soda, and 1 teaspoon of salt. Just mix it up until everything’s well combined. In another bowl, combine the wet ingredients: pour in 1 cup of vegetable oil, 1 cup of buttermilk (make sure it’s at room temperature!), 2 lightly beaten large eggs, 2 tablespoons of red food coloring, 1 teaspoon of vanilla extract, and 1 teaspoon of white vinegar. Trust me, that vinegar helps with the cake’s texture and flavor.
Next, slowly mix the wet ingredients into the dry ingredients until you have a smooth batter. Don’t overmix it; just combine until there are no lumps. Divide the batter evenly between the prepared pans and pop them in the oven. Bake for about 25-30 minutes, or until a toothpick comes out clean. Once they’re done, let them cool in the pans for about 10 minutes before transferring them to wire racks to cool completely.
Making the Cheesecake Filling
While your cakes are cooling, let’s whip up that creamy cheesecake filling! In a large bowl, beat 16 ounces of softened cream cheese until it’s smooth and fluffy. It’s essential to have it at room temperature so you don’t end up with lumps. Then, gradually add in 1 cup of powdered sugar and 1 teaspoon of vanilla extract, mixing until everything’s combined.
Now, the magic happens! In another bowl, whip 1 cup of heavy cream until stiff peaks form. This is where it gets really exciting—fold the whipped cream into your cream cheese mixture gently. You want to be careful here to keep that airy texture. Just use a spatula and fold it in a few strokes until it’s beautifully combined. Your cheesecake filling should be rich and luscious at this point!
Assembling the Cake
Alright, it’s time to bring this masterpiece together! Start by placing one layer of your cooled red velvet cake on a serving platter. Spread a generous amount of that creamy cheesecake filling on top. Seriously, don’t be shy! Then, carefully place the second cake layer on top. Now, spread the remaining cheesecake filling over the top of the cake. It should look absolutely divine!
Once it’s all assembled, pop it in the fridge to chill for at least 4 hours—this helps everything set nicely and makes slicing so much easier. Trust me, the wait will be worth it! When you’re ready to serve, just slice it up and watch everyone’s eyes light up. Enjoy every delicious bite!
Nutritional Information
Now, let’s talk about the important stuff—nutrition! Keep in mind that these values can vary depending on the specific ingredients and brands you use, so they’re just estimates. For each slice of this glorious red velvet cheesecake cake, you’re looking at around 450 calories. It packs a punch with about 30 grams of fat, including 15 grams of saturated fat, and gives you around 6 grams of protein. Carbohydrate lovers will enjoy approximately 40 grams, with about 35 grams of sugar. Just remember, it’s a dessert meant to be savored, so take a moment to enjoy every rich bite!
Tips for Success
Alright, let’s make sure you nail this red velvet cheesecake cake! First off, be sure to measure your ingredients accurately. Baking is a science, and even a little too much flour can throw things off. For the best texture, I highly recommend using gel food coloring instead of liquid—trust me, the color will pop so much more!
When it comes to baking, keep an eye on your cakes in the oven. Every oven is a little different, so start checking for doneness at the 25-minute mark. You want that toothpick to come out clean, but don’t overbake, or your cakes will become dry. If you find that your cakes are doming in the center, you can gently press them down with a clean kitchen towel right after they come out of the oven.
And finally, don’t rush the chilling time! Letting the cake set in the fridge for at least 4 hours—or even overnight—makes a huge difference in flavor and texture. You’ll thank yourself when you slice into that perfectly layered masterpiece!
Variations of the Red Velvet Cheesecake Cake
Oh, the possibilities are endless when it comes to jazzing up this red velvet cheesecake cake! One of my favorite twists is to switch up the cheesecake filling. How about a chocolate cheesecake filling? Just melt some chocolate and fold it in for a decadent chocolatey layer that pairs beautifully with the red velvet. You could also try a raspberry swirl by adding a bit of raspberry puree to the cheesecake mixture before folding in the whipped cream—so pretty and tasty!
If you’re feeling adventurous, you can get creative with the cake decorations too! Consider topping it with fresh berries or a drizzle of white chocolate ganache for an elegant touch. Feeling festive? Sprinkle some edible glitter or red and white sprinkles on top to make it pop! Each variation brings a new flavor and flair, so don’t be afraid to experiment and make this cake your own!
Serving Suggestions
When it comes to serving this gorgeous red velvet cheesecake cake, you’ll want to make it a truly delightful experience! I love pairing it with a hot cup of coffee or a rich hot chocolate—the warmth perfectly complements the creamy cake. If you’re feeling fancy, a scoop of vanilla ice cream on the side adds an extra layer of indulgence!
For a light touch, consider serving it with a fresh fruit salad—the fruity notes contrast beautifully with the richness of the cake. And if you’re hosting, don’t forget to whip up some whipped cream to serve alongside; it’s the perfect finishing touch that everyone loves!
Storage & Reheating Instructions
To keep your red velvet cheesecake cake fresh and delicious, store any leftovers in an airtight container in the refrigerator. It’ll stay good for about 4-5 days, but I bet it won’t last that long! If you want to enjoy it later, you can freeze individual slices by wrapping them tightly in plastic wrap and then placing them in a freezer-safe bag. They’ll be good for up to 2 months!
When you’re ready to indulge again, just thaw the slices in the fridge overnight. No need to reheat—this cake is best enjoyed chilled, so just slice and serve! Yum!
Why You’ll Love This Recipe
- Decadent combination of rich red velvet cake and creamy cheesecake
- Perfect for celebrations, holidays, or just satisfying your sweet tooth
- Visually stunning with vibrant colors that impress guests
- Simple steps that make baking feel like a breeze
- Customizable with various cheesecake flavors and toppings
- Leftovers (if there are any!) keep well in the fridge
- Guaranteed to be a crowd-pleaser at any gathering

Delightful Red Velvet Cheesecake Cake for Sweet Memories
- Total Time: 4 hours 30 minutes
- Yield: 12 servings 1x
- Diet: Vegetarian
Description
A rich and creamy red velvet cheesecake cake with layers of moist red velvet cake and smooth cheesecake.
Ingredients
- 2 cups all-purpose flour
- 1 cup granulated sugar
- 1 teaspoon baking soda
- 1 teaspoon salt
- 1 cup vegetable oil
- 1 cup buttermilk
- 2 large eggs
- 2 tablespoons red food coloring
- 1 teaspoon vanilla extract
- 1 teaspoon white vinegar
- 16 oz cream cheese, softened
- 1 cup powdered sugar
- 1 teaspoon vanilla extract (for cheesecake)
- 1 cup heavy cream
Instructions
- Preheat the oven to 350°F (175°C).
- Grease and flour two 9-inch round cake pans.
- In a bowl, mix flour, sugar, baking soda, and salt.
- In another bowl, combine oil, buttermilk, eggs, food coloring, vanilla, and vinegar.
- Mix wet and dry ingredients until smooth.
- Divide the batter between the prepared pans.
- Bake for 25-30 minutes or until a toothpick comes out clean.
- Let cakes cool in pans for 10 minutes, then transfer to wire racks.
- For the cheesecake, beat cream cheese until smooth.
- Add powdered sugar and vanilla, mixing until combined.
- In another bowl, whip heavy cream until stiff peaks form.
- Fold whipped cream into cream cheese mixture.
- Once cakes are cooled, layer one cake with cheesecake filling.
- Top with the second cake and spread remaining cheesecake on top.
- Chill for at least 4 hours before serving.
Latest Amazon Finds


Notes
- Store leftovers in the refrigerator.
- Use gel food coloring for better results.
- Adjust sweetness to your preference.
- Prep Time: 30 minutes
- Cook Time: 30 minutes
- Category: Dessert
- Method: Baking
- Cuisine: American
Nutrition
- Serving Size: 1 slice
- Calories: 450
- Sugar: 35g
- Sodium: 300mg
- Fat: 30g
- Saturated Fat: 15g
- Unsaturated Fat: 10g
- Trans Fat: 0g
- Carbohydrates: 40g
- Fiber: 1g
- Protein: 6g
- Cholesterol: 80mg
Keywords: red velvet, cheesecake, cake, dessert