
Oh my goodness, have you ever tasted a Christmas Mini Pavlova? These little meringue gems are the ultimate festive treat! Light and airy, with a crisp shell that gives way to a soft, marshmallow-like center, they’re simply irresistible. I remember the first time I made them for a holiday gathering; the kitchen filled with the sweet smell of vanilla as they baked, and everyone couldn’t wait to dig in! Trust me, these pavlovas are always a crowd-pleaser, making them the perfect addition to your holiday dessert table!

Ingredients List
- 4 large egg whites (make sure they’re at room temperature for better volume)
- 1 cup granulated sugar (this is key for that lovely crunch!)
- 1 teaspoon vanilla extract (for that delicious flavor)
- 1 teaspoon white vinegar (helps stabilize the meringue)
- 1 cup heavy cream (this will make your pavlovas extra dreamy)
- 2 cups mixed berries (strawberries, blueberries, and raspberries for a colorful topping)
- Powdered sugar for dusting (a little snowy touch to finish them off)
How to Prepare Christmas Mini Pavlovas
Preheat the Oven
First things first, let’s get that oven preheating to 250°F (120°C). This step is super important because a low and slow bake is what gives our pavlovas that perfect crispy exterior while keeping the inside wonderfully soft. Trust me, you want to make sure it’s nice and warm when you pop those meringues in!
Make the Meringue
Now, let’s get to the fun part—making the meringue! In a clean mixing bowl, beat your egg whites until they start to form soft peaks. This is where the magic begins! Gradually add the granulated sugar, a spoonful at a time, while continuing to beat. You want to keep going until you get those gorgeous, glossy stiff peaks. Once you’ve reached that point, gently fold in the vanilla extract and white vinegar. These ingredients not only add flavor but also help stabilize your meringue. So light and fluffy!
Shape and Bake
Next, it’s time to shape your meringues! Spoon the fluffy mixture onto a baking sheet lined with parchment paper. You can make them as big or small as you like, but I usually go for about the size of a tennis ball. Pop them in your preheated oven and bake for an hour. Once that time’s up, turn off the oven and let them cool inside. This is crucial; it helps them dry out properly and prevents cracking. You’ll be amazed at how perfect they look!
Prepare the Topping
While your pavlovas are cooling, let’s whip that heavy cream! In a chilled bowl, beat the heavy cream until you reach soft peaks. You want it fluffy, but not too stiff—you’re going for that luscious texture! Rinse your mixed berries and pat them dry. If you’re feeling fancy, you can even slice the strawberries for a beautiful presentation.
Assemble and Serve
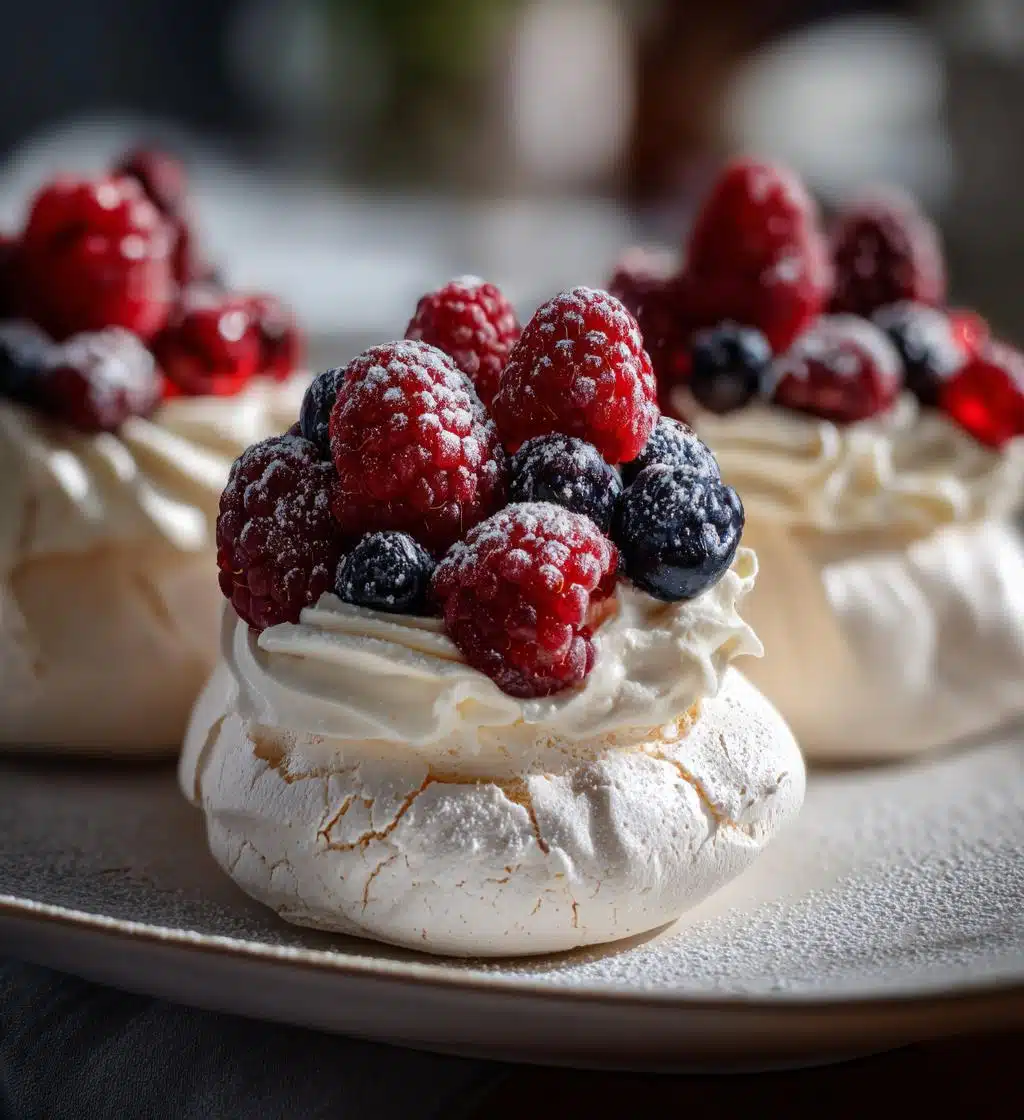
Finally, the best part! Once your meringues are completely cooled, it’s time to assemble. Top each pavlova with a generous dollop of whipped cream, and then pile on those mixed berries. For a final festive touch, dust them lightly with powdered sugar. Wow, right? These little beauties are ready to impress your guests!
Nutritional Information
Now, let’s talk about the numbers! Each Christmas Mini Pavlova is not only a delightful treat but also has some pretty manageable nutritional values. Here’s what you can expect per serving:
- Calories: 150
- Fat: 5g
- Saturated Fat: 3g
- Unsaturated Fat: 2g
- Trans Fat: 0g
- Cholesterol: 20mg
- Sodium: 10mg
- Carbohydrates: 25g
- Fiber: 1g
- Sugar: 20g
- Protein: 2g
Keep in mind that these values are estimates and can vary based on the specific ingredients you use. But hey, who’s counting when you’re indulging in something this delicious? Enjoy every bite guilt-free!
FAQ Section
Can I make these ahead of time?
Absolutely! You can make the Christmas Mini Pavlovas a day in advance. Just whip up the meringues and let them cool as usual. Store them in an airtight container at room temperature until you’re ready to serve. Just hold off on adding the whipped cream and berries until right before serving to keep everything fresh and delicious!
How do I store leftover pavlovas?
To store any leftover pavlovas, carefully place them in an airtight container. It’s best to keep them at room temperature to maintain their delightful texture. If you refrigerate them, the meringues can become a bit chewy, and we want to avoid that! Enjoy them within a couple of days for the best taste!
Can I use different fruits for topping?
Of course! Get creative with your toppings! While mixed berries are a classic choice, you can absolutely use other fruits like kiwi, mango, or even passion fruit for a tropical twist. Just make sure the fruits are fresh and ripe for the best flavor. The more colorful, the better—your Christmas Mini Pavlovas will look stunning on the dessert table!
Why You’ll Love This Recipe
- Simple and quick to prepare, perfect for any skill level!
- Stunning festive presentation that will wow your guests.
- Light and airy texture that melts in your mouth—pure bliss!
- Customizable toppings for endless flavor combinations.
- Gluten-free, making it a great option for everyone to enjoy.
- Can be made ahead of time, easing your holiday stress.
- Deliciously sweet and tart with fresh berries, a holiday classic!
Tips for Success
Alright, let’s make sure your Christmas Mini Pavlovas turn out absolutely perfect! Here are some of my best tips to ensure you achieve that dreamy texture and beautiful results:
- Use Room Temperature Egg Whites: Make sure your egg whites are at room temperature before you start beating them. This helps them whip up to maximum volume, giving you those gorgeous, fluffy peaks!
- Clean Equipment: Ensure your mixing bowl and beaters are completely clean and free from any grease. Even a tiny bit of fat can prevent your egg whites from whipping up properly. I like to wipe my bowl with a little vinegar just for good measure!
- Gradual Sugar Addition: When adding sugar to your egg whites, do it slowly, about a tablespoon at a time. This allows the sugar to dissolve properly and helps create that glossy finish we all love.
- Don’t Open the Oven: Resist the urge to peek while the pavlovas are baking. Opening the oven door can cause a drop in temperature, which may lead to cracks. Just trust the process and let them bake undisturbed!
- Cool in the Oven: Letting the pavlovas cool in the oven with the door slightly ajar helps them dry out without sudden temperature changes, which can cause them to crack. It’s a little trick that makes a big difference!
- Whip Cream to Soft Peaks: When whipping your cream, stop once you reach soft peaks. Over-whipping can turn it grainy and ruin that lovely texture you want to pair with the meringue. Aim for fluffy and smooth!
With these tips in your back pocket, you’ll be on your way to creating the perfect Christmas Mini Pavlovas. Enjoy the process and have fun with it—your guests are going to be so impressed!
Variations
One of the best things about Christmas Mini Pavlovas is their versatility! You can easily mix things up to suit your taste or to impress your guests with something a little different. Here are some fun ideas to personalize your pavlovas:
- Chocolate Drizzle: Melt some dark or white chocolate and drizzle it on top of the whipped cream for a rich twist. You won’t believe how decadent this makes them!
- Citrus Zest: Add a hint of lemon or orange zest to your whipped cream for a zesty kick that balances the sweetness perfectly. It’s a refreshing change!
- Caramel Sauce: A drizzle of homemade or store-bought caramel sauce over the berries adds a deliciously sweet and salty contrast. Trust me, it’s heavenly!
- Nutty Crunch: Sprinkle some chopped nuts, like pistachios or almonds, on top of the whipped cream for an extra layer of texture and flavor. They’ll add a delightful crunch!
- Spiced Pears: Instead of berries, top your pavlovas with poached or spiced pears. Just simmer them in a little sugar and spice mix until tender, and you’ve got a unique holiday treat!
- Seasonal Fruit Medley: Change up the fruit based on what’s in season. Think figs, pomegranates, or even mango for a tropical flair—your pavlovas will look and taste amazing!
Feel free to get creative and mix and match these ideas! The possibilities are endless, and every variation will make your Christmas Mini Pavlovas a delightful surprise for everyone at your holiday table.
Storage & Reheating Instructions
Now, let’s talk about how to keep those delicious Christmas Mini Pavlovas fresh! If you happen to have any leftovers (which is rare, trust me!), here’s what you need to do:
- Store the Meringues: Place any leftover meringues in an airtight container. It’s best to keep them at room temperature to maintain that lovely crispiness. Avoid refrigerating them, as the moisture can make them chewy, and we want to keep that delightful texture!
- Whipped Cream and Berries: If you’ve got leftover whipped cream or berries, store them separately in the refrigerator. The whipped cream should be kept in a sealed container, and the berries can go in a bowl covered with plastic wrap. This way, everything stays fresh until you’re ready to enjoy again!
- No Reheating Needed: You won’t need to reheat the pavlovas. They’re best served fresh and at room temperature, so when you’re ready for a sweet treat, just assemble them with the whipped cream and berries again. It’s like a mini dessert revival!
With these storage tips in mind, you can savor every last bite of your Christmas Mini Pavlovas without worry. Enjoy them over the next couple of days for the best taste experience!
What’s Next?
Wow, I can’t wait to hear how your Christmas Mini Pavlovas turn out! If you try this recipe, please leave a comment below and let me know what you think. I absolutely love reading your thoughts and any creative twists you might add! And if you enjoyed them, don’t forget to rate the recipe—your feedback means the world to me!
Also, if you have your own Christmas Mini Pavlovas stories or tips to share, I’d be thrilled to hear them! Whether it’s a special memory tied to making them or a fun variation you’ve tried, let’s spread the joy of these delightful treats together. Happy baking, and have a wonderful holiday season!
Print
Christmas Mini Pavlovas: 7 Irresistible Festive Delights
- Total Time: 1 hour 20 minutes
- Yield: 12 servings 1x
- Diet: Gluten Free
Description
Delicious individual meringue desserts topped with cream and fruits.
Ingredients
- 4 large egg whites
- 1 cup granulated sugar
- 1 teaspoon vanilla extract
- 1 teaspoon white vinegar
- 1 cup heavy cream
- 2 cups mixed berries
- Powdered sugar for dusting
Instructions
- Preheat the oven to 250°F (120°C).
- Beat egg whites until soft peaks form.
- Gradually add sugar, beating until stiff peaks form.
- Mix in vanilla and vinegar.
- Spoon meringue onto a baking sheet lined with parchment paper.
- Bake for 1 hour, then turn off oven and let meringues cool inside.
- Whip heavy cream until soft peaks form.
- Top cooled meringues with whipped cream and mixed berries.
- Dust with powdered sugar before serving.
Notes
- Store meringues in an airtight container.
- Use fresh berries for the best taste.
- Can be made a day in advance.
- Prep Time: 20 minutes
- Cook Time: 1 hour
- Category: Dessert
- Method: Baking
- Cuisine: Australian
Nutrition
- Serving Size: 1 pavlova
- Calories: 150
- Sugar: 20g
- Sodium: 10mg
- Fat: 5g
- Saturated Fat: 3g
- Unsaturated Fat: 2g
- Trans Fat: 0g
- Carbohydrates: 25g
- Fiber: 1g
- Protein: 2g
- Cholesterol: 20mg
Keywords: Christmas Mini Pavlovas, meringue dessert, holiday dessert