

Oh, the magic of Christmas candy! There’s just something about this sweet, colorful treat that instantly brings holiday cheer into my kitchen. Every year, I whip up a batch of this festive delight, and I can’t tell you how much joy it brings to friends and family. The process is surprisingly simple, and the taste? Wow! It’s like a burst of peppermint bliss wrapped in a shiny, candy-coated package. Trust me, once you get that perfect hard crack stage and see the vibrant red and green swirls, you’ll be hooked! It makes the perfect holiday gift, too—who wouldn’t love a little homemade sweetness during the festive season? Let’s dive into this delicious recipe together!
Ingredients List
- 2 cups granulated sugar
- 1 cup corn syrup
- 1/2 cup water
- 1 teaspoon peppermint extract
- Red and green food coloring
- 1 cup crushed candy canes
How to Prepare Christmas Candy
Making Christmas candy is such a joyful experience, and I promise it’s easier than you might think! Just follow these steps, and you’ll have a delicious batch of candy in no time. Remember, the key here is to keep an eye on your candy thermometer. Let’s get started!
Step-by-Step Instructions
- First, grab a medium saucepan and combine the 2 cups of granulated sugar, 1 cup of corn syrup, and 1/2 cup of water. Set it over medium heat and stir until the sugar dissolves completely. You want to make sure everything is well blended.
- Now, here comes the exciting part! Bring the mixture to a boil but don’t stir. Just let it bubble away until it reaches a magical temperature of 300°F—this is the hard crack stage. It’s crucial for that perfect crunch!
- Once it hits 300°F, carefully remove the saucepan from heat. Be cautious, as the mixture will be super hot and can splatter. Add in the 1 teaspoon of peppermint extract and a few drops of red and green food coloring to create those festive swirls. Stir gently to combine.
- Next, pour the hot candy mixture onto a greased baking sheet. Be sure to spread it out evenly, but don’t worry if it’s not perfect—each piece has its own charm!
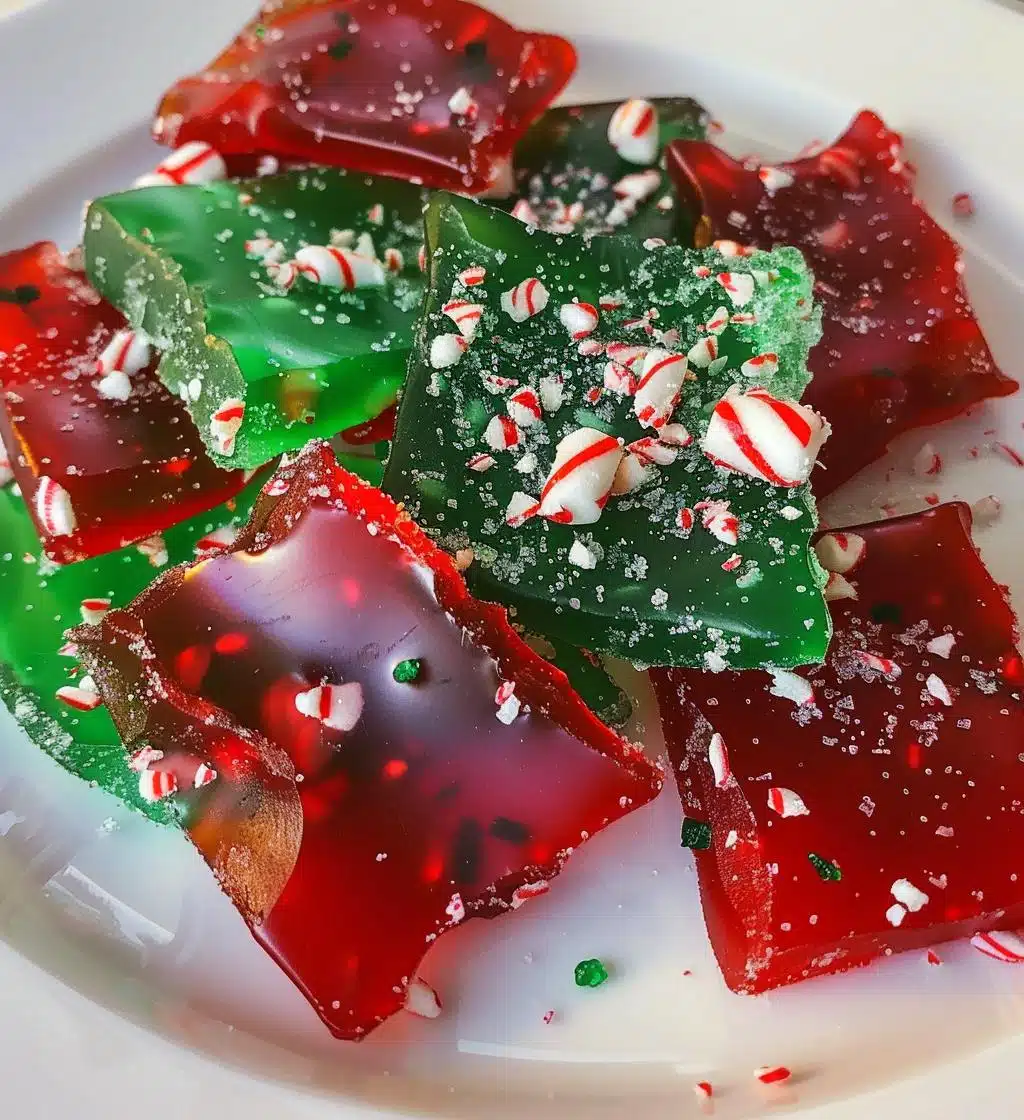
- Before it fully sets, sprinkle 1 cup of crushed candy canes on top. This adds a delightful crunch and a pop of color. Let the candy cool completely at room temperature.
- Once it’s cool and hardened, you can break it into pieces. I love to use a hammer wrapped in a kitchen towel for a fun, therapeutic candy-breaking session!
And there you have it—delicious, homemade Christmas candy ready to be enjoyed or gifted! Just make sure to let it cool completely before you dive in, or you might burn your fingers. Enjoy the festive vibes!
Why You’ll Love This Recipe
Oh, where do I even start? This Christmas candy is not just a treat; it’s an experience! First off, it’s so quick to whip up—seriously, you can have a batch ready in just about 25 minutes! That means more time to sip hot cocoa and enjoy the holiday spirit. Plus, just look at those vibrant red and green colors swirling around; they’re practically begging to be shared at holiday gatherings!
And the flavor? Wow! The refreshing burst of peppermint combined with that satisfying crunch is simply heavenly. It’s like tasting the very essence of Christmas! I can’t tell you how many compliments I get when I gift these little beauties. Trust me, they make the perfect homemade present for friends, family, or even your favorite neighbors. Everyone loves a little sweetness during the holidays, and this candy is sure to spread joy and cheer! So, ready to make some magic happen in your kitchen?
Tips for Success
Okay, friends, let’s talk about some little nuggets of wisdom to ensure your Christmas candy turns out perfectly every time! First and foremost, invest in a good candy thermometer. It’s your best friend in this process! Trust me, the temperature is everything—if it’s too low, your candy won’t set properly, and if it’s too high, well, you’ll have a burnt mess. So, keep that thermometer handy and watch it like a hawk!
Also, when you pour the hot candy onto your greased baking sheet, spread it out gently but don’t fuss over it too much. A rustic look adds to its charm! Just make sure you’re working on a flat surface to avoid any spills. Once you’ve poured it out, resist the urge to poke or prod at it while it cools—let it be! This will help it set nicely without any weird textures.
Speaking of cooling, let the candy sit at room temperature until it’s completely hardened. Patience is key here—don’t rush it! If you’re in a hurry, you can pop it in the fridge for a bit, but I find that letting it cool naturally gives the best results.
Now, when it comes to storage, keep your delicious candy in an airtight container to maintain that perfect crunch. You can layer pieces between parchment paper if you’re stacking them, which keeps them from sticking together. And believe me, they won’t last long, but if by chance you have leftovers, these little treats can last for a couple of weeks—if they even make it that long! So, get ready to enjoy the sweet rewards of your hard work!
Variations
One of the best things about making Christmas candy is how easy it is to customize! I love to play around with different flavors and colors to make each batch unique. Here are some delightful ideas to get your creative juices flowing:
- Different Extracts: While peppermint is a classic, why not switch things up? Try using almond extract for a warm, nutty flavor or vanilla extract for a sweet, creamy touch. Just a teaspoon can transform your candy into something special!
- Color Swaps: Get adventurous with your food coloring! You can use all red or all green for a festive twist, or even try swirling in some blue and white for a winter wonderland theme. The possibilities are endless!
- Toppings Galore: Instead of just crushed candy canes, consider adding chopped nuts like walnuts or pecans for a crunchy texture. You can also sprinkle on some sea salt to balance out the sweetness—sweet and salty is such a winning combo!
- Chocolate Drizzle: For an extra indulgent touch, melt some chocolate and drizzle it over the cooled candy before breaking it into pieces. Dark, milk, or even white chocolate would all be delicious choices for that extra layer of flavor.
- Seasonal Spices: How about adding a pinch of cinnamon or nutmeg to the mix? This gives your candy a cozy, holiday spice that pairs beautifully with the peppermint.
Feel free to experiment! Each variation can become a new favorite, and you might just find a combination that’s perfect for your holiday celebrations. Happy candy-making!
Nutritional Information
Now, before you dive into your delicious Christmas candy, let’s chat about nutritional information. Just a quick heads up: the nutrition values can vary based on the specific ingredients and brands you use, so these are approximate values per piece:
- Serving Size: 1 piece
- Calories: 100
- Sugar: 20g
- Sodium: 5mg
- Fat: 0g
- Saturated Fat: 0g
- Unsaturated Fat: 0g
- Trans Fat: 0g
- Carbohydrates: 25g
- Fiber: 0g
- Protein: 0g
- Cholesterol: 0mg
It’s good to enjoy these sweet treats in moderation, especially during the festive season. So go ahead, treat yourself, and spread the holiday cheer with your homemade Christmas candy!
FAQ Section
As you embark on your journey to make the perfect Christmas candy, you might have some questions. Don’t worry—I’ve got you covered! Here are some common inquiries along with my answers to help you out:
How should I store my Christmas candy?
Store your candy in an airtight container at room temperature. This way, it stays fresh and crunchy! If you live in a particularly humid area, you might want to keep it in the fridge to prevent it from getting sticky.
What’s the shelf life of Christmas candy?
If stored properly, your Christmas candy can last for about two weeks. But let’s be real—it’s so delicious that it probably won’t stick around that long! Just keep an eye on it, and if it starts to lose its crunch, it’s time to enjoy it!
Can I use different types of sugar?
Absolutely! If you want to play around, you can substitute some of the granulated sugar with brown sugar for a deeper flavor. Just keep in mind it might slightly alter the texture and color of your candy.
What if I don’t have a candy thermometer?
If you find yourself without a candy thermometer, you can do the cold water test! Drop a small amount of the hot candy mixture into a bowl of cold water. If it forms a hard ball, you’re at the right stage! Just remember to be careful with the hot mixture—it can splatter!
Can I make this candy vegan?
Yes, you can! While the ingredients are pretty straightforward, just be sure to use a corn syrup that is free of animal products, and check your peppermint extract to ensure it’s vegan-friendly as well. It’s a sweet treat everyone can enjoy!
What can I do if my candy doesn’t set?
If your candy doesn’t set, it might be because it didn’t reach the hard crack stage. Don’t worry; you can reheat the mixture, bringing it back to 300°F, and try again! Just make sure to be cautious—sugar can become extremely hot!
Can I add other flavors or colors?
Absolutely! Feel free to get creative! You can use different extracts, like almond or vanilla, and play with various food colors to create your perfect holiday masterpiece. The sky’s the limit!
Hopefully, this clears things up for you! Don’t hesitate to reach out if you have any more questions as you whip up your own festive batch of Christmas candy. Happy cooking!
Storage & Reheating Instructions
Alright, let’s talk about how to keep that delightful Christmas candy fresh and crunchy! After all the hard work you put into making it, you want to enjoy every last piece, right? The best way to store your leftover candy is in an airtight container. This keeps moisture out and helps maintain that perfect crunch! I like to layer the pieces with parchment paper if I’m stacking them, so they don’t stick together—such a simple trick!
Store your candy at room temperature in a cool, dry place, and it should last for about two weeks. However, if you live in a humid area, it might be a good idea to pop it in the fridge to prevent it from getting sticky. Just remember to let it come back to room temperature before you dig in; the texture is simply better that way!
Now, a quick note on reheating: there’s really no need to reheat this candy, as it’s meant to be enjoyed cold and crunchy! So go ahead, stash it away, and enjoy your delicious homemade Christmas candy whenever the mood strikes! Trust me, each bite is worth the wait!
Print
Christmas Candy: 5 Steps to Sweet Festive Bliss
- Total Time: 25 minutes
- Yield: 20 pieces 1x
- Diet: Vegetarian
Description
A festive treat perfect for the holiday season.
Ingredients
- 2 cups sugar
- 1 cup corn syrup
- 1/2 cup water
- 1 teaspoon peppermint extract
- Red and green food coloring
- 1 cup crushed candy canes
Instructions
- Combine sugar, corn syrup, and water in a saucepan over medium heat.
- Stir until the sugar dissolves.
- Bring the mixture to a boil without stirring.
- Cook until it reaches 300°F (hard crack stage).
- Remove from heat and add peppermint extract and food coloring.
- Pour onto a greased baking sheet.
- Sprinkle crushed candy canes on top.
- Allow to cool and break into pieces.
Notes
- Store in an airtight container.
- Use a candy thermometer for best results.
- Prep Time: 15 minutes
- Cook Time: 10 minutes
- Category: Candy
- Method: Boiling
- Cuisine: American
Nutrition
- Serving Size: 1 piece
- Calories: 100
- Sugar: 20g
- Sodium: 5mg
- Fat: 0g
- Saturated Fat: 0g
- Unsaturated Fat: 0g
- Trans Fat: 0g
- Carbohydrates: 25g
- Fiber: 0g
- Protein: 0g
- Cholesterol: 0mg
Keywords: Christmas candy, holiday treats, sweet recipes