
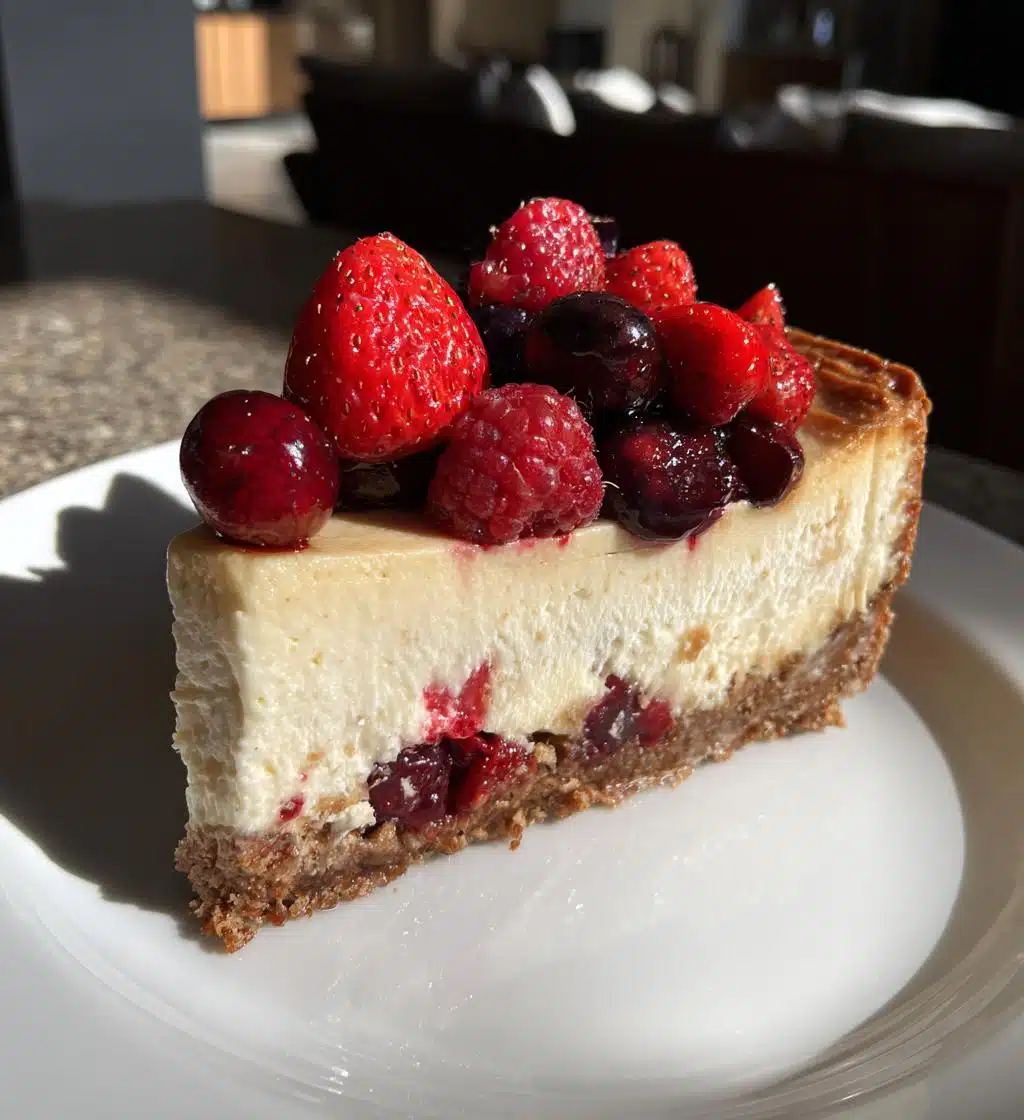
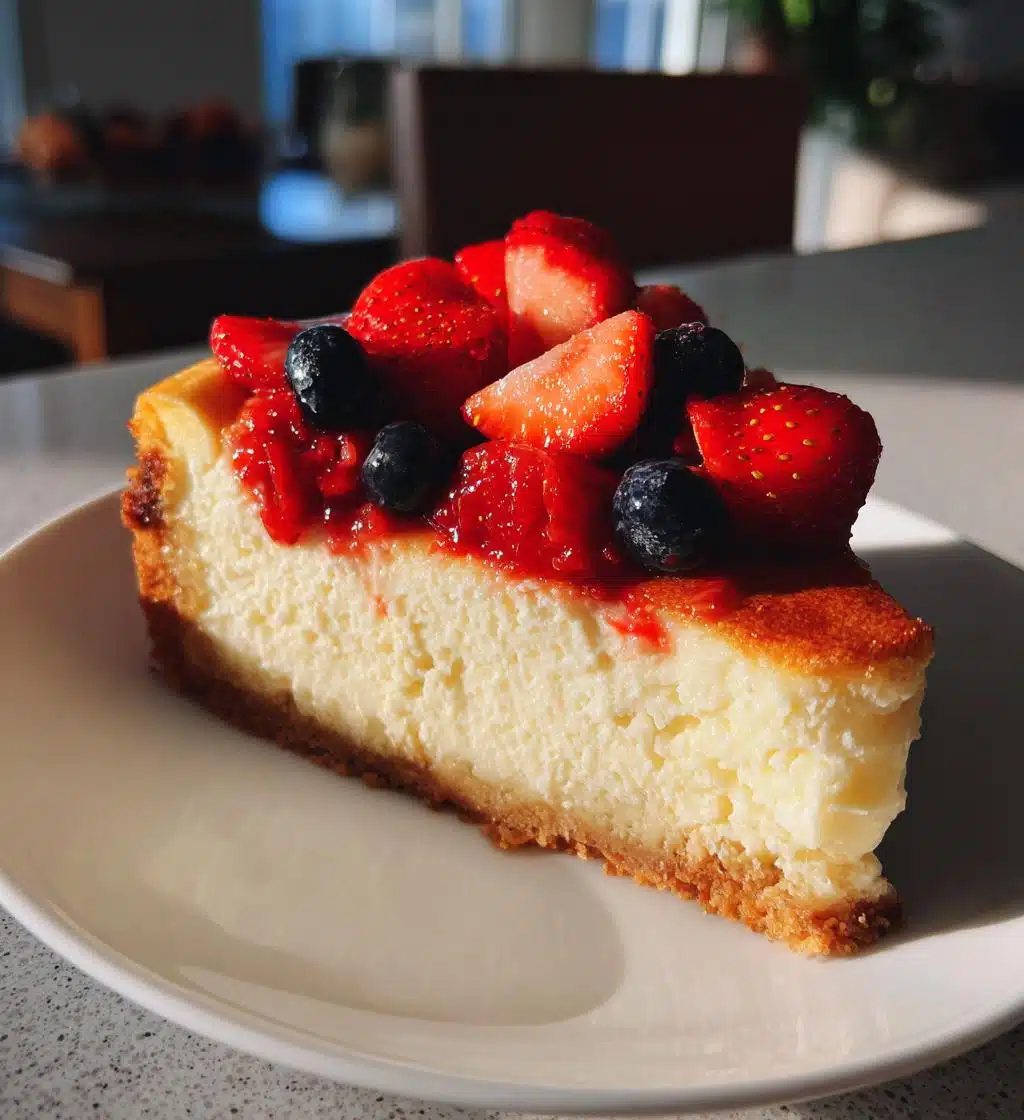
Let me tell you why my baked vegan cheesecake gluten free is an absolute showstopper! I mean, who doesn’t love a dessert that’s both indulgent and guilt-free? This cheesecake is creamy, dreamy, and oh-so-delicious, thanks to the rich cashew base and velvety coconut cream. I adore how it’s naturally gluten-free, making it perfect for everyone, including those with dietary restrictions. Trust me, once you take that first bite, you’ll be hooked on its luscious texture and bright flavors from the lemon juice. It’s the kind of dessert that makes you feel good about treating yourself!
Ingredients List
Here’s what you’ll need to whip up this amazing baked vegan cheesecake gluten free. I promise, it’s super straightforward and uses simple, wholesome ingredients!
- 1 1/2 cups almond flour
- 1/4 cup coconut oil, melted
- 1/4 cup maple syrup (for a touch of natural sweetness)
- 2 cups cashews, soaked for at least 4 hours (this is key for that creamy texture!)
- 1/2 cup coconut cream (the creamier, the better!)
- 1/4 cup fresh lemon juice (don’t skimp on this, it brightens everything up)
- 1 teaspoon vanilla extract (for that lovely aromatic flavor)
- 1/4 cup agave syrup (for extra sweetness, if you like it sweet!)
- 1/4 teaspoon salt (to enhance all those delicious flavors)
Make sure to have everything prepped and ready to go, especially those soaked cashews! They’re the secret to achieving that smooth and rich filling you’ll absolutely love.
How to Prepare Instructions
Ready to dive into making this baked vegan cheesecake gluten free? Let’s get started! I promise you’ll find it’s easier than you think, and the end result is just divine. Follow these steps and take your time to enjoy the process!
Step-by-Step Instructions
- First, preheat your oven to 350°F (175°C). This ensures that your cheesecake bakes evenly and beautifully.
- In a mixing bowl, combine the almond flour, melted coconut oil, and maple syrup. Stir until everything is well blended and looks like a crumbly mixture.
- Now, grab your springform pan! Press the almond mixture firmly into the bottom of the pan to form an even crust. This will be the base of your cheesecake.
- Bake the crust in the oven for about 10 minutes, just until it’s slightly golden and set. This little pre-bake gives it a nice texture!
- While that’s baking, let’s make the filling! In a high-speed blender, add the soaked cashews, coconut cream, lemon juice, vanilla extract, agave syrup, and salt. Blend until it’s super smooth and creamy—this is where the magic happens!
- Once your crust is done baking, take it out of the oven and pour the creamy mixture over the crust in the springform pan. Smooth the top with a spatula for an even finish.
- Pop the cheesecake back in the oven and bake for 45 minutes. You want it to be set but still a bit jiggly in the center—that’s how you know it’ll be perfectly creamy!
- After baking, remove it from the oven and let it cool down to room temperature. Then, refrigerate it for at least 4 hours (or overnight, if you can wait!). This chilling time is crucial for the flavors to meld and the texture to set.
And there you have it! You’ve made a delicious baked vegan cheesecake gluten free that’s sure to impress. Trust me, the wait will be worth it!
Why You’ll Love This Recipe
- Quick and easy to prepare—perfect for when you need a dessert in a hurry!
- Deliciously creamy texture that will leave you craving more.
- Naturally gluten-free, so it’s a great option for everyone at the table.
- Healthy and satisfying, making it a guilt-free indulgence!
- Perfect for any occasion, from casual family dinners to fancy gatherings.
Tips for Success
Alright, let’s make sure your baked vegan cheesecake gluten free turns out absolutely perfect! Here are my top tips that I’ve gathered from my own baking adventures:
- Soak those cashews: This is non-negotiable! Make sure you soak your cashews for at least 4 hours (or overnight if you plan ahead). It softens them up, giving you that ultra-smooth and creamy texture in your cheesecake. Trust me, it makes all the difference!
- Fresh ingredients are key: Use fresh lemon juice instead of bottled for the best flavor. It really brightens up the cheesecake and enhances the overall taste. Your taste buds will thank you!
- Blend until creamy: When you’re making the filling, don’t be shy with your blender! Blend until it’s completely smooth. Any lumps will ruin that silky texture you’re aiming for. If your blender struggles, add a little more coconut cream to help it along.
- Check for doneness: Keep an eye on your cheesecake as it bakes. It should be set around the edges but still have a slight jiggle in the center when you take it out. It will firm up as it cools, so don’t overbake!
- Chill for the win: Patience is key! After baking, let your cheesecake cool to room temperature before refrigerating it for at least 4 hours. This chilling time allows the flavors to meld beautifully and gives the cheesecake its perfect texture.
- Don’t rush the release: When it’s time to take your cheesecake out of the springform pan, be gentle. Run a knife around the edge to help loosen it first. This will prevent any mishaps and keep your cheesecake looking pristine!
With these tips, you’re set for success! Enjoy every moment of the process and get ready to impress everyone with your delicious creation!
Variations
One of the best things about this baked vegan cheesecake gluten free is how versatile it is! You can easily mix things up to suit your taste or the occasion. Here are some fun ideas to customize your cheesecake:
- Chocolate Delight: Add 1/2 cup of melted dark chocolate or cocoa powder to the filling for a rich, chocolatey twist. You can even swirl it in for a marbled effect!
- Berry Bliss: Blend in 1 cup of fresh or frozen berries (like raspberries or strawberries) into the filling for a fruity flavor explosion. Top with extra berries once it’s cooled for a beautiful presentation!
- Nutty Banana: Mash in a ripe banana to the filling for a subtle sweetness and a hint of banana flavor. Top with toasted walnuts for a delightful crunch!
- Coconut Lime: Swap the lemon juice for lime juice and add some lime zest to the filling. This gives it a refreshing tropical taste that’s perfect for summer!
- Spiced Pumpkin: Mix in 1 cup of pumpkin puree and a teaspoon of pumpkin spice for a cozy fall-inspired cheesecake. It’s like a slice of autumn bliss!
- Caramel Drizzle: Drizzle homemade or store-bought vegan caramel sauce over the top just before serving. It adds a decadent sweetness that pairs perfectly with the creamy cheesecake.
Feel free to get creative with toppings too! Whipped coconut cream, shredded coconut, or even a sprinkle of crushed nuts can add a lovely finishing touch. The possibilities are endless, so go ahead and make it your own!
Storage & Reheating Instructions
So, you’ve made this fabulous baked vegan cheesecake gluten free, and now you’re wondering how to store those leftovers, right? No worries, I’ve got you covered! Proper storage will keep your cheesecake fresh and delicious for days to come.
First things first, if you have any leftover cheesecake, make sure to cover it tightly. You can use plastic wrap or transfer it to an airtight container. This will help prevent any strange fridge odors from sneaking in and affecting that lovely flavor you worked hard on!
Store the cheesecake in the refrigerator for up to 5 days. It’s best served chilled, so you don’t even need to worry about reheating it. Just slice off a piece and enjoy it cold, and trust me, it’s just as delightful the next day!
If you’ve got more than you can eat, consider freezing it! Slice your cheesecake and wrap each piece tightly in plastic wrap, then place the wrapped slices in a freezer-safe bag or container. This way, you can pull out a slice whenever the craving hits! It’ll last in the freezer for up to 2 months.
When you’re ready to enjoy a frozen slice, just take it out and let it thaw in the fridge overnight. No need to reheat—this cheesecake is best enjoyed cold and creamy. If you want to add a little flair, feel free to top it with fresh fruits or a drizzle of your favorite sauce just before serving!
With these simple storage tips, you can savor your delicious baked vegan cheesecake gluten free long after you’ve made it. Get ready for a delightful treat whenever you want it!
Nutritional Information Section
Now, let’s talk about the nutritional goodness packed into this baked vegan cheesecake gluten free! Here’s a rough estimate of what you can expect per slice, based on typical values:
- Calories: 280
- Fat: 20g
- Saturated Fat: 10g
- Unsaturated Fat: 8g
- Trans Fat: 0g
- Carbohydrates: 28g
- Fiber: 3g
- Sugar: 10g
- Protein: 5g
- Sodium: 50mg
- Cholesterol: 0mg
Keep in mind that these values are estimates and can vary based on the specific ingredients you use. But what’s wonderful about this cheesecake is that it’s not just delicious; it’s also packed with wholesome ingredients that make it a healthier dessert choice. Enjoy indulging without the guilt!
FAQ Section
Got questions about my baked vegan cheesecake gluten free? Don’t worry, I’ve got answers! Here are some common queries I receive, and I’m excited to help you out:
Can I use other nuts instead of cashews?
Absolutely! While cashews provide that creamy texture, you can experiment with soaked macadamia nuts or even silken tofu for a different flavor profile. Just keep in mind that it may change the consistency a bit, but it’ll still be delicious!
What if I’m allergic to nuts?
If nuts are off the table for you, try using a blend of sunflower seeds or pumpkin seeds. Soak them just like cashews, and blend until smooth. It might have a slightly different flavor, but it’ll still be a treat!
Can I make this recipe without coconut oil?
Sure! You can substitute coconut oil with vegan butter or even extra virgin olive oil, depending on your taste preference. Just remember that it may slightly alter the flavor and texture, but it should still work out well!
How can I serve this cheesecake?
This cheesecake is delightful on its own, but you can dress it up with toppings! Fresh fruits, a drizzle of vegan caramel, or a sprinkle of crushed nuts can elevate it to a whole new level. Get creative with your presentation!
Can I use a store-bought crust?
Absolutely! If you’re short on time, a gluten-free store-bought crust can save the day. Just make sure to check the ingredients to ensure it aligns with your dietary needs. It’s all about making it work for you!
Is this cheesecake freezer-friendly?
Yes, it is! Just slice it up and wrap each piece tightly in plastic wrap before storing in a freezer-safe container. It can be frozen for up to 2 months. Just thaw overnight in the fridge when you’re ready to enjoy a slice!
How long can I keep leftovers?
Leftover cheesecake can be stored in the fridge for up to 5 days. Just make sure to cover it well to keep it fresh. It’s best served cold, so there’s no need to reheat!
If you have any more questions or need further tips, feel free to ask! I’m here to help you create the best baked vegan cheesecake gluten free experience ever!
Print
Baked Vegan Cheesecake Gluten Free: 7 Irresistible Tips
- Total Time: 4 hours 5 minutes
- Yield: 8 servings 1x
- Diet: Vegan
Description
A delicious baked vegan cheesecake that is gluten free.
Ingredients
- 1 1/2 cups almond flour
- 1/4 cup coconut oil, melted
- 1/4 cup maple syrup
- 2 cups cashews, soaked
- 1/2 cup coconut cream
- 1/4 cup lemon juice
- 1 teaspoon vanilla extract
- 1/4 cup agave syrup
- 1/4 teaspoon salt
Instructions
- Preheat the oven to 350°F (175°C).
- In a bowl, mix almond flour, melted coconut oil, and maple syrup.
- Press the mixture into the bottom of a springform pan.
- Bake the crust for 10 minutes.
- In a blender, combine soaked cashews, coconut cream, lemon juice, vanilla extract, agave syrup, and salt.
- Blend until smooth and creamy.
- Pour the mixture over the crust in the pan.
- Bake for 45 minutes.
- Let cool and refrigerate for at least 4 hours before serving.
Notes
- Make sure cashews are soaked for at least 4 hours.
- Use fresh lemon juice for the best flavor.
- Top with fresh fruits if desired.
- Prep Time: 20 minutes
- Cook Time: 45 minutes
- Category: Dessert
- Method: Baking
- Cuisine: Vegan
Nutrition
- Serving Size: 1 slice
- Calories: 280
- Sugar: 10g
- Sodium: 50mg
- Fat: 20g
- Saturated Fat: 10g
- Unsaturated Fat: 8g
- Trans Fat: 0g
- Carbohydrates: 28g
- Fiber: 3g
- Protein: 5g
- Cholesterol: 0mg
Keywords: baked vegan cheesecake, gluten free cheesecake, vegan dessert