
Hey there, fellow food lovers! I’m so excited to share my secret to making the *best* oil free hummus you’ll ever taste! Seriously, this recipe is a game changer. It’s creamy, dreamy, and packed with flavor, all while keeping things light and healthy. I’ve always loved hummus, but sometimes the added oils can make it feel a bit heavy. This oil free version keeps all the deliciousness without the extra calories, so you can enjoy it guilt-free. Trust me, once you whip this up in your kitchen, you’ll be hooked!
Why You’ll Love This Recipe
This oil free hummus is not just a dip; it’s a lifestyle choice! You’re going to love how quick and easy it is to whip up at home, and the flavor? Absolutely incredible! It’s perfect for snacking, spreading, or even as a tasty addition to your meals. Plus, it’s healthy, vegan, and packed with goodness. You’ll feel amazing knowing you’re indulging in something nutritious that satisfies your cravings. Seriously, this hummus is a delightful way to add flavor to your day without any guilt!
Quick and Easy
I mean, who doesn’t love a recipe that takes just 10 minutes? With a few simple ingredients and a trusty blender, you’ll have this creamy, dreamy hummus ready to go in no time. It’s perfect for those busy days when you want something delicious, but don’t have hours to spend in the kitchen. Just toss everything in, blend it up, and voilà! You’re ready to dig in!
Healthy Option
This oil free hummus is a powerhouse of nutrition. With chickpeas as the base, it’s loaded with protein and fiber, making it a satisfying snack that keeps you full. The tahini and lemon juice add a creamy texture and zesty flavor without any unhealthy fats. Plus, it’s completely vegan! So, you can enjoy it knowing you’re making a healthy choice that’s as good for your body as it is for your taste buds. Wow, what’s not to love?
Ingredients List
Get ready to gather some simple yet delightful ingredients for your oil free hummus! Here’s what you’ll need:
- 1 can (15 oz) chickpeas, drained and rinsed
- 1/4 cup tahini
- 1/4 cup lemon juice
- 2 cloves garlic, minced
- 1/2 teaspoon cumin
- Salt to taste
- Water as needed for consistency
These ingredients come together to create a smooth, creamy, and oh-so-tasty hummus that you’ll want to make again and again. Trust me, you’ll be amazed at how delicious something so simple can be! Happy cooking!
How to Prepare Oil Free Hummus
Alright, let’s get down to the good stuff—making your oil free hummus! This part is so straightforward, you’ll be amazed at how easy it is. Just follow these simple steps, and you’ll have a delicious dip ready in no time!
Step-by-Step Instructions
- First, grab your blender or food processor. This is where the magic happens!
- Next, toss in your drained and rinsed chickpeas. You want to make sure they’re nice and clean for the best flavor.
- Now, add in the tahini, lemon juice, minced garlic, and cumin. Wow, can you smell that? It already smells amazing!
- Blend everything together until it’s super smooth. If you find it’s a bit thick (which can happen), don’t worry! Just add water a tablespoon at a time until you reach that creamy consistency you love.
- Once it’s blended to perfection, stop and taste it. This is your moment to shine! Sprinkle in some salt to taste, and give it another quick blend to mix it all in.
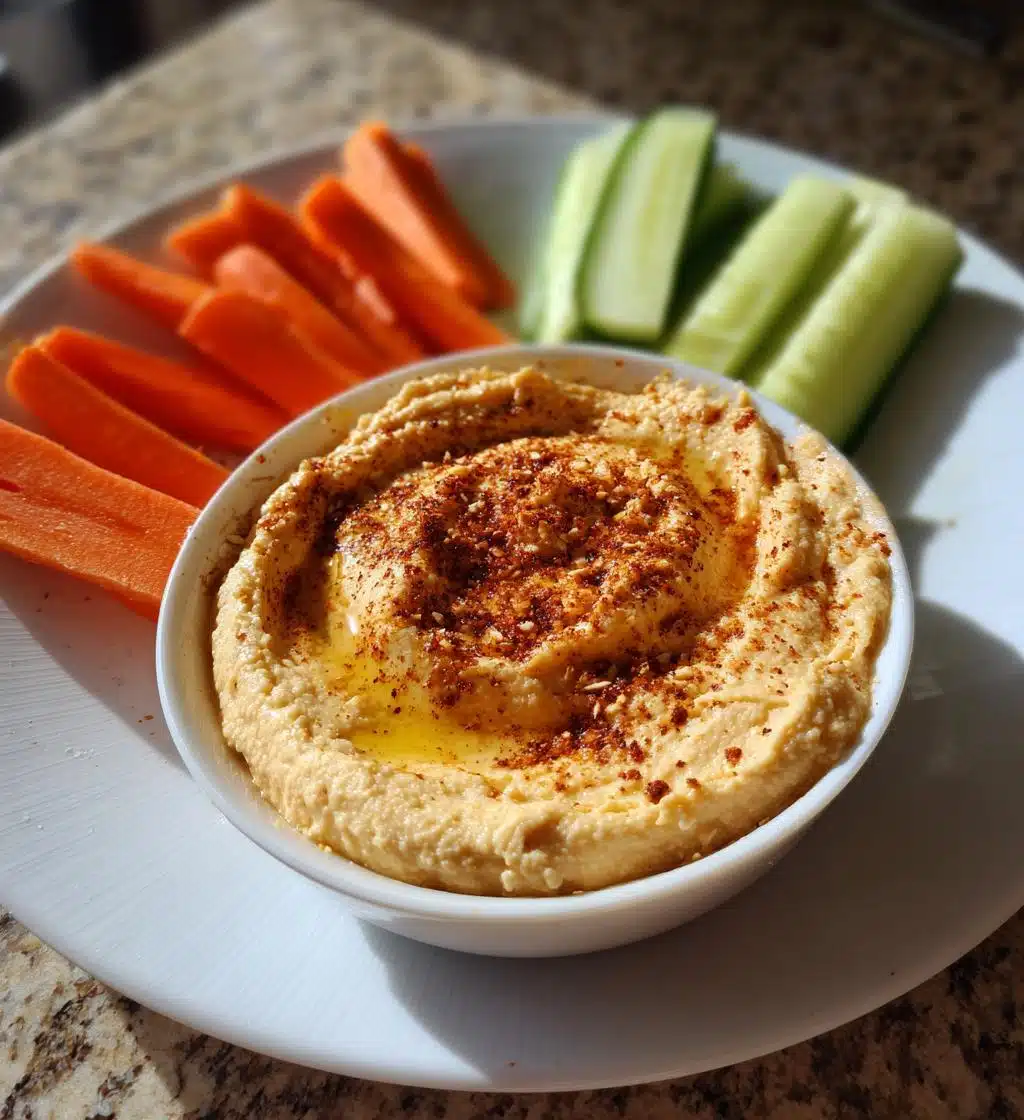
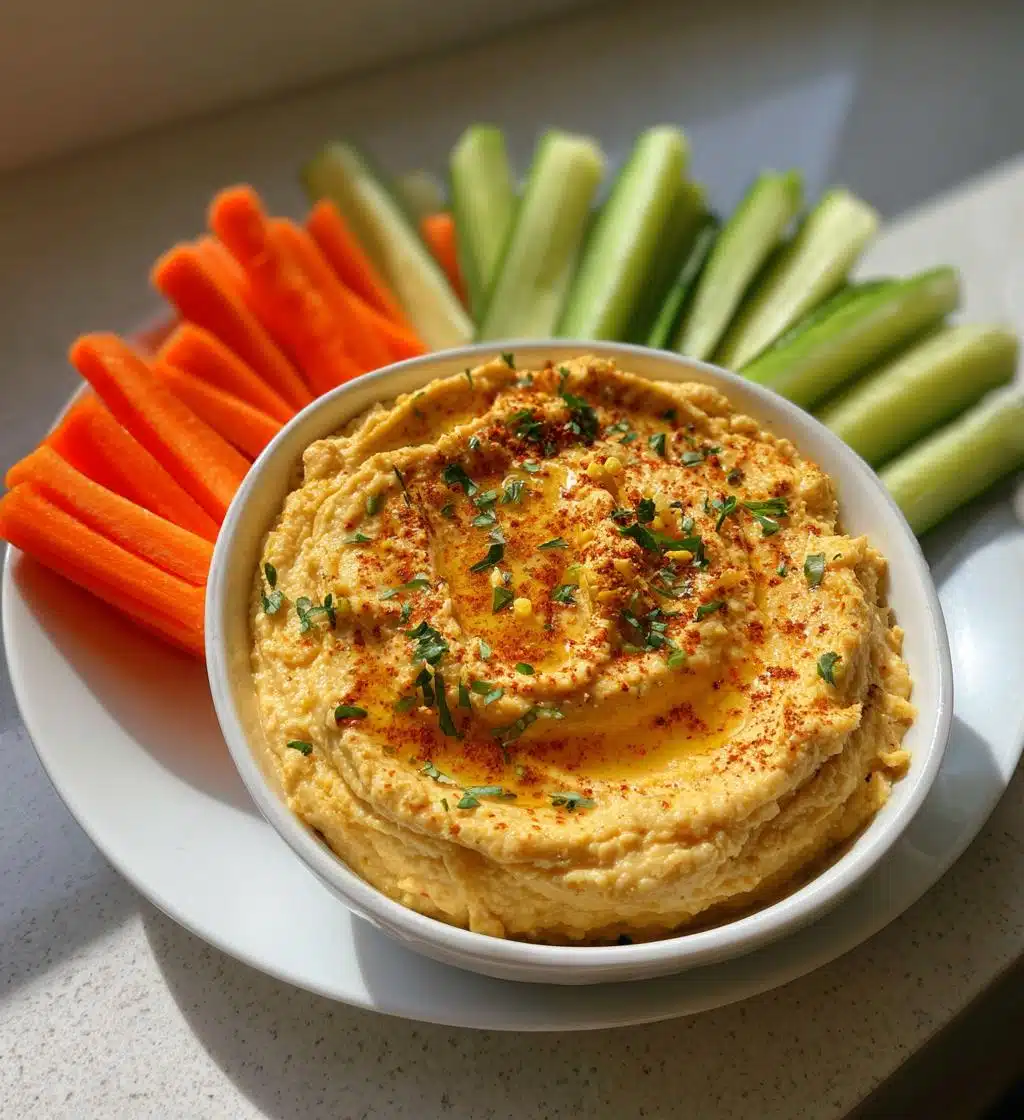
- Finally, scoop it out into a lovely serving bowl and get ready to enjoy your homemade oil free hummus with some fresh veggies or pita. Yum!
And there you have it! You’ve just made a delicious oil free hummus that’s sure to impress. How easy was that? I can’t wait for you to dive in and enjoy every bite!
Nutritional Information
Now, let’s talk about the goodness packed into this oil free hummus! Here’s a quick overview of the nutritional values per serving (about 2 tablespoons). Keep in mind, these are estimates, but they give you a great idea of how wholesome this dip is:
- Calories: 50
- Fat: 2g
- Saturated Fat: 0g
- Unsaturated Fat: 2g
- Trans Fat: 0g
- Carbohydrates: 8g
- Fiber: 2g
- Sugar: 1g
- Protein: 2g
- Sodium: 50mg
- Cholesterol: 0mg
Isn’t that fantastic? With all that protein and fiber, you’ll feel satisfied and energized. Plus, it’s guilt-free, so you can enjoy it with all your favorite dippers! Remember, it’s not just about eating well; it’s about feeling good too!
Tips for Success
Alright, let’s make sure your oil free hummus turns out absolutely perfect every time! Here are some of my favorite tips to help you achieve the best results:
- Rinse those chickpeas well: This step is super important! Rinsing helps remove any excess salt and the canning liquid, which can affect the flavor. Plus, it makes for a smoother texture!
- Adjust garlic to your liking: If you’re a garlic lover like me, feel free to add an extra clove! But if you prefer a milder taste, stick to the recipe. You can always add more, but you can’t take it out!
- Consistency is key: Don’t be afraid to adjust the water! Start with a little and keep blending until you get that dreamy, creamy consistency. It’s all about personal preference!
- Chill before serving: If you have time, let your hummus sit in the fridge for at least 30 minutes before serving. This lets all those flavors meld together beautifully. Trust me, it’s worth the wait!
- Experiment with spices: Once you’ve mastered the basic recipe, go wild! Try adding smoked paprika, cayenne pepper for a kick, or fresh herbs like parsley or cilantro. Each addition can elevate your hummus to a whole new level!
With these tips in your back pocket, you’re all set to create the most delicious oil free hummus that’ll impress your friends and family. Happy blending!
Variations
Now that you’ve mastered the basic oil free hummus, let’s have some fun with variations! The beauty of this recipe is that it’s incredibly versatile, and you can easily tweak it to suit your taste buds or whatever ingredients you have on hand. Here are some fun ideas to keep your hummus exciting:
- Herbed Delight: Add a handful of fresh herbs like basil, parsley, or cilantro for a refreshing twist. Just toss them in before blending for that burst of flavor!
- Spicy Kick: If you like it hot, sprinkle in some cayenne pepper or red pepper flakes. You can also blend in a chopped jalapeño for an extra punch!
- Roasted Red Pepper: For a smoky sweetness, add some roasted red peppers. They’ll give your hummus a beautiful color and a delightful flavor.
- Avocado Creaminess: Blend in half an avocado for an ultra-creamy texture. It adds healthy fats and a delicious twist that’s oh-so-good!
- Lemon Zest: For an extra zesty kick, grate some lemon zest into the mix. It brightens up the flavor and makes it even more refreshing!
- Smoky Flavor: Add a teaspoon of smoked paprika or liquid smoke for a deep, smoky taste. It’s like a barbecue party in your mouth!
Feel free to mix and match these ideas or come up with your own! The sky’s the limit when it comes to flavoring your oil free hummus. So, get creative and enjoy the process—you might just stumble upon your new favorite combination!
Storage & Reheating Instructions
Alright, let’s talk about how to store your delicious oil free hummus and keep it fresh for later! I always like to make a big batch because it disappears quickly in my house, but sometimes you’ve just got to save some for another day. Here’s how to do it right:
First off, make sure your hummus is completely cool before storing it. Then, transfer it to an airtight container. This is super important to keep it fresh and prevent any funky fridge odors from seeping in. You can store it in the refrigerator for up to 5 days. Just give it a good stir before serving again, as it may thicken slightly while sitting. No biggie!
If you want to keep your hummus for a longer time, you can freeze it! Just scoop it into a freezer-safe container, leaving a little space at the top for expansion as it freezes. It’ll last in the freezer for about 2 months. When you’re ready to enjoy it again, simply thaw it overnight in the fridge. If it seems a bit thick after thawing, just mix in a little water to get that creamy consistency back!
One quick note: I usually don’t recommend reheating hummus in the microwave because it can change the texture. Instead, just enjoy it cold or let it come to room temperature before diving in. Trust me, it tastes just as amazing! So go ahead and whip up a big batch of this oil free hummus; you’ll love having it on hand for snacking or meals throughout the week!
FAQ Section
Can I use dried chickpeas instead of canned?
Absolutely! If you prefer using dried chickpeas, just soak them overnight and cook them until tender before blending. It might take a little longer, but the flavor is worth it!
What can I serve with oil free hummus?
Oh, the possibilities are endless! Fresh veggies like carrots, cucumbers, and bell peppers are fantastic dippers. You can also pair it with whole grain pita, crackers, or even spread it on sandwiches!
How can I make my hummus creamier?
If you’re looking for that ultra-creamy texture, make sure to blend it well and add enough water gradually until you reach your desired consistency. You can also try using a high-speed blender for an even smoother result!
Can I make this hummus ahead of time?
Definitely! In fact, letting it sit in the fridge for a few hours or overnight allows the flavors to meld beautifully. Just give it a stir before serving!
Is this hummus gluten-free?
Yes! This oil free hummus is naturally gluten-free, so it’s perfect for anyone with gluten sensitivities. Just be sure to check any dippers or accompaniments for gluten content.

Oil Free Hummus: 5 Reasons You’ll Love This Guilt-Free Dip
- Total Time: 10 minutes
- Yield: 2 cups 1x
- Diet: Vegan
Description
A healthy, oil-free version of traditional hummus.
Ingredients
- 1 can (15 oz) chickpeas, drained and rinsed
- 1/4 cup tahini
- 1/4 cup lemon juice
- 2 cloves garlic, minced
- 1/2 teaspoon cumin
- Salt to taste
- Water as needed for consistency
Instructions
- Combine chickpeas, tahini, lemon juice, garlic, and cumin in a blender.
- Blend until smooth.
- Add water gradually to reach desired consistency.
- Season with salt to taste.
- Serve with fresh vegetables or whole grain pita.
Notes
- Adjust garlic to your preference.
- Store leftovers in the refrigerator for up to 5 days.
- Prep Time: 10 minutes
- Cook Time: 0 minutes
- Category: Dip
- Method: Blending
- Cuisine: Middle Eastern
Nutrition
- Serving Size: 2 tablespoons
- Calories: 50
- Sugar: 1g
- Sodium: 50mg
- Fat: 2g
- Saturated Fat: 0g
- Unsaturated Fat: 2g
- Trans Fat: 0g
- Carbohydrates: 8g
- Fiber: 2g
- Protein: 2g
- Cholesterol: 0mg
Keywords: oil free hummus, healthy hummus, vegan dip