

Oh my goodness, let me tell you about the joy of making Pita Pizzas! They’re not just quick and easy; they’re like a blank canvas for your culinary creativity. Imagine this: crispy, warm pitas topped with your favorite sauces, cheeses, and toppings all baked to perfection. It’s such a fun way to involve the whole family in dinner prep, and you can customize each one to suit everyone’s taste. Got leftover veggies? Toss them on! Craving something spicy? Add some jalapeños! Seriously, these Pita Pizzas are the ultimate weeknight dinner solution—ready in just about 20 minutes, and so delicious! You’ll wonder why you didn’t try them sooner!
Ingredients List
Here’s what you’ll need to whip up these delightful Pita Pizzas. Trust me, everything is super straightforward, and you might even have some of these ingredients on hand!
- 4 pita breads – You can use regular or whole wheat, depending on your preference for a healthier option.
- 1 cup pizza sauce – Store-bought is great for convenience, but homemade sauce can take it to the next level!
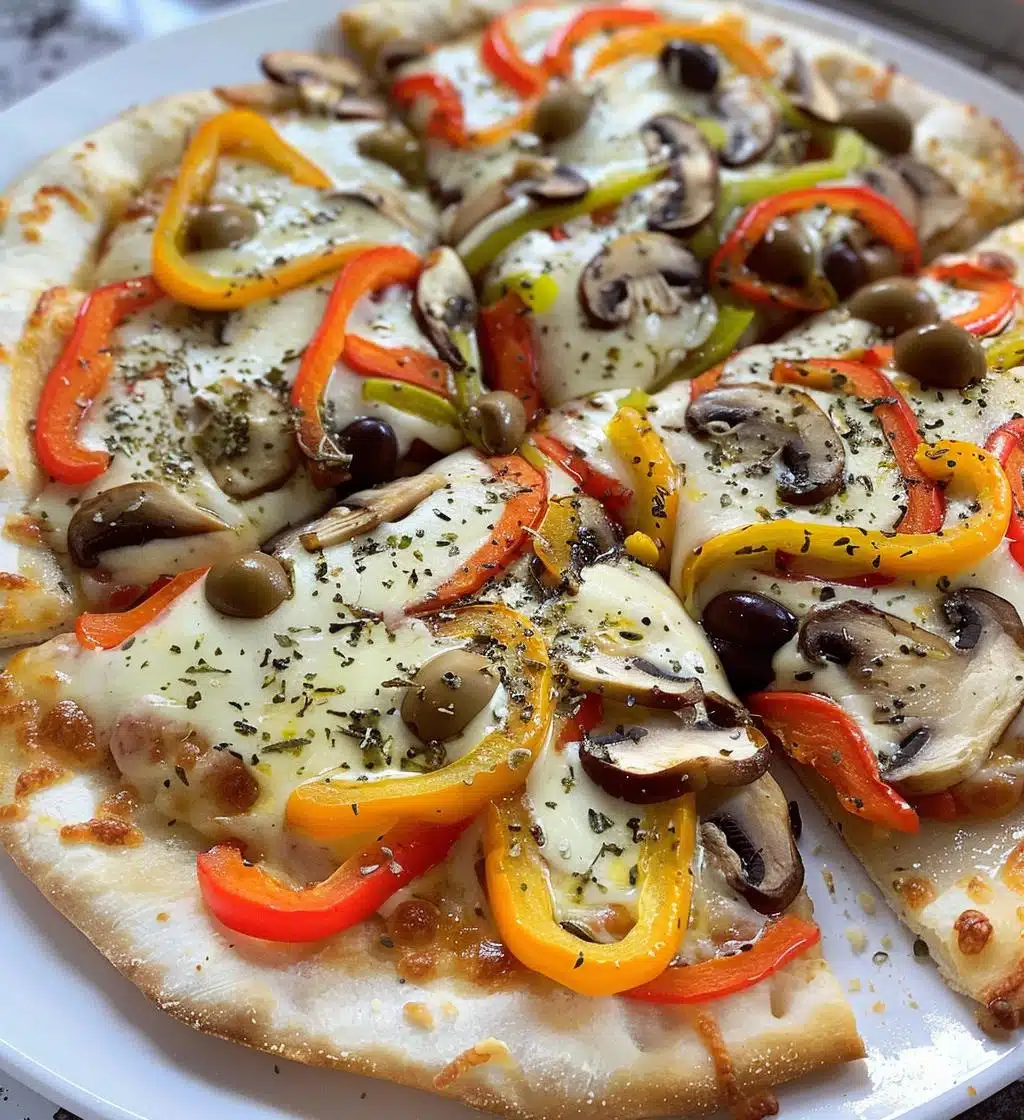
- 2 cups shredded mozzarella cheese – The gooier, the better! Feel free to mix in other cheeses like cheddar or provolone for extra flavor.
- 1 cup sliced bell peppers – Any color works! Red, yellow, or green will add a lovely crunch and sweetness.
- 1 cup sliced mushrooms – Fresh mushrooms add a nice earthy taste, but canned works too if that’s what you have.
- 1/2 cup sliced olives – Black or green, they’ll bring a briny kick to your pizzas!
- 1 tsp dried oregano – This classic herb gives that authentic Italian flavor. You can also sprinkle a bit of red pepper flakes if you like it spicy!
Make sure to gather everything before you start! It keeps the process smooth and fun. Happy cooking!
How to Prepare Pita Pizzas
Now let’s dive into the fun part—making those amazing Pita Pizzas! I promise, it’s as easy as pie, or should I say pizza? Just follow these simple steps, and you’ll be savoring your delicious creations in no time!
Preheat the Oven
First things first, you want to preheat your oven to 400°F (200°C). This step is super important because it ensures that your pizzas cook evenly and get that lovely crispy edge we all crave. So, while you’re gathering your ingredients, just let that oven do its thing and warm up!
Assemble the Pita Pizzas
Once your oven is preheated, grab those pita breads and place them on a baking sheet. Now, here’s where the magic happens: spread a generous layer of pizza sauce over each pita. Don’t be shy! Then, sprinkle that gooey shredded mozzarella cheese all over the top. This is my favorite part because cheese makes everything better, right? Now it’s time to add your toppings! Arrange the bell peppers, mushrooms, and olives evenly for balanced flavor. Remember, the more colorful, the better! If you’re feeling adventurous, toss on some extra herbs or spices for a kick.
Bake the Pita Pizzas
Pop those beauties in the oven and bake for about 10-12 minutes. Keep an eye on them; you’re looking for that glorious melted cheese and slightly golden edges. If you like it extra crispy, feel free to leave them in for an extra minute or two, but be careful not to overdo it! Once they’re done, take them out and let them cool for a minute before slicing into wedges. Oh, the aroma is just heavenly!
Why You’ll Love This Recipe
Seriously, there are so many reasons to adore these Pita Pizzas! They’re not just a meal; they’re an experience. Let me share why they’ve become a staple in my kitchen.
- Quick Preparation: You can whip these up in about 20 minutes, making them perfect for busy weeknights when you need dinner on the table fast!
- Customizable Toppings: The topping possibilities are endless! Whether you’re a meat lover, a veggie enthusiast, or a cheese fanatic, you can tailor each pita to your liking.
- Kid-Friendly: Kids love to get involved in the kitchen, and making their own Pita Pizzas is a fun way to encourage them to help out. Plus, they can choose their own toppings!
- Healthy Options: You can easily make them healthier by using whole wheat pitas and loading up on fresh veggies. It’s a great way to sneak in some nutrients!
- Great for Leftovers: Have some veggies or proteins hanging around? Throw them on top! These pizzas are a fantastic way to use up leftovers creatively.
- Perfect for Any Occasion: Whether it’s a casual family dinner, a movie night, or a fun get-together with friends, Pita Pizzas fit right in!
Trust me, once you try making these, they’ll become your go-to meal for just about any occasion!
Tips for Success
To make sure your Pita Pizzas turn out delicious every single time, I’ve got some pro tips to share! These little nuggets of wisdom will help you get the best texture and flavor, and help you avoid any common pitfalls.
- Don’t Overload Toppings: While it’s tempting to pile on all your favorite toppings, too much can make your pizzas soggy. Stick to a balanced amount for that perfect crispiness!
- Use Fresh Ingredients: Fresh veggies not only taste better but also provide a nice crunch. If you’re using pre-sliced or canned items, make sure to drain excess liquid to keep your pizzas from getting soggy.
- Experiment with Cheese: Try mixing different types of cheese for a more complex flavor. A blend of mozzarella and goat cheese, for example, can add a delightful tang!
- Keep an Eye on Baking Time: Ovens can vary, so keep a close watch when baking. The golden-brown color and bubbling cheese are your best indicators for doneness.
- Let Them Cool Slightly: After baking, let your Pita Pizzas cool for a minute before cutting. This helps the cheese set a bit, making for cleaner slices!
- Check Your Pita Size: If you use larger pita breads, you might need to adjust the cooking time. Just make sure the cheese is melted and bubbly for the best results!
- Try Different Sauces: While pizza sauce is classic, don’t hesitate to experiment with pesto, barbecue sauce, or even hummus for a twist! Each sauce can bring a new flavor profile to your pizzas.
With these tips in your back pocket, you’ll be a Pita Pizza pro in no time! Enjoy the delicious journey of creating your own unique flavors!
Variations of Pita Pizzas
One of the best things about Pita Pizzas is how incredibly versatile they are! You can let your imagination run wild and create your own signature combinations. Here are some fun variations to inspire your next pizza night:
- Margherita Style: Keep it classic with fresh mozzarella, sliced tomatoes, and fresh basil. Drizzle with a little olive oil and balsamic glaze after baking for a gourmet touch!
- BBQ Chicken: Spread BBQ sauce instead of pizza sauce, top with cooked chicken, red onions, and cheddar cheese. Add cilantro after baking for a fresh pop!
- Mediterranean Delight: Use hummus as your base, then top with feta cheese, cherry tomatoes, cucumbers, and olives. A sprinkle of oregano or dill can take it over the top!
- Breakfast Pita: Top your pita with scrambled eggs, cheese, and cooked sausage or bacon. Add a sprinkle of chives for a morning twist!
- Spicy Veggie: Load up on spicy jalapeños, roasted red peppers, and pepper jack cheese. A drizzle of sriracha after baking adds an extra kick!
- Buffalo Cauliflower: Toss cauliflower florets in buffalo sauce and roast them before adding to your pita with mozzarella. It’s a fiery and flavorful vegetarian option!
- Four Cheese: Combine mozzarella, cheddar, parmesan, and gorgonzola for a cheesy explosion. Trust me, you won’t regret this indulgent choice!
Don’t be afraid to mix and match your favorite toppings or even try out new sauces! The beauty of Pita Pizzas is that they can reflect your mood, your cravings, or whatever you have in the fridge. So get creative, and let your taste buds guide you on this delicious adventure!
Nutritional Information
Let’s talk about the nutrition in these delightful Pita Pizzas! Keep in mind that these values are estimates and can vary based on the specific ingredients you use and the portion sizes. Here’s a general breakdown per serving (1 pizza):
- Calories: 300
- Fat: 10g
- Saturated Fat: 4g
- Unsaturated Fat: 6g
- Trans Fat: 0g
- Cholesterol: 20mg
- Sodium: 600mg
- Sugar: 4g
- Carbohydrates: 38g
- Fiber: 4g
- Protein: 12g
These Pita Pizzas can fit nicely into a balanced meal, especially when you load them up with veggies! Just remember, the beauty of cooking is that you can adjust ingredients to suit your dietary needs. Enjoy your delicious creations guilt-free!
Storage & Reheating Instructions
Alright, so you’ve made these scrumptious Pita Pizzas, and now you’ve got some leftovers. No problem! Proper storage is key to keeping them delicious for your next meal. Here’s how I do it:
- Storage: Once your Pita Pizzas have cooled down, I recommend placing them in an airtight container. You can stack them with parchment paper in between to prevent sticking. They’ll keep well in the fridge for about 3-4 days. If you’re not planning to eat them in that time frame, consider freezing them!
- Freezing: To freeze, wrap each Pita Pizza tightly in plastic wrap or aluminum foil, then place them in a freezer-safe bag or container. They can be frozen for up to 2 months. Just make sure to label them with the date so you know when they were made!
Now, when it comes to reheating, I’ve got a few tips to keep that fresh-out-of-the-oven taste:
- Oven: Preheat your oven to 375°F (190°C). Place the Pita Pizzas directly on the oven rack or on a baking sheet for about 10 minutes. This method helps to crisp up the pita again and melt the cheese beautifully!
- Microwave: If you’re in a hurry, the microwave will do the trick, but be warned! The pita might get a bit chewy. Just place your pizza on a microwave-safe plate and heat for about 30-60 seconds. Keep an eye on it so it doesn’t get too hot!
- Air Fryer: If you’ve got an air fryer, it’s a fantastic option! Preheat it to 350°F (175°C) and heat the Pita Pizzas for about 5-6 minutes. This will give you that crispy texture we all love!
And there you have it! With these storage and reheating tips, you can enjoy your Pita Pizzas just as much on day two (or three!) as you did right out of the oven. Yum!
FAQ Section
Got questions about making the perfect Pita Pizzas? I’m here to help! Here are some common queries I often get, along with my tried-and-true answers:
Can I use a different type of bread instead of pita?
Absolutely! While pitas are fantastic for their pocket-like shape, you can use any flatbread or even naan for a different twist. Just keep an eye on the baking time, as different breads may cook faster or slower.
What are some good toppings for a gluten-free version?
If you’re going gluten-free, look for gluten-free pita or flatbread options. As for toppings, you can go wild with fresh veggies, grilled chicken, or even a drizzle of pesto. Just make sure all your ingredients are certified gluten-free!
How can I make these Pita Pizzas dairy-free?
Easy! Substitute the mozzarella with your favorite dairy-free cheese. There are plenty of delicious vegan cheese options available now! You can also use nutritional yeast for a cheesy flavor without the dairy.
Can I prepare the toppings ahead of time?
Definitely! You can slice your veggies, cook any meats, and even prepare your sauce a day in advance. Just store them in airtight containers in the fridge, and you’ll have a super quick assembly process when you’re ready to bake.
How do I store leftover Pita Pizzas?
After they’ve cooled, store any leftovers in an airtight container in the fridge for up to 3-4 days. If you want to keep them longer, wrap them well and freeze them for up to 2 months. Just remember to label them!
What about reheating them?
For the best texture, I recommend reheating in the oven or air fryer to restore that crispy crust. The microwave is fine for a quick fix, but it might make the pita a little chewy. Just heat for a short time and keep an eye on it!
Can I make these Pita Pizzas vegetarian or vegan?
Absolutely! They’re naturally vegetarian, and with a few swaps, you can easily make them vegan. Just use vegan cheese, and load up on all the veggies you love!
Feel free to reach out with any more questions or tips you’d like to share! I love hearing about your Pita Pizza adventures!
For more delicious recipes, check out our blog or try our healthy cheesecake recipe for a sweet treat!
Print
Pita Pizzas: 7 Delicious Ways to Savor Every Bite
- Total Time: 22 minutes
- Yield: 4 servings 1x
- Diet: Vegetarian
Description
Easy and quick pita pizzas with your favorite toppings.
Ingredients
- 4 pita breads
- 1 cup pizza sauce
- 2 cups shredded mozzarella cheese
- 1 cup sliced bell peppers
- 1 cup sliced mushrooms
- 1/2 cup sliced olives
- 1 tsp dried oregano
Instructions
- Preheat the oven to 400°F (200°C).
- Place pita breads on a baking sheet.
- Spread pizza sauce evenly over each pita.
- Sprinkle mozzarella cheese on top.
- Add bell peppers, mushrooms, and olives as toppings.
- Sprinkle oregano over the pizzas.
- Bake for 10-12 minutes or until the cheese is melted.
- Remove from oven and slice into wedges.
Notes
- You can customize toppings as per your preference.
- Use whole wheat pita for a healthier option.
- Serve with a side salad for a complete meal.
- Prep Time: 10 minutes
- Cook Time: 12 minutes
- Category: Dinner
- Method: Baking
- Cuisine: Italian
Nutrition
- Serving Size: 1 pizza
- Calories: 300
- Sugar: 4g
- Sodium: 600mg
- Fat: 10g
- Saturated Fat: 4g
- Unsaturated Fat: 6g
- Trans Fat: 0g
- Carbohydrates: 38g
- Fiber: 4g
- Protein: 12g
- Cholesterol: 20mg
Keywords: Pita Pizzas, Quick Dinner, Easy Recipe