

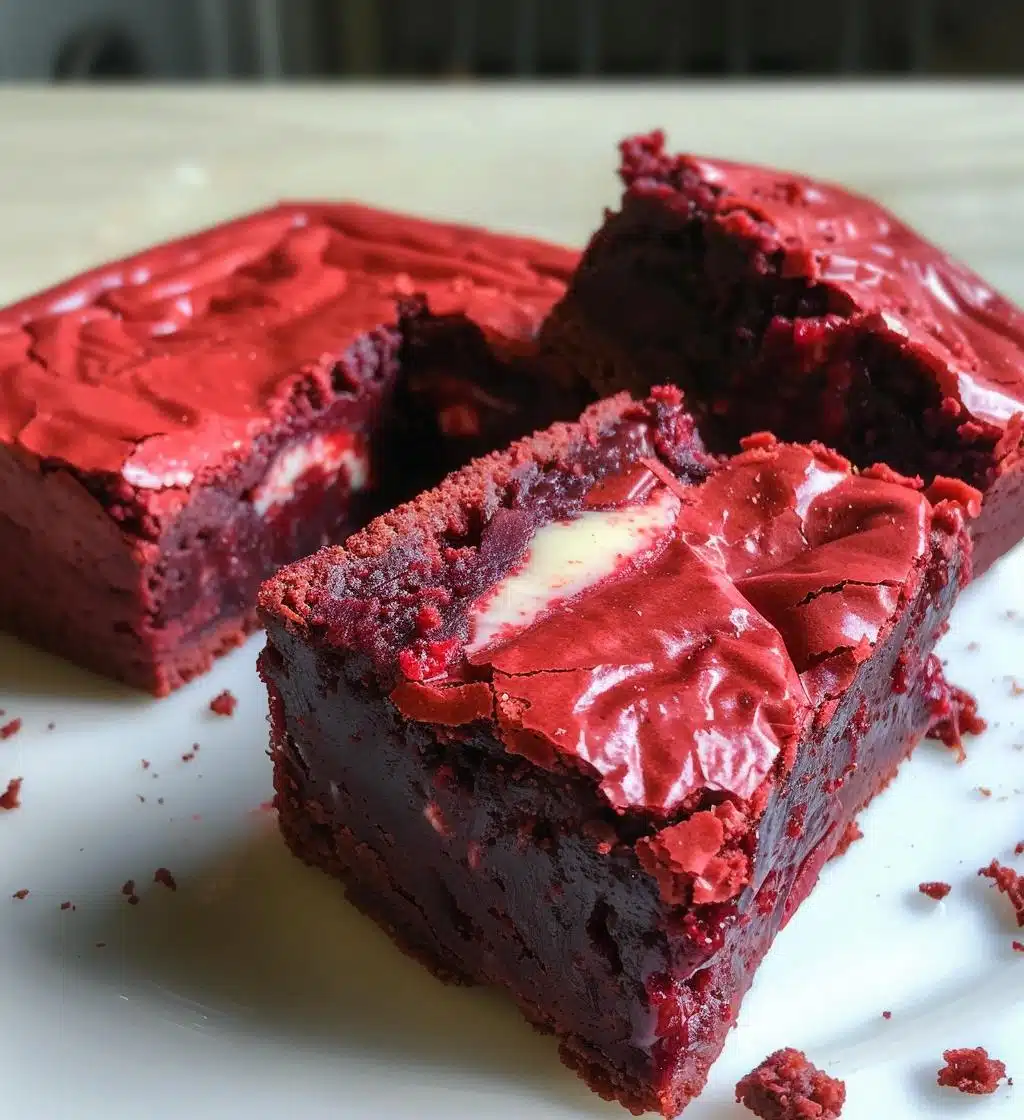
Oh my goodness, let me tell you about my absolute favorite treat: Red Velvet Brownies! Seriously, these brownies are like a hug in dessert form. They’ve got that gorgeous, deep red color that just makes you want to dive right in. The moment you take a bite, you’ll experience that rich, moist texture that perfectly balances the sweetness with a hint of cocoa. And don’t even get me started on the cream cheese swirl—it’s like adding a velvety cloud right in the middle! Trust me, these brownies stand out among the usual desserts at any gathering. They’re perfect for birthdays, holidays, or just a cozy night in. Once you make these, you’ll understand why I’m so obsessed with Red Velvet Brownies!
Ingredients for Red Velvet Brownies
- 1 cup unsalted butter, melted
- 2 cups granulated sugar
- 4 large eggs
- 2 teaspoons vanilla extract
- 1 cup all-purpose flour
- 1 cup cocoa powder
- 1 teaspoon baking powder
- 1 teaspoon salt
- 1 tablespoon red food coloring
- 8 oz cream cheese, softened
- 1/2 cup powdered sugar
How to Prepare Red Velvet Brownies
Preheat and Prepare
First things first, let’s get that oven preheating to 350°F (175°C). While it’s warming up, grab a 9×13 inch baking pan and grease it well—trust me, you don’t want your delicious brownies sticking! A little butter or non-stick spray works wonders here.
Mix the Ingredients
In a large bowl, melt your butter. I like to do this in the microwave—it’s quick and easy! Once it’s melted, stir in the granulated sugar until it’s all combined. Now, crack in those four eggs and add the vanilla extract. Mix everything together until it’s smooth and blended. In a separate bowl, whisk together the flour, cocoa powder, baking powder, and salt. Gradually add this dry mixture to the wet ingredients, stirring gently until just combined. Finally, add that vibrant red food coloring and mix until you have a beautiful, deep red batter. It’s so satisfying to see!
Create the Cream Cheese Swirl
In another bowl, take your softened cream cheese and mix it with the powdered sugar until it’s nice and smooth. This is going to add that dreamy swirl to your brownies! Now, pour half of your brownie batter into the prepared pan, spreading it out evenly. Spoon dollops of the cream cheese mixture over this layer, and then pour the remaining brownie batter on top. Here comes the fun part: take a knife and gently swirl it through the batter to create that beautiful marbled effect. Don’t overdo it—just a few swirls will do!
Baking Instructions
Place your pan in the oven and bake for 30-35 minutes. I usually check them at the 30-minute mark by inserting a toothpick into the center. If it comes out with a few moist crumbs, they’re perfect! Once done, let them cool in the pan for a bit before transferring to a wire rack to cool completely. This cooling step is super important—it makes cutting them into squares so much easier. Get ready for the most decadent Red Velvet Brownies you’ve ever tasted!
Why You’ll Love This Recipe
- Rich and indulgent flavor that’s sure to impress everyone at your gathering.
- Easy to prepare with straightforward steps—perfect for both novice and experienced bakers!
- Gorgeous presentation with that stunning red color and creamy swirl, making them ideal for special occasions.
- Each bite is a delightful mix of moist brownie and tangy cream cheese—an irresistible combo!
- They’re great for sharing, but trust me, you might not want to!
- Perfect for any season or celebration—birthdays, holidays, or just a Tuesday treat!
- Leftovers (if there are any!) can be stored easily, so you can enjoy these brownies for days.
Tips for Success
Okay, friends, if you want to take your Red Velvet Brownies to the next level, I’ve got some tips that’ll ensure you nail this recipe every single time. Trust me, these little nuggets of wisdom will make all the difference!
- Quality Ingredients Matter: Use the best cocoa powder you can find—trust me, it really enhances the flavor. And make sure your butter is unsalted for better control over the sweetness.
- Don’t Overmix: When combining your wet and dry ingredients, mix just until everything is combined. Overmixing can lead to dense brownies, and we want them to be light and fudgy!
- Check for Doneness Carefully: Everyone’s oven is a little different, so keep an eye on your brownies as they bake. A toothpick inserted should come out with a few moist crumbs, but not wet batter. If it comes out clean, you might be overbaking!
- Let Them Cool: I know it’s tempting to dig in right away, but letting the brownies cool in the pan for at least 10-15 minutes makes cutting them into squares so much easier and helps them set up nicely.
- Flavor Boost: For an extra kick of flavor, consider adding a splash of espresso powder to the batter. It enhances the chocolate flavor without making them taste like coffee!
- Experiment with Swirls: Don’t be shy with that cream cheese mixture! Try creating different swirl patterns for a unique look each time you make these brownies.
- Storage Tip: If you make a big batch (or if you’re just super generous), store your brownies in an airtight container at room temperature for up to 3 days. They’ll stay moist and delicious!
Follow these tips, and you’ll be the star of your kitchen with the most incredible Red Velvet Brownies. Enjoy, and happy baking!
Nutritional Information
When it comes to enjoying Red Velvet Brownies, it’s always good to know what you’re indulging in! Here’s some estimated nutritional information to keep in mind. Remember, these values can vary based on the specific ingredients you use and portion sizes, but this should give you a decent idea of what’s in each delicious brownie:
- Serving Size: 1 brownie
- Calories: 250
- Fat: 12g
- Saturated Fat: 7g
- Unsaturated Fat: 4g
- Trans Fat: 0g
- Cholesterol: 70mg
- Sodium: 150mg
- Carbohydrates: 35g
- Fiber: 2g
- Sugar: 20g
- Protein: 3g
This is a little treat that packs a punch, so enjoy them in moderation! With these rich flavors and delightful textures, they’re totally worth every single calorie. Happy baking and indulging!
FAQ About Red Velvet Brownies
Got questions about making these delightful Red Velvet Brownies? Don’t worry, I’ve got you covered! Here are some of the most common inquiries I hear, along with my trusty answers. Let’s dive in!
Can I use a different type of food coloring?
Absolutely! While red is traditional, you can experiment with other colors if you want to switch things up. Just keep in mind that the flavor might slightly change depending on the color you choose!
What if I don’t have cream cheese?
No cream cheese? No problem! You can substitute it with mascarpone for a similar creamy texture or even a thicker Greek yogurt for a lighter version. Just mix it with the powdered sugar as you would with cream cheese!
Can I make these brownies gluten-free?
Yes! Simply swap out the all-purpose flour for a 1:1 gluten-free flour blend. It works like a charm, and you won’t miss a beat in flavor or texture!
How should I store leftover brownies?
To keep your Red Velvet Brownies fresh, store them in an airtight container at room temperature for up to 3 days. If you want to keep them longer, you can freeze them for up to 2 months. Just thaw in the fridge overnight before enjoying!
Can I add nuts or chocolate chips?
You bet! Feel free to fold in some chopped nuts like walnuts or pecans for a delightful crunch, or throw in some chocolate chips for an extra chocolatey kick. Just be careful not to overmix the batter!
What’s the best way to cut these brownies?
Once they’re completely cooled, use a sharp knife to cut them into squares. For clean cuts, dip the knife in hot water and wipe it dry between cuts. This helps prevent the brownies from crumbling!
Is the cream cheese swirl necessary?
Not at all! If you’re not a fan of cream cheese, you can skip it altogether or replace it with a simple chocolate ganache swirl instead. The brownies will still be deliciously rich!
Feel free to experiment with these tips and tricks, and don’t hesitate to reach out if you have more questions. Happy baking, and enjoy those scrumptious Red Velvet Brownies!
Storage & Reheating Instructions
After you’ve baked and devoured these amazing Red Velvet Brownies, you’ll want to make sure any leftovers are stored correctly so they stay just as delicious! To keep them fresh, simply place the brownies in an airtight container at room temperature for up to 3 days. If you’re anything like me, they might not last that long, but just in case you have some left, this is the way to go!
If you want to keep them for a longer period, you can also freeze these decadent treats. Just wrap each brownie individually in plastic wrap, then place them in a freezer-safe container or a zip-top bag. They’ll keep well for up to 2 months. When you’re ready to enjoy, simply take them out and let them thaw overnight in the fridge. No need to reheat unless you want that gooey, melty texture again—just pop them in the microwave for about 15-20 seconds for a warm, fudgy treat!
With these simple storage tips, you can enjoy your Red Velvet Brownies for days to come. Happy snacking!
Print
Red Velvet Brownies: 7 Irresistibly Rich Delightful Treats
- Total Time: 55 minutes
- Yield: 24 brownies 1x
- Diet: Vegetarian
Description
Rich and moist red velvet brownies with a cream cheese swirl.
Ingredients
- 1 cup unsalted butter
- 2 cups granulated sugar
- 4 large eggs
- 2 teaspoons vanilla extract
- 1 cup all-purpose flour
- 1 cup cocoa powder
- 1 teaspoon baking powder
- 1 teaspoon salt
- 1 tablespoon red food coloring
- 8 oz cream cheese, softened
- 1/2 cup powdered sugar
Instructions
- Preheat oven to 350°F (175°C).
- Grease a 9×13 inch baking pan.
- In a large bowl, melt the butter and mix in sugar.
- Add eggs and vanilla, mix well.
- In another bowl, combine flour, cocoa powder, baking powder, and salt.
- Gradually add dry ingredients to the wet mixture.
- Stir in food coloring until well combined.
- In a separate bowl, mix cream cheese and powdered sugar until smooth.
- Pour half of the brownie batter into the pan.
- Drop spoonfuls of cream cheese mixture over the batter.
- Top with remaining brownie batter and swirl with a knife.
- Bake for 30-35 minutes.
- Allow to cool before cutting into squares.
Notes
- Store leftovers in an airtight container.
- For a richer flavor, add chocolate chips.
- Serve with whipped cream for added taste.
- Prep Time: 20 minutes
- Cook Time: 35 minutes
- Category: Dessert
- Method: Baking
- Cuisine: American
Nutrition
- Serving Size: 1 brownie
- Calories: 250
- Sugar: 20g
- Sodium: 150mg
- Fat: 12g
- Saturated Fat: 7g
- Unsaturated Fat: 4g
- Trans Fat: 0g
- Carbohydrates: 35g
- Fiber: 2g
- Protein: 3g
- Cholesterol: 70mg
Keywords: Red Velvet Brownies, brownies, dessert, red velvet