

Oh my goodness, let me tell you about *Red Velvet Cookie Bars*! These beauties are the perfect combination of soft, chewy cookie goodness with that iconic red velvet flavor that just screams celebration. Seriously, they’re a delightful treat for any occasion—whether it’s a cozy night in, a birthday party, or just because you feel like indulging (which is always a great reason, right?).
What I love most about these bars is how they blend the rich, chocolatey notes with the slight tang of cream cheese frosting. It’s like a hug from a dessert! I remember the first time I tried red velvet cake at a friend’s wedding. I was blown away by the vibrant color and that luscious frosting. From then on, I was hooked! I started experimenting with red velvet recipes, and believe me, this cookie bar version quickly became a favorite in my kitchen.
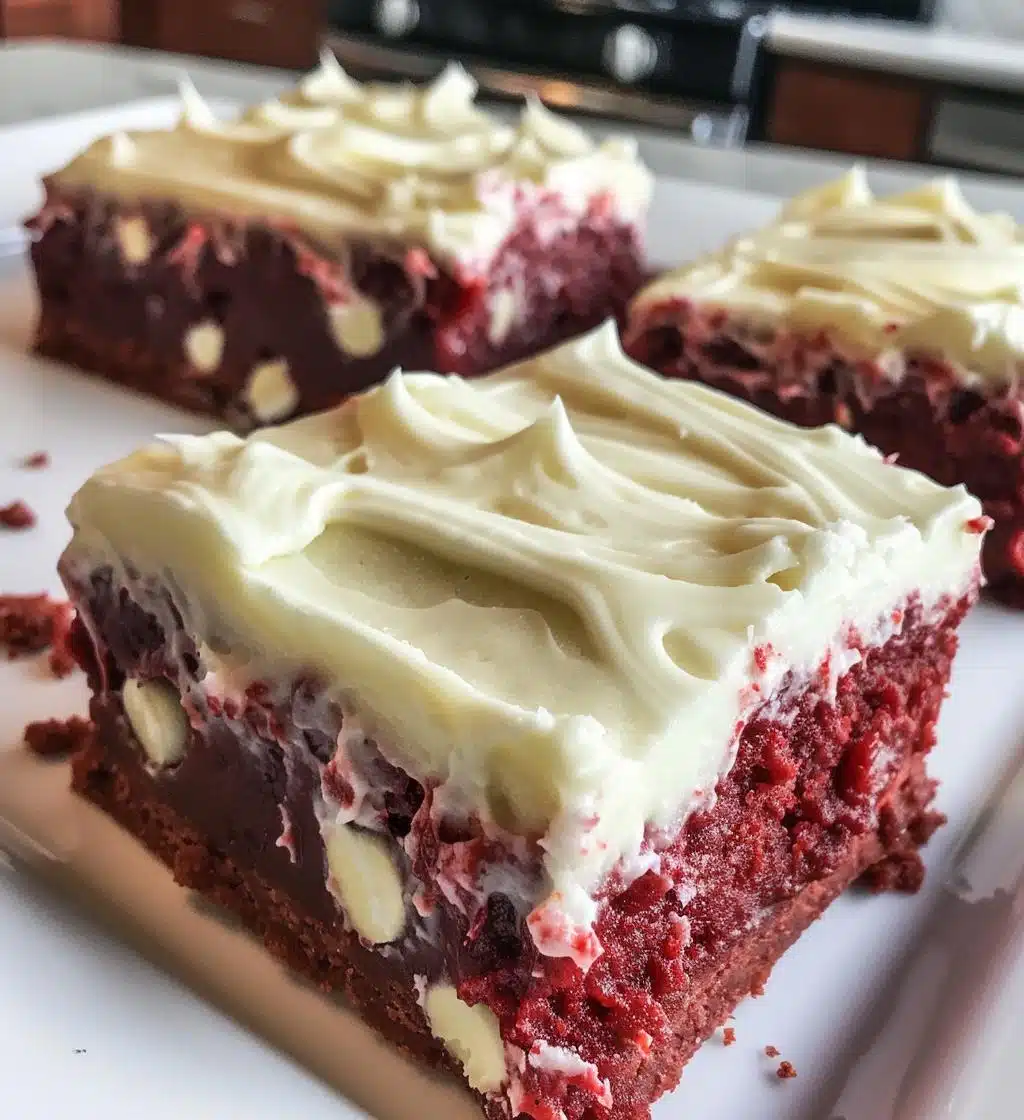
Imagine cutting into a warm bar, the soft texture giving way to your bite, and then—bam!—you hit that creamy frosting layer. It’s pure bliss! Trust me, once you try these, you’ll understand why they’re a go-to dessert for me! So grab your apron, because we’re about to dive into this deliciousness together!
Ingredients List
Alright, let’s gather all the goodies you’ll need to whip up these fabulous Red Velvet Cookie Bars! Here’s what you’ll need:
- 2 1/2 cups all-purpose flour: This is the base of our cookie bars, giving them that delightful structure.
- 1 cup granulated sugar: For that essential sweetness—because who can resist a bit of sugar?
- 1/2 cup brown sugar: Adds a touch of moisture and deepens the flavor just a bit.
- 1 cup unsalted butter, softened: Make sure it’s soft, so it creams beautifully with the sugars.
- 2 large eggs: These are our binders, helping everything come together perfectly.
- 2 tablespoons cocoa powder: Just a hint of cocoa to enhance that chocolatey flavor we love!
- 1 teaspoon vanilla extract: A splash of vanilla is always a good idea for flavor depth.
- 1 tablespoon red food coloring: The star of the show! This gives our bars that stunning red hue.
- 1/2 teaspoon baking soda: This will help our bars rise just the right amount.
- 1/2 teaspoon salt: Balances out the sweetness and enhances all those yummy flavors.
- 1 cup white chocolate chips: Because who doesn’t love a little creamy sweetness mixed in?
And there you have it! Gather these ingredients, and let’s get ready to make some magic happen in the kitchen!
How to Prepare Red Velvet Cookie Bars
Alright, my fellow bakers, let’s roll up our sleeves and get those Red Velvet Cookie Bars into the oven! I promise, the process is super straightforward and totally worth the momentary mess. Grab your mixing bowls and let’s dive in!
Step-by-Step Instructions
- Preheat your oven: First things first, preheat your oven to 350°F (175°C). This is crucial because we want our cookie bars to bake evenly and perfectly!
- Cream the butter and sugars: In a large mixing bowl, cream together the softened butter, granulated sugar, and brown sugar. You can use a hand mixer or stand mixer for this—whip it until it’s light and fluffy! This should take about 2-3 minutes. Trust me, this step is key for that melt-in-your-mouth texture.
- Add the eggs and flavorings: Next, crack in those two large eggs and pour in the vanilla extract and red food coloring. Mix until everything is well combined. The batter will start to look beautiful and vibrant—don’t be afraid to get in there and mix it up!
- Combine dry ingredients: In another bowl, whisk together the all-purpose flour, cocoa powder, baking soda, and salt. This helps to evenly distribute the baking soda and cocoa, ensuring our bars rise and taste great!
- Mix it all together: Gradually add the dry ingredients to the wet mixture. I like to do this in batches to avoid flour explosions! Mix until just combined—don’t overdo it; a few lumps are perfectly fine.
- Fold in the white chocolate chips: Now comes the fun part! Gently fold in the white chocolate chips using a spatula. This adds delightful pockets of sweetness that you’ll adore in every bite.
- Spread the batter: Grab your greased baking pan (I usually use a 9×13 inch pan), and spread the batter evenly into the pan. I like to use a spatula to make sure it’s nice and smooth on top.
- Bake to perfection: Pop the pan into your preheated oven and bake for about 25-30 minutes. You’ll know they’re done when a toothpick inserted into the center comes out clean or with just a few moist crumbs. Oh, the smell wafting through your kitchen will be divine!
- Cooling time: Once baked, take them out and let them cool in the pan for about 10-15 minutes. Then, transfer them to a wire rack to cool completely before frosting. This step is important so the frosting doesn’t melt all over the place!
And that’s it! You’re well on your way to creating some scrumptious Red Velvet Cookie Bars. Just wait until you get to the frosting part—it’s going to be heavenly!
Nutritional Information
Now, let’s talk about the numbers! While I’m all about enjoying a tasty treat, it’s good to know what’s in these luscious Red Velvet Cookie Bars. Here’s a breakdown of the typical nutritional values per serving, which is one cookie bar:
- Calories: 210
- Fat: 10g
- Saturated Fat: 6g
- Unsaturated Fat: 4g
- Trans Fat: 0g
- Sodium: 150mg
- Carbohydrates: 28g
- Sugar: 15g
- Fiber: 1g
- Protein: 2g
- Cholesterol: 30mg
Keep in mind that these values are estimates based on standard ingredients and can vary depending on specific brands or any substitutions you might make. So, enjoy these bars in moderation and savor every delicious bite!
Why You’ll Love This Recipe
- Easy to Prepare: Seriously, these Red Velvet Cookie Bars come together in just a few simple steps! Even if you’re a beginner, you’ll feel like a pro in no time.
- Delicious Flavor: The combination of soft, chewy cookie with that rich, creamy frosting is like a party in your mouth! It’s sweet, tangy, and oh-so-satisfying.
- Perfect for Any Occasion: Whether it’s a birthday, holiday, or just a Tuesday, these bars are a hit! They’re great for sharing with friends or keeping all to yourself (I won’t judge!).
- Make-Ahead Friendly: You can easily bake these bars in advance, making them perfect for potlucks or gatherings. Just frost before serving for that fresh touch!
- Customizable: Feel free to get creative! Add nuts, swap the white chocolate chips for dark, or even mix in some spices for a fun twist.
- Great for Kids: The vibrant color and sweet taste make these cookie bars a favorite among kids! They’re sure to bring smiles all around.
Tips for Success
Alright, my baking friends, let’s make sure those Red Velvet Cookie Bars turn out absolutely perfect! Here are some of my tried-and-true tips to help you along the way:
- Check Your Butter: Make sure your butter is softened but not melted! If it’s too warm, your batter may spread too much, and we want those bars to have the right chewy texture.
- Don’t Overmix: When combining the wet and dry ingredients, mix just until everything is combined. Overmixing can lead to tough bars, and we want them soft and tender!
- Use an Oven Thermometer: Oven temperatures can vary quite a bit. If you have an oven thermometer, use it! This way, you can ensure your cookies bake at the perfect temperature.
- Keep an Eye on Baking Time: Every oven is different, so start checking your bars a few minutes before the timer goes off. You want that toothpick to come out clean, but don’t overbake—there’s nothing worse than dry cookie bars!
- Cool Completely: Allow your cookie bars to cool completely before frosting—this prevents the frosting from melting and turning into a gooey mess. Patience is key here!
- Adjust for Altitude: If you’re baking at a higher elevation, you may need to adjust the flour and sugar amounts slightly. It’s a good idea to look up specific guidelines for your altitude.
- Experiment with Frosting: While cream cheese frosting is classic, don’t hesitate to try other frostings or toppings! A simple glaze or whipped cream can give a fun twist to these bars.
With these tips in your back pocket, you’re all set to create some seriously delicious Red Velvet Cookie Bars that will impress everyone. Happy baking!
Variations
Oh, the fun doesn’t stop at the classic Red Velvet Cookie Bars! There are so many delightful variations you can try to switch things up and keep everyone guessing. Here are some of my favorite twists that’ll add even more joy to your baking adventures:
- Nutty Delight: Want to add some crunch? Toss in a cup of chopped walnuts or pecans to the batter! They add a wonderful texture and pair beautifully with the sweetness of the bars.
- Chocolate Chip Twist: Instead of white chocolate chips, try using dark or semi-sweet chocolate chips. The bittersweet chocolate will complement the red velvet flavor in a whole new way!
- Spiced Up: Add a teaspoon of cinnamon or a pinch of nutmeg to the dry ingredients for a warm, spiced flavor that makes these bars even more comforting—perfect for fall gatherings!
- Cheesecake Swirl: Create a dreamy cheesecake swirl by mixing 8 oz of softened cream cheese with 1/4 cup of sugar and an egg. Drop spoonfuls of this mixture into the batter and swirl it around before baking for a creamy surprise in every bite!
- Berry Bliss: Fold in some fresh or frozen raspberries or strawberries for a fruity twist! The tartness of the berries will balance the sweetness beautifully.
- Minty Fresh: Add a teaspoon of peppermint extract to the batter and top your bars with crushed peppermint candies after frosting. It’s a refreshing twist that’s perfect for the holidays!
With these variations, you can customize your Red Velvet Cookie Bars to suit any mood or occasion. Go ahead, get creative, and have fun experimenting! Each batch can be a new adventure in flavor, and I can’t wait to hear what you come up with!
Storage & Reheating Instructions
Alright, let’s talk about how to store those amazing Red Velvet Cookie Bars so you can enjoy them even after the initial bake! Trust me, you’ll want to keep these delicious treats around as long as possible!
To store, simply place your cookie bars in an airtight container. This keeps them fresh and prevents them from drying out. If you’re worried about sticking, you can layer parchment paper between the bars to ensure they stay separate. They’ll last in the container at room temperature for about 3-4 days. But honestly, I doubt they’ll last that long—they’re just too good!
If you want to keep them for a longer period, you can pop them in the fridge for up to a week. Just make sure they’re well-sealed to avoid absorbing any fridge odors. When you’re ready to indulge again, simply take them out and let them come to room temperature.
Now, if you’re like me and enjoy your cookie bars warm (because who doesn’t love that melty, gooey goodness?), just reheat them in the microwave for about 10-15 seconds. Keep an eye on them, though—you don’t want to overdo it! You can also warm them in the oven at 350°F (175°C) for about 5-7 minutes. This will give them that freshly baked feel again.
And there you have it—easy storage and reheating tips to keep your Red Velvet Cookie Bars delightful and delicious! Enjoy every last crumb!
FAQ Section
Got questions about these scrumptious Red Velvet Cookie Bars? Don’t worry, I’ve got you covered! Here are some common queries I hear, along with my answers to help you bake these beauties to perfection:
Can I make these cookie bars gluten-free?
Absolutely! You can substitute the all-purpose flour with a gluten-free flour blend. Just make sure it’s a 1:1 ratio blend that includes xanthan gum for the best results. Your bars will still be delicious!
How can I adjust the recipe for high altitude?
If you’re baking at a higher elevation, you might need to slightly decrease the baking powder or baking soda and add a bit more flour. Usually, around 1-2 tablespoons of additional flour will do the trick. Keep an eye on the baking time as well, as your bars may bake faster!
Can I use less sugar in this recipe?
You can definitely reduce the sugar a bit if you prefer less sweetness. Just keep in mind that sugar contributes to the texture and moisture, so cutting it too much may affect the final product. Maybe try reducing by 1/4 cup first and see how you like it!
What if I don’t have cream cheese for frosting?
No problem! You can make a simple buttercream frosting with just butter, powdered sugar, and a splash of vanilla extract. It’ll still be sweet and delicious, perfect for topping those cookie bars!
How do I know when my cookie bars are done?
The best way to check is by inserting a toothpick into the center. If it comes out clean or with just a few moist crumbs, they’re ready! Remember, they’ll continue to cook a bit while cooling, so don’t leave them in the oven too long.
Can I freeze these cookie bars?
Yes! These Red Velvet Cookie Bars freeze beautifully. Just make sure they are completely cooled, then wrap them tightly in plastic wrap and place them in an airtight container. They’ll last up to 3 months in the freezer. When you’re ready to enjoy, just thaw them in the fridge overnight!
What’s the best way to cut these bars?
For clean cuts, I recommend using a sharp knife. If you want even squares, you can measure and mark where to cut with a toothpick before slicing. It makes the presentation look so nice!
I hope these answers help clear up any confusion. If you have more questions, feel free to reach out! Happy baking, and enjoy those delightful Red Velvet Cookie Bars!
Print
Red Velvet Cookie Bars: 7 Delicious Ways to Indulge
- Total Time: 45 minutes
- Yield: 24 cookie bars 1x
- Diet: Vegetarian
Description
Delicious red velvet cookie bars with cream cheese frosting.
Ingredients
- 2 1/2 cups all-purpose flour
- 1 cup granulated sugar
- 1/2 cup brown sugar
- 1 cup unsalted butter, softened
- 2 large eggs
- 2 tablespoons cocoa powder
- 1 teaspoon vanilla extract
- 1 tablespoon red food coloring
- 1/2 teaspoon baking soda
- 1/2 teaspoon salt
- 1 cup white chocolate chips
Instructions
- Preheat your oven to 350°F (175°C).
- In a bowl, cream together the butter, granulated sugar, and brown sugar.
- Add the eggs, vanilla extract, and food coloring. Mix well.
- In another bowl, combine flour, cocoa powder, baking soda, and salt.
- Gradually add the dry ingredients to the wet mixture.
- Fold in the white chocolate chips.
- Spread the batter into a greased baking pan.
- Bake for 25-30 minutes or until a toothpick comes out clean.
- Let cool before frosting.
Notes
- Store in an airtight container.
- Can be topped with cream cheese frosting.
- Adjust food coloring for desired color intensity.
- Prep Time: 15 minutes
- Cook Time: 30 minutes
- Category: Dessert
- Method: Baking
- Cuisine: American
Nutrition
- Serving Size: 1 cookie bar
- Calories: 210
- Sugar: 15g
- Sodium: 150mg
- Fat: 10g
- Saturated Fat: 6g
- Unsaturated Fat: 4g
- Trans Fat: 0g
- Carbohydrates: 28g
- Fiber: 1g
- Protein: 2g
- Cholesterol: 30mg
Keywords: Red Velvet Cookie Bars, dessert, baking, cream cheese frosting