

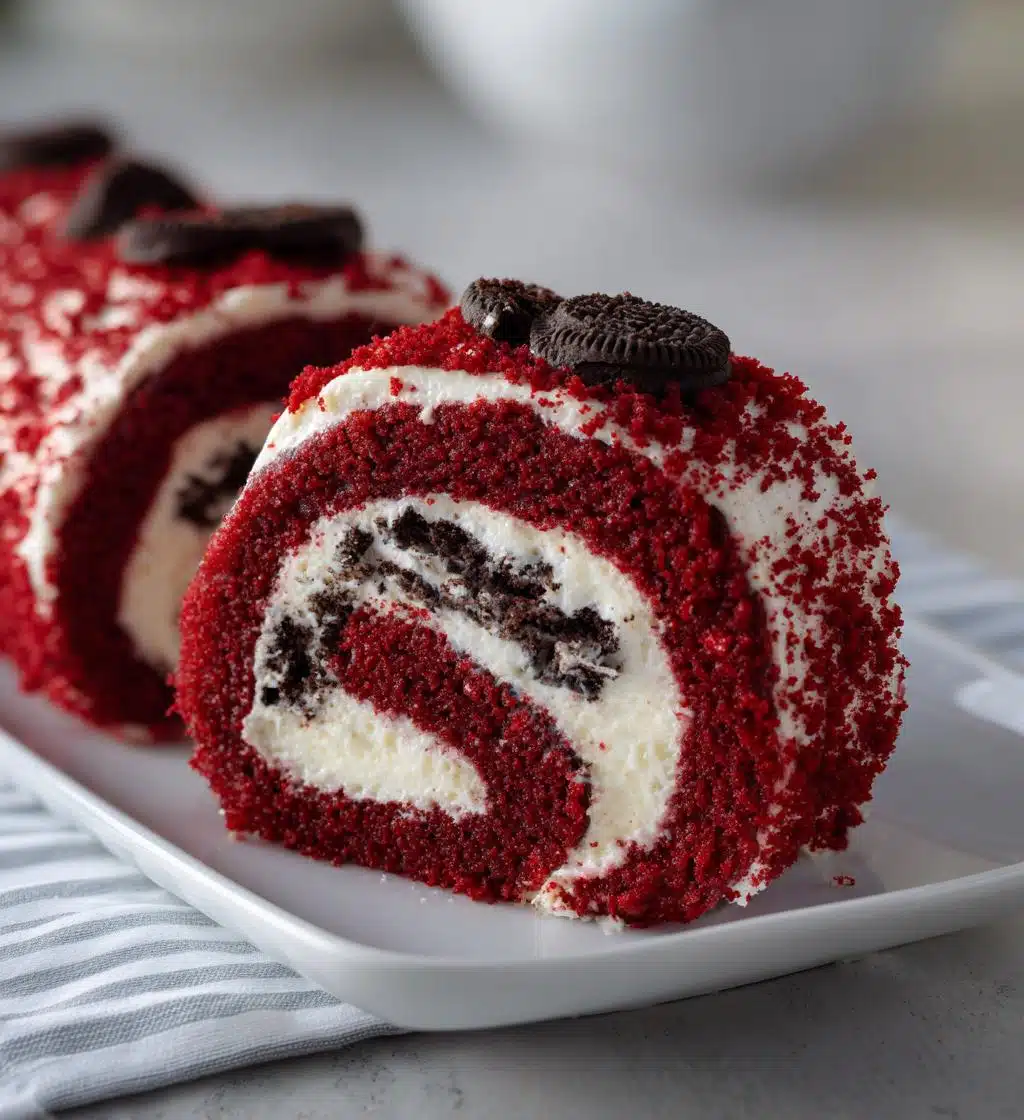
Oh my goodness, let me tell you about my absolute favorite dessert – the red velvet Oreo cake roll! There’s just something about that vibrant red color and the luscious swirl of cream cheese filling that gets me every time. I remember the first time I made this showstopper for a family gathering; the moment I unveiled it, the oohs and aahs from everyone around the table just filled my heart with joy! It’s not just stunning to look at, but the first bite is pure bliss – the rich, velvety cake paired with crunchy Oreo bits and that creamy filling is a match made in dessert heaven. Trust me, once you try this, you’ll want to make it for every occasion. It’s the perfect blend of flavors that makes every slice a little celebration on its own!
Ingredients for Red Velvet Oreo Cake Roll
Before we dive into the magic of baking, let’s gather everything you’ll need to create this delicious masterpiece. Trust me, having your ingredients prepped makes the process so much smoother and more fun! Here’s what you’ll need:
- 1 cup all-purpose flour
- 1/4 cup cocoa powder
- 1 teaspoon baking powder
- 1/2 teaspoon baking soda
- 1/4 teaspoon salt
- 3 large eggs
- 1 cup granulated sugar
- 1/2 cup vegetable oil
- 1 teaspoon vanilla extract
- 1 tablespoon red food coloring
- 1 cup cream cheese, softened
- 1/2 cup powdered sugar
- 1 cup crushed Oreo cookies
Make sure to have everything set out before you begin; it’ll make mixing and measuring a breeze! And remember, quality ingredients lead to the best flavors, so don’t skimp on that cream cheese or those Oreos – they’re the stars of the show!
How to Prepare the Red Velvet Oreo Cake Roll
Alright, let’s get to the fun part – making this gorgeous red velvet Oreo cake roll! Follow these steps, and I promise you’ll be in for a treat. It’s all about taking your time and enjoying each phase of the process!
Prepping the Cake Batter
First things first, let’s get that cake batter ready! In a medium bowl, whisk together the dry ingredients: flour, cocoa powder, baking powder, baking soda, and salt. Make sure everything’s well combined – this helps your cake rise nicely and have an even texture. In a separate large bowl, beat the eggs and sugar together until they’re light and fluffy, which usually takes about 3-5 minutes. The fluffiness adds air into the batter, giving it that delightful lift. Now, it’s time to add in the vegetable oil, vanilla extract, and red food coloring. Mix until everything is beautifully combined. Finally, gently fold in the dry ingredients until just combined. You don’t want to overmix, or your cake may turn out dense!
Baking the Cake Roll
Now that your batter is ready, it’s time to bake! Preheat your oven to 350°F (175°C). Line a baking sheet with parchment paper – this is key for easy removal later. Spread your cake batter evenly onto the lined baking sheet, making sure it reaches all the corners. Pop it in the oven and bake for about 15-20 minutes. You’ll know it’s done when a toothpick inserted in the center comes out clean. While it’s baking, you can take a moment to clean up your workspace and maybe even sneak a taste of those crushed Oreos! Yum!
Rolling the Cake
Once your cake is out of the oven, let it cool for just a few minutes, but don’t let it sit too long! Grab a clean kitchen towel and sprinkle some powdered sugar over it (this prevents sticking). Now, here’s the trick – carefully flip the warm cake onto the towel, peel off the parchment paper, and then start to roll it up with the towel inside. This helps create that lovely spiral shape. Let it cool completely rolled up – this ensures it holds its shape when we fill it!
Making the Filling
While your cake is cooling, let’s whip up that irresistible filling! In a bowl, beat together the softened cream cheese and powdered sugar until it’s smooth and creamy. This is where the magic happens! Once combined, gently fold in those crushed Oreo cookies. Oh, the crunch and flavor they add to the filling is just divine!
Assembling the Cake Roll
Now comes the best part! Once your cake has cooled completely, carefully unroll it from the towel – it should be nice and flexible. Spread the cream cheese and Oreo filling evenly over the cake, leaving a bit of space at the edges. Then, roll it back up tightly (without the towel this time!) and wrap it in plastic wrap. Pop it in the fridge for at least an hour to chill. This chilling time is crucial, as it helps the cake hold its shape and makes slicing easier!
Why You’ll Love This Recipe
Let me tell you, this red velvet Oreo cake roll is an absolute game changer! First off, it’s quick to whip up, making it perfect for those moments when you need a stunning dessert without spending hours in the kitchen. Trust me, you’ll be amazed at how fast it comes together!
Not to mention, just look at it! The vibrant red and the creamy white filling studded with crunchy Oreo bits creates a visual feast that’s sure to impress anyone at your table. It’s the kind of dessert that makes you feel like a superstar baker, even if you’re just getting started!
And let’s talk flavor – the classic red velvet paired with the rich, chocolatey goodness of Oreos is a match made in dessert heaven. It’s indulgent and satisfying, yet still light enough that you’ll want to go back for seconds (and maybe thirds!). This cake roll is perfect for celebrations, special gatherings, or just to treat yourself after a long day. You’ll find yourself making it again and again, and each time, it’ll feel like a little party on your plate!
Tips for Success
Alright, friends, let’s make sure your red velvet Oreo cake roll turns out absolutely perfect! Here are my top tips for success that I’ve learned over the years:
- Cool It Right: Patience is key! Allow your cake to cool completely before adding the filling. If you rush this step, the filling might melt or ooze out, and nobody wants that! Trust me, letting it chill for a bit makes all the difference.
- Slicing with Precision: When it’s time to slice, use a sharp, serrated knife for clean edges. A gentle sawing motion works wonders here—no need to press down too hard. This way, you’ll get those beautiful swirls to show off!
- Filling Consistency: Make sure your cream cheese is softened but not overly warm. If it’s too soft, it won’t hold its shape when you spread it on the cake. Also, don’t skip on the Oreo crushing; a mix of fine and chunky pieces adds great texture!
- Wrap It Well: After rolling up your cake, wrap it tightly in plastic wrap to avoid any air exposure. This helps keep it fresh and prevents it from drying out. Plus, it’ll help maintain that lovely shape!
- Chill it Again: I can’t stress this enough—don’t skip the chilling time after assembling! Refrigerating the rolled cake for at least an hour helps set the filling and makes it easier to slice later.
- Be Creative: Feel free to experiment! Try adding different mix-ins to the filling, like mini chocolate chips or even a splash of vanilla extract for an extra flavor boost. The sky’s the limit!
With these tips in your back pocket, I’m confident your cake roll will turn out absolutely stunning and delicious! Happy baking!
Storage & Reheating Instructions
Now, let’s talk about how to keep that delicious red velvet Oreo cake roll fresh and tasty! If you happen to have any leftovers (which is rare, but it does happen!), here’s how to store them properly:
- Refrigerate: Wrap the cake roll tightly in plastic wrap or aluminum foil to keep it from drying out. Store it in the refrigerator for up to 3 days. This way, you can enjoy a slice of that delightful dessert whenever the craving hits!
- Freezing: If you want to save some for later, you can freeze the cake roll! Just make sure to wrap it really well in plastic wrap, followed by aluminum foil, to prevent freezer burn. It’ll stay good for about 2 months. When you’re ready to enjoy it, let it thaw in the refrigerator overnight.
As for reheating, this cake roll is best served chilled, so I don’t recommend warming it up. But if you want to enjoy it slightly at room temperature, just take it out of the fridge for about 15-20 minutes before slicing. This makes it a touch softer and easier to cut! Trust me, it’s still just as delightful!
Nutritional Information
Now, I know you’re curious about the numbers behind this indulgent red velvet Oreo cake roll, so here’s a rough estimate of the nutritional values per slice. Keep in mind that these values can vary based on the specific ingredients you use and portion sizes, but this should give you a good idea:
- Calories: 320
- Fat: 15g
- Saturated Fat: 5g
- Trans Fat: 0g
- Cholesterol: 50mg
- Sodium: 200mg
- Carbohydrates: 40g
- Fiber: 1g
- Sugar: 28g
- Protein: 4g
Remember, this delightful treat is a dessert, so it’s all about balance! Enjoying a slice or two is totally fine in moderation, especially when it brings so much joy. Happy baking and indulging!
FAQ Section
Got questions about the red velvet Oreo cake roll? Don’t worry, I’ve got you covered! Here are some common queries I’ve encountered and my answers to help you on your baking adventure:
Can I use a different type of flour?
Absolutely! You can try using cake flour for a lighter texture, or even a gluten-free flour blend if you’re looking for a gluten-free option. Just keep in mind that the texture might vary slightly!
What if I don’t have red food coloring?
No red food coloring? No problem! You can use beet juice for a natural alternative, though it may change the flavor a bit. Or, if you’re feeling adventurous, just skip it and enjoy a chocolate cake roll instead!
Can I make this ahead of time?
Yes, you can! The cake roll actually benefits from chilling in the fridge for a bit, so making it a day in advance is a great idea. Just make sure to wrap it well to keep it fresh!
How long can I store leftovers?
Leftovers will keep in the fridge for up to 3 days when wrapped tightly. If you freeze it, it’ll last about 2 months, but I doubt it’ll last that long with all the yumminess!
Can I add other mix-ins to the filling?
Definitely! You can mix in mini chocolate chips, crushed nuts, or even a swirl of peanut butter for a fun twist. Get creative and make it your own!
What’s the best way to serve this cake roll?
Slice it up and serve it chilled for the best texture and flavor! It’s perfect on its own, but you can also add a dollop of whipped cream or a drizzle of chocolate sauce for an extra treat!
Can I use store-bought cream cheese frosting instead of making the filling?
Absolutely! Store-bought cream cheese frosting is a convenient option and will taste delicious. Just make sure to adjust the sugar in the recipe if needed!
I hope these FAQs help answer any lingering questions you might have! Enjoy every moment of making and indulging in your red velvet Oreo cake roll! Happy baking!

Red Velvet Oreo Cake Roll: 5 Tips for a Blissful Bake
- Total Time: 1 hour
- Yield: 8 servings 1x
- Diet: Vegetarian
Description
A delicious red velvet cake roll filled with cream cheese and Oreo cookies.
Ingredients
- 1 cup all-purpose flour
- 1/4 cup cocoa powder
- 1 teaspoon baking powder
- 1/2 teaspoon baking soda
- 1/4 teaspoon salt
- 3 large eggs
- 1 cup granulated sugar
- 1/2 cup vegetable oil
- 1 teaspoon vanilla extract
- 1 tablespoon red food coloring
- 1 cup cream cheese, softened
- 1/2 cup powdered sugar
- 1 cup crushed Oreo cookies
Instructions
- Preheat the oven to 350°F (175°C).
- In a bowl, mix flour, cocoa powder, baking powder, baking soda, and salt.
- In another bowl, whisk eggs and sugar until fluffy.
- Add oil, vanilla, and food coloring to the egg mixture.
- Combine the dry ingredients with the wet ingredients.
- Spread the batter onto a lined baking sheet.
- Bake for 15-20 minutes or until a toothpick comes out clean.
- Let it cool for a few minutes, then roll it with a towel.
- In a bowl, mix cream cheese and powdered sugar until smooth.
- Add crushed Oreo cookies to the cream cheese mixture.
- Unroll the cake and spread the filling evenly.
- Roll the cake back up and refrigerate for at least 1 hour before serving.
Notes
- Ensure the cake is completely cooled before adding the filling.
- Use a sharp knife to slice for clean edges.
- Store leftovers in the refrigerator.
- Prep Time: 30 minutes
- Cook Time: 20 minutes
- Category: Dessert
- Method: Baking
- Cuisine: American
Nutrition
- Serving Size: 1 slice
- Calories: 320
- Sugar: 28g
- Sodium: 200mg
- Fat: 15g
- Saturated Fat: 5g
- Unsaturated Fat: 8g
- Trans Fat: 0g
- Carbohydrates: 40g
- Fiber: 1g
- Protein: 4g
- Cholesterol: 50mg
Keywords: red velvet cake, Oreo cake roll, dessert, baking