
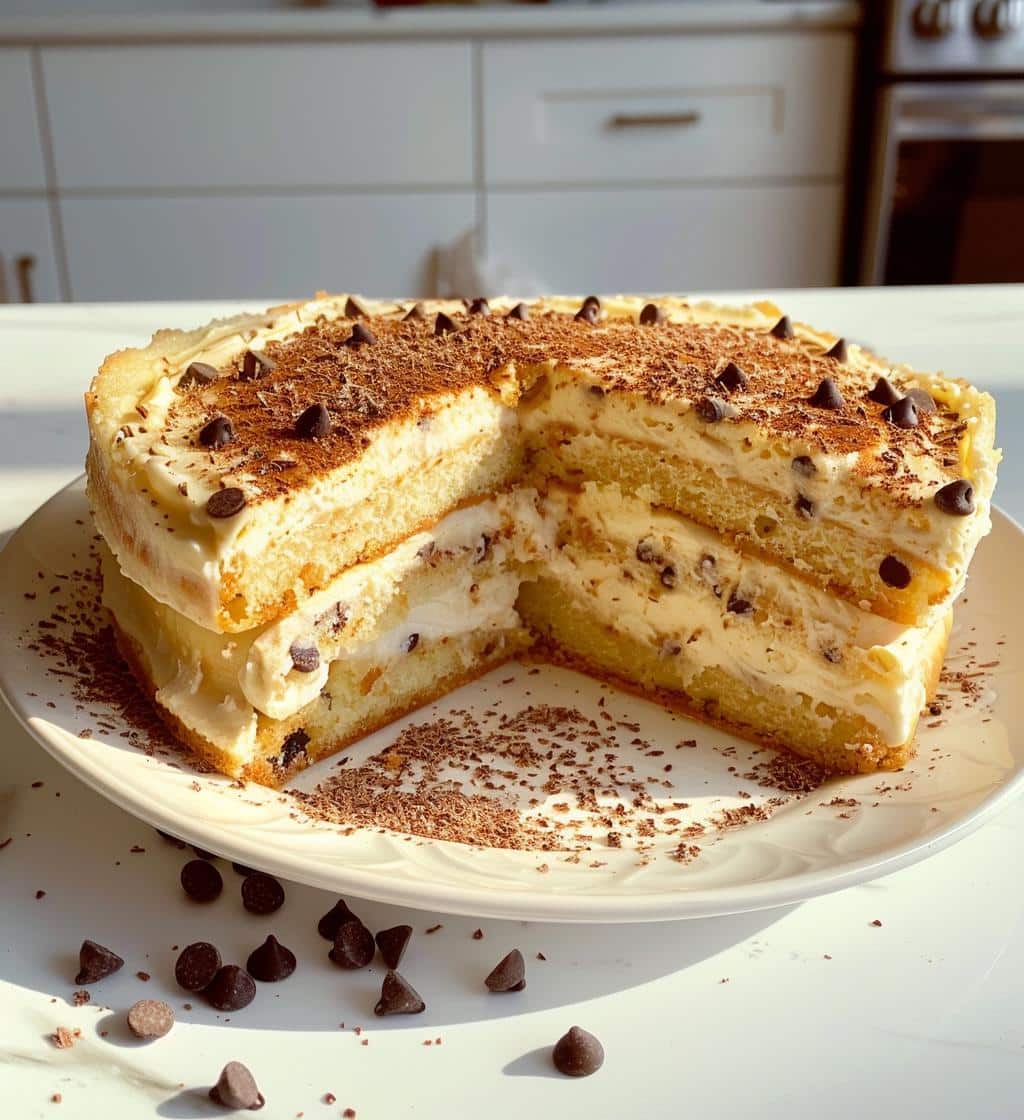
Oh my gosh, let me tell you about my absolute favorite dessert—Cannoli Cake! It’s a delicious twist on the classic Italian cannoli, and trust me, it’s like a party for your taste buds. Imagine a moist, fluffy cake layered with creamy ricotta filling and generously studded with mini chocolate chips. Just thinking about it makes me smile!
I first tried this cake at a family gathering a few years ago, and I was totally blown away. My aunt, who’s an incredible cook, made it, and I couldn’t stop going back for seconds (and thirds!). After that, I knew I had to learn how to make it myself. Now, it’s become a staple in my kitchen, perfect for birthdays, holidays, or just because it’s Tuesday and I need a little sweetness in my life.
What I love most about this Cannoli Cake is that it captures all the flavors of a traditional cannoli but in cake form—what’s not to love? So, grab your mixing bowl and let’s get ready to whip up something truly special. I promise you, this cake is going to impress everyone!
Ingredients
Gather these simple ingredients to create your Cannoli Cake masterpiece. You’ll love how easy they are to find, and they come together to make the most delightful cake!
- 2 cups all-purpose flour
- 1 cup granulated sugar
- 1 cup ricotta cheese (make sure it’s creamy and smooth)
- 1/2 cup unsalted butter, softened to room temperature
- 4 large eggs (give them a quick whisk beforehand)
- 1 teaspoon vanilla extract (the good stuff, if you can find it!)
- 1 teaspoon baking powder
- 1/2 teaspoon salt
- 1/2 cup mini chocolate chips (or more if you’re feeling indulgent!)
These ingredients blend together to create a cake that’s not only delicious but also has that authentic cannoli flavor. Trust me, you won’t want to skip any of these! Now, let’s get cooking!
How to Prepare Cannoli Cake
Alright, let’s dive into the fun part—making this Cannoli Cake! I promise, it’s easier than it looks and so worth every step. Just follow along, and you’ll have a gorgeous cake that’ll wow everyone!
Preheat and Prepare
First things first, preheat your oven to 350°F (175°C). This is crucial because we want that cake to rise beautifully! While the oven is heating up, grab your cake pans and grease them with a bit of butter or cooking spray. I like to use two 9-inch round pans for this cake. If you have parchment paper, lining the bottom of the pans is a great idea for easy removal later on!
Cream the Butter and Sugar
Now, in a large mixing bowl, let’s cream together the softened butter and granulated sugar. I usually use an electric mixer for this part—just a few minutes on medium speed will do the trick. You want it to be light, fluffy, and pale in color. This step is super important because it helps to incorporate air into the batter, giving your cake that lovely, tender texture.
Combine Wet Ingredients
Next, it’s time to add the eggs, ricotta cheese, and vanilla extract into the buttery mixture. Add the eggs one at a time, mixing well after each addition. This ensures everything blends smoothly, and you get that creamy goodness mixed in. Trust me, the ricotta is what makes this cake so special! Just keep mixing until it’s all combined and smooth—no lumps allowed!
Mix Dry Ingredients
In another bowl, whisk together the all-purpose flour, baking powder, and salt. This step is key to evenly distributing the leavening agent. I like to give it a good whisk for about a minute—this helps aerate the flour and makes for a fluffier cake! Once you’re done, it’s time to combine everything.
Combine Wet and Dry Mixtures
Gradually add your dry mixture into the wet ingredients. I usually do this in three parts, mixing just until everything is combined. You don’t want to overmix it; a few lumps are perfectly fine! Finally, gently fold in those mini chocolate chips—this is where the magic happens! You’ll see those little gems just waiting to melt into the cake.
Bake the Cake
Now, pour the batter evenly into your prepared cake pans. Give them a little shake to level it out, then pop them in the preheated oven. Bake for about 30-35 minutes, or until a toothpick inserted in the center comes out clean. Keep an eye on them as they bake—the smell will be irresistible, and you’ll know they’re close when the edges start to pull away from the pan!
Cooling and Frosting
Once the cakes are done, let them cool in the pans for about 10 minutes. Then, carefully turn them out onto a wire rack to cool completely. This is super important because if you frost them while they’re still warm, the frosting will melt and create a gooey mess! Once cool, you can frost with your favorite frosting or even a simple dusting of powdered sugar. The choice is yours, my friend!
Tips for Success
Alright, let’s make sure your Cannoli Cake turns out absolutely perfect! Here are some of my favorite tips and tricks to help you nail this recipe:
- Room Temperature Ingredients: Make sure your butter, eggs, and ricotta are at room temperature before you start mixing. This helps everything combine smoothly and creates that lovely, fluffy texture!
- Don’t Overmix: When you combine the wet and dry ingredients, be gentle! Overmixing can lead to a dense cake. Mix just until you see no more flour—it’s okay if there are a few lumps!
- Check for Doneness: Ovens can vary, so keep an eye on your cake as it bakes. If a toothpick comes out with a few moist crumbs, it’s perfect! If there’s wet batter, give it a couple more minutes.
- Let It Cool: Don’t rush the cooling process! Allow the cakes to cool in the pans for about 10 minutes, then transfer them to a wire rack. This prevents sogginess and helps maintain that wonderful texture.
- Frosting Options: If you want to really capture that cannoli flavor, consider using a ricotta-based frosting! Just blend ricotta with some powdered sugar and a touch of vanilla for a delicious topping. You can also fold in some mini chocolate chips for extra yumminess!
- Make It Ahead: This cake actually tastes even better the day after you make it! If you can resist, let it sit overnight in the fridge. The flavors meld beautifully, and it’s perfect for serving to guests.
Keep these tips in mind, and I promise your Cannoli Cake will be a showstopper! Enjoy the process and happy baking!
Nutritional Information
Now, let’s talk about what’s in each slice of this delightful Cannoli Cake! Keep in mind that these values are estimates, but they give you a good idea of what you’re indulging in. It’s a treat, so let’s enjoy it!
- Serving Size: 1 slice
- Calories: 350
- Fat: 15g
- Saturated Fat: 8g
- Trans Fat: 0g
- Cholesterol: 80mg
- Sodium: 200mg
- Carbohydrates: 45g
- Fiber: 1g
- Sugar: 20g
- Protein: 6g
This cake is definitely a sweet indulgence, but it’s packed with flavor and a touch of nostalgia! Enjoy every rich bite, and remember, balance is key—so maybe pair it with a nice cup of coffee or tea. Happy baking and happy indulging!
FAQ Section
Got questions about Cannoli Cake? Don’t worry, I’ve got you covered! Here are some of the most common queries I get, along with my answers to help you on your baking journey.
Can I use store-bought ricotta cheese?
Absolutely! Just make sure it’s quality ricotta. I’ve used both fresh and store-bought, and they both work wonderfully. Just be sure to drain any excess liquid if it’s too runny!
How can I make this Cannoli Cake gluten-free?
If you want to make a gluten-free version, just substitute the all-purpose flour with a good gluten-free flour blend. I’ve had success with brands that are designed for baking, and it usually turns out just as delicious!
What’s the best way to store leftovers?
Store any leftover Cannoli Cake in the refrigerator, tightly wrapped or in an airtight container. It should last about 3-4 days, but trust me, it’s usually gone long before then!
Can I freeze Cannoli Cake?
Yes, you can! Just let the cake cool completely, then wrap it tightly in plastic wrap and aluminum foil before freezing. It’ll keep for about 2-3 months. Thaw it in the fridge overnight when you’re ready to enjoy it again!
Do I have to frost the cake?
Nope! While frosting adds a nice touch, you can totally enjoy it plain or just dusted with powdered sugar. It’s delicious either way, so make it how you love it best!
Why You’ll Love This Recipe
- It’s a fun twist on a classic dessert that combines the flavors of cannoli in cake form!
- Quick and easy to make, perfect for both novice and experienced bakers.
- Rich, creamy ricotta filling paired with delightful mini chocolate chips makes every bite a treat!
- Ideal for any occasion—birthdays, holidays, or just a sweet craving any day of the week.
- Can be made ahead of time, allowing the flavors to meld beautifully overnight.
- Versatile enough to enjoy plain or dressed up with frosting and toppings.
- It’s a crowd-pleaser that’s sure to impress family and friends!
Storage & Reheating Instructions
Let’s make sure that delicious Cannoli Cake stays fresh and tasty for as long as possible! Proper storage is key to enjoying every last bite. Here’s how I like to do it:
First things first, if you have any leftovers (which is often a big “if” because it’s so good!), let the cake cool completely. Once it’s cooled, you can store it in the fridge. Just wrap it tightly in plastic wrap or place it in an airtight container. This helps keep that moisture in and prevents it from drying out. It should last about 3-4 days in the fridge, but I can’t promise it’ll stick around that long!
If you want to keep it for a longer time, you can freeze the cake! Just slice it first for easy access later. Wrap each slice tightly in plastic wrap and then place it in a freezer-safe container or a zip-top freezer bag. It’ll be good for about 2-3 months. When you’re ready to enjoy, just take a slice out and let it thaw in the fridge overnight. It’ll taste just as amazing as the day you made it!
As for reheating, if you prefer your cake a little warm, you can pop a slice in the microwave for about 10-15 seconds. Just be careful not to overdo it, or it can get a bit too warm and lose that lovely texture. Alternatively, you can warm it gently in the oven at 300°F (150°C) for about 5-10 minutes. Either way, it’s a scrumptious way to bring back that fresh-baked goodness!
So, there you have it—easy storage and reheating tips to make sure your Cannoli Cake stays as delightful as ever. Enjoy every bite, and happy baking!
Print
Cannoli Cake: 7 Blissful Layers of Pure Indulgence
- Total Time: 55 minutes
- Yield: 12 servings 1x
- Diet: Vegetarian
Description
A delicious twist on traditional cannoli, this cake is layered with creamy ricotta filling and topped with chocolate chips.
Ingredients
- 2 cups all-purpose flour
- 1 cup granulated sugar
- 1 cup ricotta cheese
- 1/2 cup unsalted butter, softened
- 4 large eggs
- 1 teaspoon vanilla extract
- 1 teaspoon baking powder
- 1/2 teaspoon salt
- 1/2 cup mini chocolate chips
Instructions
- Preheat the oven to 350°F (175°C).
- In a bowl, cream together the butter and sugar.
- Add eggs one at a time, mixing well after each.
- Stir in ricotta and vanilla extract.
- In another bowl, whisk together flour, baking powder, and salt.
- Gradually add dry ingredients to the wet mixture.
- Fold in chocolate chips.
- Pour batter into greased cake pans.
- Bake for 30-35 minutes or until a toothpick comes out clean.
- Let the cakes cool completely before frosting.
Notes
- Store leftovers in the refrigerator.
- Can be served with extra chocolate chips on top.
- For a richer flavor, add a splash of almond extract.
- Prep Time: 20 minutes
- Cook Time: 35 minutes
- Category: Dessert
- Method: Baking
- Cuisine: Italian
Nutrition
- Serving Size: 1 slice
- Calories: 350
- Sugar: 20g
- Sodium: 200mg
- Fat: 15g
- Saturated Fat: 8g
- Unsaturated Fat: 5g
- Trans Fat: 0g
- Carbohydrates: 45g
- Fiber: 1g
- Protein: 6g
- Cholesterol: 80mg
Keywords: Cannoli Cake, Italian Dessert, Cake Recipe